How to Install OpenERP Odoo 8 on Ubuntu Server 14.04 LTS
![]()
Introduction
Welcome to the latest of our very popular OpenERP Odoo installation “How Tos”.
The new release of Odoo 8.0 is a major upgrade introducing a great many new features and a new name.
Odoo 8.0 is not only better looking and easier to use, it also brings many improvements to the existing feature-set and adds a number of brand new features which extend the scope of the business needs covered by Odoo. Ecommerce, CMS, Integrated BI…
Rather than me blathering on about what’s new, you can simply just go and read the release notes here.
The How To
Following that introduction, I bet you can’t wait to get your hands dirty…
Just one thing before we start: You can simply download a .deb (for Debian/Ubuntu type systems) or a. rpm (Redhat/CentOS) package of OpenERP and install that. Unfortunately that approach doesn’t provide us (Libertus Solutions) with enough fine-grained control over where things get installed, and it restricts our flexibility to modify & customise, hence I prefer to do it a slightly more manual way (this install process below should only take about 10-15 minutes once the host machine has been built).
This time, rather than using a source tarball as the basis for installation we are going to take the code straight from the Odoo 8.0 branch on Github. This should help when it comes to installing updates and bug fixes in the future by being able to issue a git pull command to update the code. Bear in mind before doing a pull request you should always have backups and you may need to update your Odoo database(s) as well.
So without further ado here we go:
Step 1. Build your server
I install just the bare minimum from the install routine (you may want to install the openssh-server during the install procedure or install subsequently depending on your needs).
After the server has restarted for the first time I install the openssh-server package (so we can connect to it remotely) and denyhosts
sudo apt-get install openssh-server denyhosts
UPDATE: Note that it seems denyhosts is no longer being maintained and is not in the main Ubuntu repository any more. I’m aware of a possibly suitable alternative called fail2ban but have not used it yet; do you own research. Thanks to Rami for the cluebat!
UPDATE2: Thanks to Paul for the pointer. I have added python-unicodecsv to the list of dependencies. Apparently this is required to correctly restore backups.
Now make sure your server has all the latest versions & patches by doing an update:
sudo apt-get update
sudo apt-get dist-upgrade
Although not always essential it’s probably a good idea to reboot your server now and make sure it all comes back up and you can login via ssh.
Now we’re ready to start the Odoo install.
Step 2. Create the Odoo user that will own and run the application
sudo adduser --system --home=/opt/odoo --group odoo
This is a “system†user. It is there to own and run the application, it isn’t supposed to be a person type user with a login etc. In Ubuntu, a system user gets a UID below 1000, has no shell (it’s actually /bin/false) and has logins disabled. Note that I’ve specified a “home†of /opt/odoo, this is where the OpenERP server code will reside and is created automatically by the command above. The location of the server code is your choice of course, but be aware that some of the instructions and configuration files below may need to be altered if you decide to install to a different location.
[Note: If you want to run multiple versions of Odoo/OpenERP on the same server, the way I do it is to create multiple users with the correct version number as part of the name, e.g. openerp70, openerp61 etc. If you also use this when creating the Postgres users too, you can have full separation of systems on the same server. I also use similarly named home directories, e.g. /opt/odoo80, /opt/openerp70, /opt/openerp61 and config and start-up/shutdown files. You will also need to configure different ports for each instance or else only the first will start.]
A question I have been asked a few times is how to run the Odoo server as the odoo system user from the command line if it has no shell. This can be done quite easily:
sudo su - odoo -s /bin/bash
This will su your current terminal login to the odoo user (the “-” between su and odoo is correct) and use the shell /bin/bash. When this command is run you will be in odoo’s home directory: /opt/odoo.
When you have done what you need you can leave the odoo user’s shell by typing exit.
Step 3. Install and configure the database server, PostgreSQL
sudo apt-get install postgresql
Then configure the Odoo user on postgres:
First change to the postgres user so we have the necessary privileges to configure the database.
sudo su - postgres
Now create a new database user. This is so Odoo has access rights to connect to PostgreSQL and to create and drop databases. Remember what your choice of password is here; you will need it later on:
createuser --createdb --username postgres --no-createrole --no-superuser --pwprompt odoo
Enter password for new role: ********
Enter it again: ********
Finally exit from the postgres user account:
exit
Step 4. Install the necessary Python libraries for the server
sudo apt-get install python-cups python-dateutil python-decorator python-docutils python-feedparser \

python-gdata python-geoip python-gevent python-imaging python-jinja2 python-ldap python-libxslt1

python-lxml python-mako python-mock python-openid python-passlib python-psutil python-psycopg2

python-pybabel python-pychart python-pydot python-pyparsing python-pypdf python-reportlab python-requests \

python-simplejson python-tz python-unicodecsv python-unittest2 python-vatnumber python-vobject \

python-werkzeug python-xlwt python-yaml wkhtmltopdf
With that done, all the dependencies for installing Odoo 8.0 are now satisfied (note that there are some changes between this and the packages required for OpenERP 7.0).
UPDATE & NOTE: It has been pointed out to me that the Qweb templating engine in Odoo 8 is warning that the version of wkhtmltopdf is too old. It turns out that Ubuntu 14.04 packages version 0.9.9 of this library even though this is rather old. To update your Ubuntu server please follow the instructions on this page. Many thanks to Ruben Kannan for pointing this out :-).
UPDATE & NOTE II: Zak suggests an alternative method to get and install the most recent version of wkhtmltopdf in this comment below. Thanks Zak.
UPDATE & NOTE III: David suggested adding python-cups and python-geoip to the list of modules to install in this comment below. Thanks David.
Step 5. Install the Odoo server
Install Git.
sudo apt-get install git
Switch to the Odoo user:
sudo su - odoo -s /bin/bash
Grab a copy of the most current Odoo 8 branch (Note the “.” at the end of this command!):
git clone https://www.github.com/odoo/odoo --depth 1 --branch 8.0 --single-branch .
(This might take a little while depending on the speed of your Internet connection.)
Note: Thanks to Ian Beardslee for the cluebat. Have now added --depth 1 to the command so it only retrieves the latest version without all the history. The download is now quite a bit quicker.
Once it’s finished exit from the odoo user: exit.
Step 6. Configuring the OpenERP application
The default configuration file for the server (/opt/odoo/debian/openerp-server.conf) is actually very minimal and will, with only a small change work fine so we’ll copy that file to where we need it and change it’s ownership and permissions:
sudo cp /opt/odoo/debian/openerp-server.conf /etc/odoo-server.conf

sudo chown odoo: /etc/odoo-server.conf

sudo chmod 640 /etc/odoo-server.conf
The above commands make the file owned and writeable only by the odoo user and group and only readable by odoo and root.
To allow the odoo server to run initially, you should only need to change two lines in this file. Toward to the top of the file change the line db_password = False to the same password you used back in step 3. Then modify the line addons_path = /usr/lib/python2.7/dist-packages/openerp/addons so that it reads addons_path = /opt/odoo/addons instead.
One other line we might as well add to the configuration file now, is to tell Odoo where to write its log file. To complement my suggested location below add the following line to the odoo-server.conf file:
logfile = /var/log/odoo/odoo-server.log
Use your favourite text editor here. I tend to use nano, e.g.
sudo nano /etc/odoo-server.conf
Once the configuration file is edited and saved, you can start the server just to check if it actually runs.
sudo su - odoo -s /bin/bash
/opt/odoo/openerp-server
If you end up with a few lines eventually saying OpenERP (Yes. The log still says OpenERP and not Odoo) is running and waiting for connections then you are all set.
If there are errors, you’ll need to go back and find out where the problem is.
Otherwise simply enter CTL+C to stop the server and then exit to leave the openerp user account and go back to your own shell.
Step 7. Installing the boot script
For the final step we need to install a script which will be used to start-up and shut down the server automatically and also run the application as the correct user. There is a script you can use in /opt/odoo/debian/init but this will need a few small modifications to work with the system installed the way I have described above. Here’s a link to the one I’ve already modified for Odoo version 8.
Similar to the configuration file, you need to either copy it or paste the contents of this script to a file in /etc/init.d/ and call it odoo-server. Once it is in the right place you will need to make it executable and owned by root:
sudo chmod 755 /etc/init.d/odoo-server
sudo chown root: /etc/init.d/odoo-server
In the configuration file there’s an entry for the server’s log file. We need to create that directory first so that the server has somewhere to log to and also we must make it writeable by the openerp user:
sudo mkdir /var/log/odoo
sudo chown odoo:root /var/log/odoo
Step 8. Testing the server
To start the Odoo server type:
sudo /etc/init.d/odoo-server start
You should now be able to view the logfile and see that the server has started.
less /var/log/odoo/odoo-server.log
If there are any problems starting the server you need to go back and check. There’s really no point ploughing on if the server doesn’t start…

Odoo 8 New Database
If the log file looks OK, now point your web browser at the domain or IP address of your Odoo server (or localhost if you are on the same machine) and use port 8069. The url will look something like this:
http://IP_or_domain.com:8069
What you should see is a screen like this one (it is the Database Management Screen because you have no Odoo databases yet):
What I do recommend you do at this point is to change the super admin password to something nice and strong (Click the “Password” menu). By default this password is just “admin” and knowing that, a user can create, backup, restore and drop databases! This password is stored in plain text in the /etc/odoo-server.conf file; hence why we restricted access to just odoo and root. When you change and save the new password the /etc/odoo-server.conf file will be re-written and will have a lot more options in it.
Now it’s time to make sure the server stops properly too:
sudo /etc/init.d/odoo-server stop
Check the log file again to make sure it has stopped and/or look at your server’s process list.
Step 9. Automating Odoo startup and shutdown
If everything above seems to be working OK, the final step is make the script start and stop automatically with the Ubuntu Server. To do this type:
sudo update-rc.d odoo-server defaults
You can now try rebooting you server if you like. Odoo should be running by the time you log back in.
If you type ps aux | grep odoo you should see a line similar to this:
odoo 1491 0.1 10.6 207132 53596 ? Sl 22:23 0:02 python /opt/odoo/openerp-server -c /etc/odoo-server.conf
Which shows that the server is running. And of course you can check the logfile or visit the server from your web browser too.
Odoo 8 Opening Screen
That’s it! Next I would suggest you create a new database filling in the fields as desired. Once the database is initialised, you will be directed straight to the new main configuration screen which gives you a feel for the new User Interface in Odoo 8 and shows you how easy it is to set up a basic system.
How to install a Squid & Dansguardian content filter on Ubuntu Server
Being a family man and a geek, our household has both children and lots of tech; there are 6 or so computers, various tablets, smartphones and other devices capable of connecting to, and displaying content from, the Internet.
For a while now I’ve wanted to provide a degree of content filtering on our network to prevent accidental, or deliberate, access to some of the worst things the Internet has to offer. What I didn’t want to do however was blindly hand control of this very important job to my ISP (as our beloved leader would like us all to do). Also, I absolutely believe this is one of my responsibilities as a parent; it is not anyone else’s. In addition, there are several problems I have with our government’s chosen approach:
- Filtering at the ISP network-side means the ISP must try and inspect all my internet traffic all of the time (what else could they potentially do with this information I wonder?)
- If the ISP’s filter prevents access to content which we feel that our kids should be able access, how can I change that? Essentially I can’t.
- I reckon that most kids of mid-teenage years will have worked out ways to bypass these filters anyway (see footnote) leaving more naive parents in blissful ignorance; thinking their kids are protected when in fact they are not.
With the above in mind I set about thinking how I could provide a degree of security on our home network using tried and trusted Open Source tools…
Firstly this is how our networked looked before.
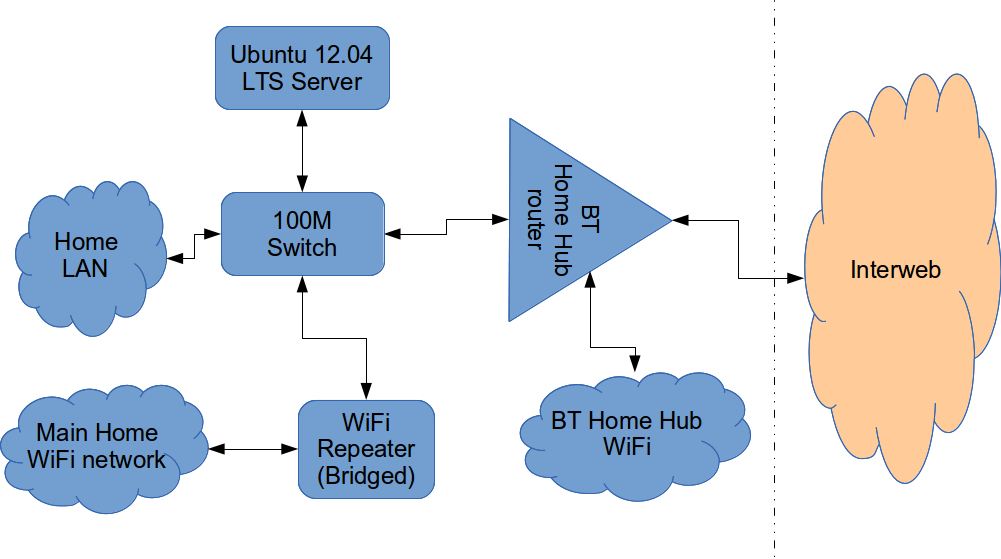
The BT Router is providing the DHCP service in the above diagram.
The Ubuntu 12.04 Server is called vimes (after Commander Vimes in the Discworld novels by Terry Pratchett) and is still running the same hardware that I described way back in 2007! It’s a low power VIA C7 processor, 1G of RAM and it now has a couple of Terabytes of disk. It’s mainly used as a central backup controller and dlna media store/server for the house.
I never did get Untangle working on it, but now it seemed like a good device to use to do some filtering… There are loads of instructions on the Internet about using Squid & Dansguardian but none covered quite what I wanted to achieve: A dhcp serving, bridging, transparent proxy content filter.
Architecturally, my network needed to look like this:
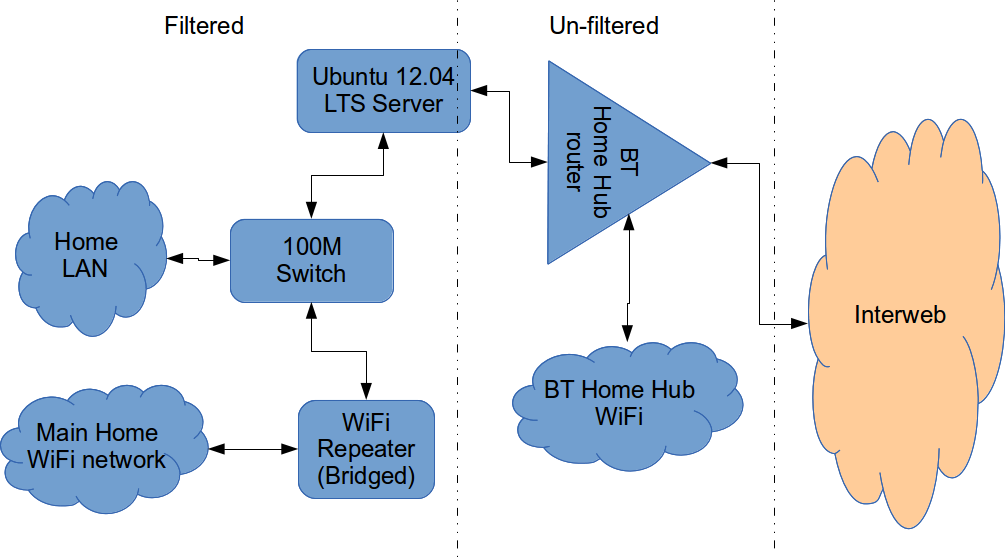
As you can see above, the physical change is rather negligible. The Ubuntu server now sits between the home LAN and the broadband router rather than as just another network node on the LAN as it was before.
The configuration of the server to provide what I required can be broken down into several steps.
1. Get the Ubuntu server acting as a transparent bridge
This is relatively straightforward. First install the bridge-utils package: sudo apt-get install bridge-utils
Then I made a backup of my /etc/network/interfaces file and replaced it with this one:
# This file describes the network interfaces available on your system
# and how to activate them. For more information, see interfaces(5).

# The loopback network interface
auto lo
iface lo inet loopback

# Set up interfaces
iface eth0 inet manual
iface eth1 inet manual

# Bridge setup
auto br0
iface br0 inet static
  bridge_ports eth0 eth1
  address 192.168.1.2
  broadcast 192.168.1.255
  netmask 255.255.255.0
  gateway 192.168.1.1
Probably the most interesting part of this file is where we assign a static IP address to the bridge itself. Without this I would not be able to connect to this server as both ethernet ports are now just transparent bridge ports so not actually listening for IP traffic at all.
(Obviously you will need to determine the correct IP address scheme for your own network)
2. Disable DHCP on the router and let Ubuntu do it instead
The reason for this is mostly down to the BT Home Hub… For some bizarre reason, BT determined that they should control what DNS servers you can use. Although I’m not using it right now, I might choose to use OpenDNS for example, but I can’t change the DNS addresses served by the BT Home Hub router so the only way I can control this is to turn off DHCP on the router altogether and do it myself.
Install the dhcp server: sudo apt-get install dhcp3-server
Tell the dhcp server to listen for requests on the bridge port we created before by editing the file /etc/default/isc-dchp-server so that the INTERFACES line reads: INTERFACES="br0".
Then edit the dhcp configuration file /etc/dhcp/dhcpd.conf so we allocate the IP addresses we want to our network devices. This is how mine looks:
ddns-update-style none;

default-lease-time 600;
max-lease-time 7200;

# If this DHCP server is the official DHCP server for the local
# network, the authoritative directive should be uncommented.
authoritative;

# Use this to send dhcp log messages to a different log file (you also
# have to hack syslog.conf to complete the redirection).
log-facility local7;

subnet 192.168.1.0 netmask 255.255.255.0 {
        range 192.168.1.16 192.168.1.254;

        option subnet-mask 255.255.255.0;
        option routers 192.168.1.1;

        #Google DNS
        option domain-name-servers 8.8.8.8, 8.8.4.4;
        #OpenDNS
        #option domain-name-servers 208.67.222.222, 208.67.220.220;

        option broadcast-address 192.168.1.255;
}
There are many options and choices to make regarding setting up your DHCP server. It is extremely flexible; you will probably need to consult the man pages and other on-line resources to determine what is best for you. Mine is very simple. It serves one block of IP addresses within the range 192.168.1.16 to 192.168.1.254 to all devices. Currently I’m using Google’s DNS servers but as you can see I’ve also added OpenDNS as a comment so I can try it later if I want to.
3. Install Squid and get it working as a transparent proxy using IPTables
This bit took a while to get right but, as with most things it seems to me, in the end the actual configuration is fairly straightforward.
Install Squid: sudo apt-get install squid.
Edit the Squid configuration file /etc/squid3/squid.conf… By default this file contains a lot of settings. I made a backup and then reduced it to just those lines that needed changing so it looked like this:
http_port 3128 transparent
acl localnet src 192.168.1.0/24
acl localhost src 127.0.0.1/255.255.255.255
acl CONNECT method CONNECThttp_access allow localnet
http_access allow localhost
always_direct allow allcache_dir aufs /var/spool/squid3 50000 16 256
Probably the most interesting part in the above is the word “transparent” after the proxy port. Essentially this means we do not have to configure every browser on our network: http://en.wikipedia.org/wiki/Proxy_server#Transparent_proxy. The final line of the file is just some instructions to configure where the cache is stored and how big it is. Again, there are tons of options available which the reader will need to find out for themselves…
To actually cause all the traffic on our LAN to go through the proxy rather than just passing through the bridge transparently requires a bit of configuration on the server using ebtables to allow easier configuration of the Linux kernel’s bridge & iptables to redirect particular TCP/IP ports to the proxy.
First I installed ebtables: sudo apt-get install ebtables
My very simplistic understanding of the following command is that it essentially tells the bridge to identify IP traffic for port 80 (http) and pass this up to the kernel’s IP stack for further processing (routing) which we then use iptables to handle.
sudo ebtables -t broute -A BROUTING -p IPv4 --ip-protocol 6 --ip-destination-port 80 -j redirect --redirect-target ACCEPT
Then we tell iptables to forward all port 80 traffic from the bridge to our proxy:
sudo iptables -t nat -A PREROUTING -i br0 -p tcp --dport 80 -j REDIRECT --to-port 3128
Restart Squid: sudo service squid3 restart
At this point http browser traffic should now be passing through your bridge and squid proxy before going on to the router and Internet. You can test to see if it is working by tailing the squid access.log file.
I found that squid seemed to be very slow at this juncture. So I resorted to some google fu and looked for some help on tuning the performance of the system. I came across this post and decided to try the configuration suggestions by adding the following lines to my squid.conf file:
#Performance Tuning Options
hosts_file /etc/hosts
dns_nameservers 8.8.8.8 8.8.4.4
cache_replacement_policy heap LFUDA
cache_swap_low 90
cache_swap_high 95
cache_mem 200MB
logfile_rotate 10
memory_pools off
maximum_object_size 50 MB
maximum_object_size_in_memory 50 KB
quick_abort_min 0 KB
quick_abort_max 0 KB
log_icp_queries off
client_db off
buffered_logs on
half_closed_clients off
log_fqdn off
This made an immediate and noticeable difference to the performance; enough so in fact that I haven’t yet bothered to go any further with tuning investigations. Thanks to the author Tony at last.fm for the suggestions.
4. Install Dansguardian and get it filtering content
sudo apt-get install dansguardian is all you need to install the application.
To get it to work with our proxy I needed to make a couple of changes to the configuration file /etc/dansguardian/dansguardian.conf.
First, remove or comment out the line at the top that reads UNCONFIGURED - Please remove this line after configuration I just prefixed it with a #.
Next we need to configure the ports by changing two lines so they look like this:
filterport = 8080
proxyport = 3128
Finally, and I think this is right, we need to set it so that Dansguardian and squid are both running as the same user so edit these two lines:
daemonuser = ‘proxy’
daemongroup = ‘proxy’
As you will see in that file, there are loads of other configuration options for Dansguardian and I will leave it up to the reader to investigate these at their leisure.
One suggestion I came across on my wanderings around the Interwebs was to grab a copy of one of the large collections of blacklisted sites records and install these into /etc/dansguardian/blacklists/. I used the one linked to from the Dansguardian website here http://urlblacklist.com/ which says it is OK to download once for free. As I understand it, having a list of blacklist sites will reduce the need for Dansguardian to parse every url or all content but this shouldn’t be relied on as the only mechanism as obviously the blacklist will get out-of-date pretty quickly.
Dansguardian has configurable lists of “phrases” and “weights” that you can tailor to suit your needs.
Now that’s installed we need to go back and reconfigure one of the iptables rules so that traffic is routed to Dansguardian rather than straight to Squid first and also enable communication between Squid and Dansguardian. You can flush (empty) the existing iptables rules by running iptables -F.
Now re-enter the rules as follows:
sudo iptables -t nat -A PREROUTING -i br0 -p tcp –dport 80 -j REDIRECT –to-port 8080
sudo iptables -t nat -A OUTPUT -p tcp –dport 80 -m owner –uid-owner proxy -j ACCEPT
sudo iptables -t nat -A OUTPUT -p tcp –dport 3128 -m owner –uid-owner proxy -j ACCEPT
sudo iptables -t nat -A OUTPUT -p tcp –dport 3128 -j REDIRECT –to-ports 8080
Restart Squid and Dansguardian: sudo service squid3 restart & sudo service dansguardian restart.
Now if you try to connect to the internet from behind the server your requests should be passed through Dansguardian and Squid automatically. If you try and visit something that is inappropriate your request should be blocked.
If it all seems to be working OK then I suggest making your ebtables and iptables rules permanent so they are restored after a reboot.
This can be achieved easily for iptables by simply running sudo iptables-save.
I followed these very helpful instructions to achieve a similar thing for the ebtables rule.
And that’s it. Try rebooting the server to make sure that it all still works without you having to re-configure everything. Then ask your kids and wife to let you know if things that they want to get to are being blocked. YOU now have the ability to control this – not your ISP… 😀
Footnotes
Be aware that on the network diagrams above the Wifi service provided by the BT Homehub router, and the LAN on the router side of the server, are not protected by these instructions. For me this is fine as the coverage of that Wifi network only makes it as far as the Kitchen anyway. And if it was more visible I could always change the key and only let my wife and I have access.
Also, I should make it clear that I know what I have above is not foolproof. I am completely aware that filtering/monitoring encrypted traffic is virtually impossible and there are plenty of services available that provide ways to circumvent what I have here. But I am also not naive and I reckon that if my kids have understood enough about networking and protocols etc. to be able to use tunnelling proxies or VPN services then they are probably mature enough to decide for themselves what they want to look at.
Of course there are plenty of additional mechanisms one can put in place if desired.
- Time-based filters preventing any Internet access at all at certain times
- Confiscation of Internet connected devices at bedtime
- Placing computers and gaming consoles in public rooms of the house and not in bedrooms
- And many more I’m sure you can think of yourself
As I see it, the point is simply this: As a parent, this is your responsibility…
Building Ubuntu for the Raspberry Pi
As a result of the prior musings about crowdfunding and the rather shaky VAT status of the whole sector I have been thinking quite a bit about crowdfunding and where it might be useful and how we could get involved in some way. For our normal consultancy business we have no need of capital investments and we don’t produce anything that lends itself to the crowdfunding model, however I did come up with a project I have been wanting to do for quite a long time. Allow me to introduce it by way of a little video . . .
Back when the Raspberry Pi was in development it was shown running Ubuntu 9.04, Jaunty Jackalope. This was the last Ubuntu release that supported the ARMv6 instruction set, from that point on Ubuntu was optimised for newer ARM chips and would not run on the Broadcom chip that the Pi used. I am the point of contact of the Ubuntu UK Local Community team and I was dead excited about this little computer with it’s exposed PCB and low price point. I asked some of the Ubuntu ARM folk if they could support it going forward, but that wasn’t going to be possible, they didn’t have the resources to build for two ARM platforms and the bottom line was that the Pi probably wasn’t going to provide a good user experience for the increasingly heavy Ubuntu user interface. This was sad, but it was the situation. I was a bit concerned that the Raspberry Pi foundation was proceeding on the basis that Jaunty was available – it was already old, going out of support and was a dead end, there were going to be no future updates for it. I was concerned that the UK Local community was going to be landed with a lot of new users who were having a poor user experience and there would be nothing we could do about it. Reluctantly I approached the Raspberry Pi foundation (I met the lovely Liz and Eben at an event in Oxford) and shared my concerns with them, and suggested Debian was the way forward, so the Pi would have a system based on a platform Ubuntu users would be familiar with, that would get updates.
So this was sad, I wasn’t happy about it, the foundation wasn’t happy about it, many users were not happy about it, but it was much better to have a new Debian with updates and prospects than an old dead end Ubuntu release.
Moving on to the present, the Raspberry Pi is a huge success, Rasbian is a great operating platform for it, the LXDE desktop is fine, the Wayland demo was brilliant and loads of cool projects are happening based on the Pi. We still want Ubuntu on it though. We are using it in embedded projects, it is also turning up in things like the OpenERP Point of Sale kit, situations where it doesn’t need a responsive user interface (or a user interface at all). It would be great to know that all the libraries we are using on it are the same versions we are using on other computers that are running Ubuntu. It might be nice to see what the Ubuntu Unity desktop looks like on the Pi, especially Unity 8 running in Mir, but that explicitly isn’t a goal. This project aims to build everything that will build from source without too much hassle. If that gets us a desktop then great, if it gets us a command line with python, that is great too.
Now for the armchair accountants in the audience, having seen the admin end of a campaign I can explain it a little better than before. This is a flexible funding setup rather than the all-or-nothing option and we are accepting paypal and credit card pledges. The paypal pledges happen instantly, the money goes from the end user direct to our paypal account and then there is an immediate debit of 9% of the amount which goes from us to indiegogo – so the money is not held in escrow at all, and it isn’t a big payment at the end. This is fairly clearly a purchase of a pledge to the full pledge value and a subsequent payment to indiegogo which is either a purchase of campaign hosting services, or some kind of financial services fee, not sure about that bit yet. Credit card payments are slightly different, we don’t have the money for those yet, after the campaign ends Indiegogo will do a bank transfer to us for the funds (less the 4% or 9% commission presumably). Paypal is regulated as a bank now, so I think the money should turn up in our financials when it is in the paypal account, not just when we make a transfer of it to a bricks and mortar bank. We will enter all the pledges as sales and pay VAT on them and we will reclaim the VAT on the materials purchased to build the cluster. If anyone wants a VAT invoice for a paypal pledge I can sort that out. Credit card pledges are a bit more interesting as it is questionable whether they have happened yet.
If you want to contribute to the cluster and help us build Ubuntu for the Raspberry Pi then do head on over to Indiegogo and join the 40 or so other contributors we have so far.
From the technical side of things, designing the cluster feel free to pitch in your comments and suggestions below. We have had a lot of people suggesting that we don’t use the Raspberry Pi and use some other platform instead. These suggestions include: cross compile it from Intel machines, use QEMU on fast Intel computers, use cloud computing, use a Power Mac (whut!), use the OpenSUSE Build Service, Use a Calxeda box, use Pandaboards, use Wandboard quad core arm boards. Feel free to add to the list of other platforms we should be using instead, I think I will add the yet to be delivered Parallela board to the list of things we should be using. All these suggestions are great, they would work and they might even be faster or easier. They just are not things I really want (apart from the Parallela which I don’t have) and I don’t think it works as a crowdfunding concept to raise funds to build it out of anything but the Raspberry Pi.
To provide power to lots of Pis there are a few approaches, Southampton University did this:

and other cluster projects have build custom 5v electronics for feeding the USB or direct to the GPIO pins. The custom supply option doesn’t work out particularly cheap and to run the whole cluster you are looking at parts of the circuit supporting a current heading towards 32 amps, which gets kinda complicated. At the moment I am leaning towards using a special powered hub, the Pihub which can cope with powering 4 Pi devices from a single slightly beefy supply. This keeps the plug count down (they will all need PAT testing at some point so I don’t want to go completely wild on plugs) and keeps everything neat and safe and fanless.
Networking is another area where there are options. WiFi sounds mad for a cluster, but is it really? The Pi Ethernet port kind of hangs off USB internally, so wouldn’t a 150Mbit USB wifi dongle be comparable to a 100Mbit ethernet? Lets solve this using science. Initial testing with iperf shows 74Mbit throughput on the ethernet between two Pi devices, over WiFi just 20Mbit. This is rather less than I would expect, maybe there is more performance that can be teased out of the wifi, or maybe the initial feeling is right and ethernet is the way forward. Maybe you have an opinion or advice in this area?
The funding campaign runs through to Christmas but as we have some of the money available already I am thinking we will probably start getting some bits fairly soon and start setting up the cluster controllers and do some power measurements and more detailed performance testing.
Ubuntu Coaster and other animals
My son James (12) has presented me with two gifts he’s made at school recently. Both are terrific and he designed and made them himself.
As a proud dad I felt it only right to show them off…

Note the clever location of the hole for use as a keyring…
Then yesterday he presented me with this very nice USB Device modelled into a Seahorse:


There’s a clip to hold the two parts together and I’m really impressed how the two halves line up; seeing as they are cut from two different sheets of perspex!
How to install OpenERP 7.0 on Ubuntu 12.04 LTS
![]()
Introduction
Welcome to the latest of our very popular OpenERP installation “How Tos”.
The new release of OpenERP 7.0 is a major upgrade and a new Long Term Support release; the 7.0 Release Notes extend to over 90 pages! The most noticeable change is a complete re-write of the User Interface that features a much more modern look and feel.
OpenERP 7.0 is not only better looking and easier to use, it also brings many improvements to the existing feature-set and adds a number of brand new features which extend the scope of the business needs covered by OpenERP. Integration of social network capabilities, integration with Google Docs and LinkedIn, new Contract Management, new Event Management, new Point of Sale, new Address Book, new Fleet Management,… are only some of the many enhancements in OpenERP 7.0.
The How To
Following that introduction, I bet you can’t wait to get your hands dirty…
Just one thing before we start: You can simply download a “.deb†package of OpenERP and install that on Ubuntu. Unfortunately that approach doesn’t provide us (Libertus Solutions) with enough fine-grained control over where things get installed, and it restricts our flexibility to modify & customise, hence I prefer to do it a slightly more manual way (this install process below should only take about 10-15 minutes once the host machine has been built).
So without further ado here we go:
Step 1. Build your server
I install just the bare minimum from the install routine (you may want to install the openssh-server during the install procedure or install subsequently depending on your needs).
After the server has restarted for the first time I install the openssh-server package (so we can connect to it remotely) and denyhosts to add a degree of brute-force attack protection. There are other protection applications available: I’m not saying this one is the best, but it’s one that works and is easy to configure and manage. If you don’t already, it’s also worth looking at setting up key-based ssh access, rather than relying on passwords. This can also help to limit the potential of brute-force attacks. [NB: This isn’t a How To on securing your server…]
sudo apt-get install openssh-server denyhosts
Now make sure your server has all the latest versions & patches by doing an update:
sudo apt-get update
sudo apt-get dist-upgrade
Although not always essential it’s probably a good idea to reboot your server now and make sure it all comes back up and you can login via ssh.
Now we’re ready to start the OpenERP install.
Step 2. Create the OpenERP user that will own and run the application
sudo adduser --system --home=/opt/openerp --group openerp
This is a “system†user. It is there to own and run the application, it isn’t supposed to be a person type user with a login etc. In Ubuntu, a system user gets a UID below 1000, has no shell (it’s actually /bin/false) and has logins disabled. Note that I’ve specified a “home†of /opt/openerp, this is where the OpenERP server code will reside and is created automatically by the command above. The location of the server code is your choice of course, but be aware that some of the instructions and configuration files below may need to be altered if you decide to install to a different location.
[Note: If you want to run multiple versions of OpenERP on the same server, the way I do it is to create multiple users with the correct version number as part of the name, e.g. openerp70, openerp61 etc. If you also use this when creating the Postgres users too, you can have full separation of systems on the same server. I also use similarly named home directories, e.g. /opt/openerp70, /opt/openerp61 and config and start-up/shutdown files. You will also need to configure different ports for each instance or else only the first will start.]
A question I have been asked a few times is how to run the OpenERP server as the openerp system user from the command line if it has no shell. This can be done quite easily:
sudo su - openerp -s /bin/bash
This will su your current terminal login to the openerp user (the “-” between su and openerp is correct) and use the shell /bin/bash. When this command is run you will be in openerp’s home directory: /opt/openerp.
When you have done what you need you can leave the openerp user’s shell by typing exit.
Step 3. Install and configure the database server, PostgreSQL
sudo apt-get install postgresql
Then configure the OpenERP user on postgres:
First change to the postgres user so we have the necessary privileges to configure the database.
sudo su - postgres
Now create a new database user. This is so OpenERP has access rights to connect to PostgreSQL and to create and drop databases. Remember what your choice of password is here; you will need it later on:
createuser --createdb --username postgres --no-createrole --no-superuser --pwprompt openerp
Enter password for new role: ********
Enter it again: ********
Finally exit from the postgres user account:
exit
Step 4. Install the necessary Python libraries for the server
sudo apt-get install python-dateutil python-docutils python-feedparser python-gdata \

python-jinja2 python-ldap python-libxslt1 python-lxml python-mako python-mock python-openid \

python-psycopg2 python-psutil python-pybabel python-pychart python-pydot python-pyparsing \

python-reportlab python-simplejson python-tz python-unittest2 python-vatnumber python-vobject \

python-webdav python-werkzeug python-xlwt python-yaml python-zsi
With that done, all the dependencies for installing OpenERP 7.0 are now satisfied (note that there are some new packages required since 6.1).
Step 5. Install the OpenERP server
I tend to use wget for this sort of thing and I download the files to my home directory.
Make sure you get the latest version of the application: at the time of writing this it’s 7.0. I got the download links from their download pages (note there are also deb, rpm and exe builds in this area too). There isn’t a static 7.0 release tarball as such anymore, but there is a nightly build of the 7.0 source tree which should be just as good and will contain patches as and when things get fixed. The link below is to the source tarball for the 7.0 branch.
Note: As an alternative method of getting the code onto your server, Jerome added a very useful comment showing how to get it straight from launchpad. Thanks!
wget http://nightly.openerp.com/7.0/nightly/src/openerp-7.0-latest.tar.gz
Now install the code where we need it: cd to the /opt/openerp/ directory and extract the tarball there.
cd /opt/openerp
sudo tar xvf ~/openerp-7.0-latest.tar.gz
Next we need to change the ownership of all the the files to the OpenERP user and group we created earlier.
sudo chown -R openerp: *
And finally, the way I have done this is to copy the server directory to something with a simpler name so that the configuration files and boot scripts don’t need constant editing (I called it, rather unimaginatively, server). I started out using a symlink solution, but I found that when it comes to upgrading, it seems to make more sense to me to just keep a copy of the files in place and then overwrite them with the new code. This way you keep any custom or user-installed modules and reports etc. all in the right place.
sudo cp -a openerp-7.0 server
As an example, should OpenERP 7.0.1 come out soon, I can extract the tarballs into /opt/openerp/ as above. I can do any testing I need, then repeat the copy command so that the modified files will overwrite as needed and any custom modules, report templates and such will be retained. Once satisfied the upgrade is stable, the older 7.0 directories can be removed if wanted.
That’s the OpenERP server software installed. The last steps to a working system is to set up the configuration file and associated boot script so OpenERP starts and stops automatically when the server itself stops and starts.
Step 6. Configuring the OpenERP application
The default configuration file for the server (in /opt/openerp/server/install/) is actually very minimal and will, with only one small change work fine so we’ll simply copy that file to where we need it and change it’s ownership and permissions:
sudo cp /opt/openerp/server/install/openerp-server.conf /etc/

sudo chown openerp: /etc/openerp-server.conf

sudo chmod 640 /etc/openerp-server.conf
The above commands make the file owned and writeable only by the openerp user and group and only readable by openerp and root.
To allow the OpenERP server to run initially, you should only need to change one line in this file. Toward to the top of the file change the line db_password = False to the same password you used back in step 3. Use your favourite text editor here. I tend to use nano, e.g.
sudo nano /etc/openerp-server.conf
One other line we might as well add to the configuration file now, is to tell OpenERP where to write its log file. To complement my suggested location below add the following line to the openerp-server.conf file:
logfile = /var/log/openerp/openerp-server.log
Once the configuration file is edited and saved, you can start the server just to check if it actually runs.
sudo su - openerp -s /bin/bash
/opt/openerp/server/openerp-server
If you end up with a few lines eventually saying OpenERP is running and waiting for connections then you are all set.
On my system I noticed the following warning:
2012-12-19 11:53:51,613 6586 WARNING ? openerp.addons.google_docs.google_docs: Please install latest gdata-python-client from http://code.google.com/p/gdata-python-client/downloads/listThe Ubuntu 12.04 packaged version of the python gdata client library is not quite recent enough, so to install a more up-to-date version I did the following (exit from the openerp user’s shell if you are still in it first):
sudo apt-get install python-pip
sudo pip install gdata --upgradeGoing back and repeating the commands to start the server resulted in no further warnings
sudo su - openerp -s /bin/bash
/opt/openerp/server/openerp-server
If there are errors, you’ll need to go back and find out where the problem is.
Otherwise simply enter CTL+C to stop the server and then exit to leave the openerp user account and go back to your own shell.
Step 7. Installing the boot script
For the final step we need to install a script which will be used to start-up and shut down the server automatically and also run the application as the correct user. There is a script you can use in /opt/openerp/server/install/openerp-server.init but this will need a few small modifications to work with the system installed the way I have described above. Here’s a link to the one I’ve already modified for 7.0.
Similar to the configuration file, you need to either copy it or paste the contents of this script to a file in /etc/init.d/ and call it openerp-server. Once it is in the right place you will need to make it executable and owned by root:
sudo chmod 755 /etc/init.d/openerp-server
sudo chown root: /etc/init.d/openerp-server
In the configuration file there’s an entry for the server’s log file. We need to create that directory first so that the server has somewhere to log to and also we must make it writeable by the openerp user:
sudo mkdir /var/log/openerp
sudo chown openerp:root /var/log/openerp
Step 8. Testing the server
To start the OpenERP server type:
sudo /etc/init.d/openerp-server start
You should now be able to view the logfile and see that the server has started.
less /var/log/openerp/openerp-server.log
If there are any problems starting the server you need to go back and check. There’s really no point ploughing on if the server doesn’t start…

OpenERP 7 Database Management Screen
If the log file looks OK, now point your web browser at the domain or IP address of your OpenERP server (or localhost if you are on the same machine) and use port 8069. The url will look something like this:
http://IP_or_domain.com:8069
What you should see is a screen like this one (it is the Database Management Screen because you have no OpenERP databases yet):
What I do recommend you do at this point is to change the super admin password to something nice and strong (Click the “Password” menu). By default this password is just “admin” and knowing that, a user can create, backup, restore and drop databases! This password is stored in plain text in the /etc/openerp-server.conf file; hence why we restricted access to just openerp and root. When you change and save the new password the /etc/openerp-server.conf file will be re-written and will have a lot more options in it.
Now it’s time to make sure the server stops properly too:
sudo /etc/init.d/openerp-server stop
Check the logfile again to make sure it has stopped and/or look at your server’s process list.
Step 9. Automating OpenERP startup and shutdown
If everything above seems to be working OK, the final step is make the script start and stop automatically with the Ubuntu Server. To do this type:
sudo update-rc.d openerp-server defaults
You can now try rebooting you server if you like. OpenERP should be running by the time you log back in.
If you type ps aux | grep openerp you should see a line similar to this:
openerp 1491 0.1 10.6 207132 53596 ? Sl 22:23 0:02 python /opt/openerp/server/openerp-server -c /etc/openerp-server.conf
Which shows that the server is running. And of course you can check the logfile or visit the server from your web browser too.

OpenERP 70 Main Setup Screen
That’s it! Next I would suggest you create a new database filling in the fields as desired. Once the database is initialised, you will be directed straight to the new main configuration screen which gives you a fell for the new User Interface in OpenERP 7 and shows you how easy it is to set up a basic system.
How to: OpenERP 6.1, Ubuntu 10.04 LTS, nginx SSL Reverse Proxy
This article follows on (hopefully not unsurprisingly) from the basic 6.1 installation howto.
In this post I’ll describe one way of providing SSL encrypted access to your shiny new OpenERP 6.1 server running on Ubuntu 10.04 LTS.
This time I thought I’d use the nginx (pronounced like “Engine X”) webserver to act as a reverse proxy and do SSL termination for web, GTK client and WebDAV/CalDAV access. nginx is gaining in popularity and is now the second most popular web server in the world according to some figures. It has a reputation for being fast and lean – so it seemed like a good choice for a relatively simple job like this.
I’m indebted to xat for this post which provided the main configuration script for a reverse proxy on OpenERP 6.0. The changes I have made to xat’s original configuration are: different port number, some additional rewrite rules to support WebDAV and the new mobile interface, new location for static files.
NB: For the purposes of this how to, we’ll be using self-signed certificates. A discussion of the pros and cons of this choice is beyond the scope of this article.
Step 1. Install nginx
On your server install nginx by typing:
sudo apt-get install nginx
Next, we need to generate a SSL certificate and key.
Step 2. Create your cert and key
I create the files in a temporary directory then move them to their final resting place once they have been built (the first cd is just to make sure we are in our home directory to start with):
cd

mkdir temp

cd temp
Then we generate a new key, you will be asked to enter a passphrase and confirm:
openssl genrsa -des3 -out server.pkey 1024
We don’t really want to have to enter a passphrase every time the server starts up so we remove the passphrase by doing this:
openssl rsa -in server.pkey -out server.key
Next we need to create a signing request which will hold the data that will be visible in your final certificate:
openssl req -new -key server.key -out server.csr
This will generate a series of prompts like this: Enter the information as requested:
You are about to be asked to enter information that will be incorporated into your certificate request. What you are about to enter is what is called a Distinguished Name or a DN. There are quite a few fields but you can leave some blank For some fields there will be a default value, If you enter ‘.’, the field will be left blank.
—–
Country Name (2 letter code) [AU]:
State or Province Name (full name) [Some-State]:
Locality Name (eg, city) []:
Organization Name (eg, company) [Internet Widgits Pty Ltd]:
Organizational Unit Name (eg, section) []:
Common Name (eg, YOUR name) []:
Email Address []:Please enter the following ‘extra’ attributes
to be sent with your certificate request
A challenge password []:
An optional company name []:The Client’s Company
And finally we self-sign our certificate.
openssl x509 -req -days 365 -in server.csr -signkey server.key -out server.crt
We only need two of the files in the working directory, the key and the certificate. But before we can use them they need to have their ownership and access rights altered:
sudo chown root:www-data server.crt server.key

sudo chmod 640 server.crt server.key
And then we put them in a sensible place:
sudo mkdir /etc/ssl/nginx

sudo chown www-data:root /etc/ssl/nginx

sudo chmod 710 /etc/ssl/nginx

sudo mv server.crt server.key /etc/ssl/nginx/
Now the key and certificate are safely stored away, we can tell nginx where they are and what it should be doing…
Step 3. Create the nginx site configuration file
We create a new configuration file
sudo nano /etc/nginx/sites-available/openerp
with the following content:
Note: You will need to change all references to 10.0.0.26 in the following file to either the domain name or static IP address of your server. This was the IP address of the machine I built this test script on. It will not work unless changed to suit your own system!
upstream openerpweb {
    server 127.0.0.1:8069 weight=1 fail_timeout=300s;
}

server {
    listen 80;
    server_name    10.0.0.26;

    # Strict Transport Security
    add_header Strict-Transport-Security max-age=2592000;

    rewrite ^/mobile.*$ https://10.0.0.26/web_mobile/static/src/web_mobile.html permanent;
    rewrite ^/webdav(.*)$ https://10.0.0.26/webdav/$1 permanent;
    rewrite ^/.*$ https://10.0.0.26/web/webclient/home permanent;
}

server {
    # server port and name
    listen        443 default;
    server_name   10.0.0.26;

    # Specifies the maximum accepted body size of a client request,
    # as indicated by the request header Content-Length.
    client_max_body_size 200m;

    # ssl log files
    access_log    /var/log/nginx/openerp-access.log;
    error_log    /var/log/nginx/openerp-error.log;

    # ssl certificate files
    ssl on;
    ssl_certificate        /etc/ssl/nginx/server.crt;
    ssl_certificate_key    /etc/ssl/nginx/server.key;

    # add ssl specific settings
    keepalive_timeout    60;

    # limit ciphers
    ssl_ciphers            HIGH:!ADH:!MD5;
    ssl_protocols            SSLv3 TLSv1;
    ssl_prefer_server_ciphers    on;

    # increase proxy buffer to handle some OpenERP web requests
    proxy_buffers 16 64k;
    proxy_buffer_size 128k;

    location / {
        proxy_pass    http://openerpweb;
        # force timeouts if the backend dies
        proxy_next_upstream error timeout invalid_header http_500 http_502 http_503;

        # set headers
        proxy_set_header Host $host;
        proxy_set_header X-Real-IP $remote_addr;
        proxy_set_header X-Forward-For $proxy_add_x_forwarded_for;

        # Let the OpenERP web service know that we're using HTTPS, otherwise
        # it will generate URL using http:// and not https://
        proxy_set_header X-Forwarded-Proto https;

        # by default, do not forward anything
        proxy_redirect off;
    }

    # cache some static data in memory for 60mins.
    # under heavy load this should relieve stress on the OpenERP web interface a bit.
    location ~* /web/static/ {
        proxy_cache_valid 200 60m;
        proxy_buffering    on;
        expires 864000;
        proxy_pass http://openerpweb;
    }

}
UPDATE: 04/04/2012. I have added a line to the above file: client_max_body_size 200m; thanks to Praxi for reminding me about this. The default setting is just 1MB which will stop users from uploading any files larger than that, including databases!
And then we can enable the new site configuration by creating a symbolic link in the /etc/nginx/sites-enabled directory.
sudo ln -s /etc/nginx/sites-available/openerp /etc/nginx/sites-enabled/openerp
Step 4. Change the OpenERP server configuration file
The next step is to re-configure the OpenERP server so that non-encrypted services are not accessible from the outside world.
In /etc/openerp-server.conf the non-encrypted services will only listen on localhost, i.e. not from external connections so in effect only traffic from nginx will be accepted.
After opening the file for editing, just add 127.0.0.1 to the xmlrpc and netrpc interface lines as shown below.
sudo nano /etc/openerp-server.conf
xmlrpc_interface = 127.0.0.1

netrpc_interface = 127.0.0.1
That’s it. Everything is now configured.
Step 5. Try it out
Restart the services to load the new configurations
sudo service openerp-server restart

sudo service nginx restart
You should not be able to connect to the web client on port 8069 and the GTK client should not connect on either the NetRPC (8070) or XMLRPC (8069) services.
For web access you just need to visit https://your-ip-or-domain and in the GTK client you will need to use port 443 (https) and choose the XMLRPC (Secure) protocol.
The nginx configuration above will also redirect any incoming requests for port 80 to port 443 (https) and it also makes sensible redirects for the mobile and WebDAV/CalDAV services. (From what I can gather however WebDAV clients really don’t handle redirects so this bit is probably not that useful). I think the best bet for WebDAV/CalDAV is just to provide the correct URL in the first place.
For CalDAV access then, the URL to a calendar will be something like this:
https://your-ip-or-domain/webdav/DB_NAME/calendars/users/USERNAME/c/CALENDAR_NAME
There you have it. In OpenERP 6.1 this job actually proved to be a little simpler than the previous version largely due to the integrated web interface. There are also fewer configuration changes required in openerp-server.conf.
Finally, I really wanted to try and make use of the WSGI support in OpenERP 6.1 instead of the method above, but my efforts to get this to work from nginx or Apache have so far ended in failure 🙁 Obviously if anyone wants to provide a working config for that please feel free to add a comment and link.

