I’m back!
This has taken a while. I’m sorry if you have missed me.
Blogging seemed to have rather dropped off the radar for quite a few years, I guess with the (then) rapid growth of various social media platforms folks just didn’t really see the need to every write much more than a few sentences.
But, as you can probably tell by this very post, I’ve decided to start again. It’s around 10 years since I last wrote a post on here so why not I say!
On my company’s website, Libertus Solutions, I’ll be mostly writing about what’s going on in and around my business’ activities and the CRM I still work with most frequently: Vtiger.
Here at theopensourcerer.com on the other hand, I’ll post about other subjects that interest me, such as cooking, chillies, 3D printing, motorbikes, Home Automation, electronics, and probably other stuff too.
Watch this space.
Love Al
How to Install OpenERP Odoo 8 on Ubuntu Server 14.04 LTS
![]()
Introduction
Welcome to the latest of our very popular OpenERP Odoo installation “How Tos”.
The new release of Odoo 8.0 is a major upgrade introducing a great many new features and a new name.
Odoo 8.0 is not only better looking and easier to use, it also brings many improvements to the existing feature-set and adds a number of brand new features which extend the scope of the business needs covered by Odoo. Ecommerce, CMS, Integrated BI…
Rather than me blathering on about what’s new, you can simply just go and read the release notes here.
The How To
Following that introduction, I bet you can’t wait to get your hands dirty…
Just one thing before we start: You can simply download a .deb (for Debian/Ubuntu type systems) or a. rpm (Redhat/CentOS) package of OpenERP and install that. Unfortunately that approach doesn’t provide us (Libertus Solutions) with enough fine-grained control over where things get installed, and it restricts our flexibility to modify & customise, hence I prefer to do it a slightly more manual way (this install process below should only take about 10-15 minutes once the host machine has been built).
This time, rather than using a source tarball as the basis for installation we are going to take the code straight from the Odoo 8.0 branch on Github. This should help when it comes to installing updates and bug fixes in the future by being able to issue a git pull command to update the code. Bear in mind before doing a pull request you should always have backups and you may need to update your Odoo database(s) as well.
So without further ado here we go:
Step 1. Build your server
I install just the bare minimum from the install routine (you may want to install the openssh-server during the install procedure or install subsequently depending on your needs).
After the server has restarted for the first time I install the openssh-server package (so we can connect to it remotely) and denyhosts
sudo apt-get install openssh-server denyhosts
UPDATE: Note that it seems denyhosts is no longer being maintained and is not in the main Ubuntu repository any more. I’m aware of a possibly suitable alternative called fail2ban but have not used it yet; do you own research. Thanks to Rami for the cluebat!
UPDATE2: Thanks to Paul for the pointer. I have added python-unicodecsv to the list of dependencies. Apparently this is required to correctly restore backups.
Now make sure your server has all the latest versions & patches by doing an update:
sudo apt-get update
sudo apt-get dist-upgrade
Although not always essential it’s probably a good idea to reboot your server now and make sure it all comes back up and you can login via ssh.
Now we’re ready to start the Odoo install.
Step 2. Create the Odoo user that will own and run the application
sudo adduser --system --home=/opt/odoo --group odoo
This is a “system†user. It is there to own and run the application, it isn’t supposed to be a person type user with a login etc. In Ubuntu, a system user gets a UID below 1000, has no shell (it’s actually /bin/false) and has logins disabled. Note that I’ve specified a “home†of /opt/odoo, this is where the OpenERP server code will reside and is created automatically by the command above. The location of the server code is your choice of course, but be aware that some of the instructions and configuration files below may need to be altered if you decide to install to a different location.
[Note: If you want to run multiple versions of Odoo/OpenERP on the same server, the way I do it is to create multiple users with the correct version number as part of the name, e.g. openerp70, openerp61 etc. If you also use this when creating the Postgres users too, you can have full separation of systems on the same server. I also use similarly named home directories, e.g. /opt/odoo80, /opt/openerp70, /opt/openerp61 and config and start-up/shutdown files. You will also need to configure different ports for each instance or else only the first will start.]
A question I have been asked a few times is how to run the Odoo server as the odoo system user from the command line if it has no shell. This can be done quite easily:
sudo su - odoo -s /bin/bash
This will su your current terminal login to the odoo user (the “-” between su and odoo is correct) and use the shell /bin/bash. When this command is run you will be in odoo’s home directory: /opt/odoo.
When you have done what you need you can leave the odoo user’s shell by typing exit.
Step 3. Install and configure the database server, PostgreSQL
sudo apt-get install postgresql
Then configure the Odoo user on postgres:
First change to the postgres user so we have the necessary privileges to configure the database.
sudo su - postgres
Now create a new database user. This is so Odoo has access rights to connect to PostgreSQL and to create and drop databases. Remember what your choice of password is here; you will need it later on:
createuser --createdb --username postgres --no-createrole --no-superuser --pwprompt odoo
Enter password for new role: ********
Enter it again: ********
Finally exit from the postgres user account:
exit
Step 4. Install the necessary Python libraries for the server
sudo apt-get install python-cups python-dateutil python-decorator python-docutils python-feedparser \

python-gdata python-geoip python-gevent python-imaging python-jinja2 python-ldap python-libxslt1

python-lxml python-mako python-mock python-openid python-passlib python-psutil python-psycopg2

python-pybabel python-pychart python-pydot python-pyparsing python-pypdf python-reportlab python-requests \

python-simplejson python-tz python-unicodecsv python-unittest2 python-vatnumber python-vobject \

python-werkzeug python-xlwt python-yaml wkhtmltopdf
With that done, all the dependencies for installing Odoo 8.0 are now satisfied (note that there are some changes between this and the packages required for OpenERP 7.0).
UPDATE & NOTE: It has been pointed out to me that the Qweb templating engine in Odoo 8 is warning that the version of wkhtmltopdf is too old. It turns out that Ubuntu 14.04 packages version 0.9.9 of this library even though this is rather old. To update your Ubuntu server please follow the instructions on this page. Many thanks to Ruben Kannan for pointing this out :-).
UPDATE & NOTE II: Zak suggests an alternative method to get and install the most recent version of wkhtmltopdf in this comment below. Thanks Zak.
UPDATE & NOTE III: David suggested adding python-cups and python-geoip to the list of modules to install in this comment below. Thanks David.
Step 5. Install the Odoo server
Install Git.
sudo apt-get install git
Switch to the Odoo user:
sudo su - odoo -s /bin/bash
Grab a copy of the most current Odoo 8 branch (Note the “.” at the end of this command!):
git clone https://www.github.com/odoo/odoo --depth 1 --branch 8.0 --single-branch .
(This might take a little while depending on the speed of your Internet connection.)
Note: Thanks to Ian Beardslee for the cluebat. Have now added --depth 1 to the command so it only retrieves the latest version without all the history. The download is now quite a bit quicker.
Once it’s finished exit from the odoo user: exit.
Step 6. Configuring the OpenERP application
The default configuration file for the server (/opt/odoo/debian/openerp-server.conf) is actually very minimal and will, with only a small change work fine so we’ll copy that file to where we need it and change it’s ownership and permissions:
sudo cp /opt/odoo/debian/openerp-server.conf /etc/odoo-server.conf

sudo chown odoo: /etc/odoo-server.conf

sudo chmod 640 /etc/odoo-server.conf
The above commands make the file owned and writeable only by the odoo user and group and only readable by odoo and root.
To allow the odoo server to run initially, you should only need to change two lines in this file. Toward to the top of the file change the line db_password = False to the same password you used back in step 3. Then modify the line addons_path = /usr/lib/python2.7/dist-packages/openerp/addons so that it reads addons_path = /opt/odoo/addons instead.
One other line we might as well add to the configuration file now, is to tell Odoo where to write its log file. To complement my suggested location below add the following line to the odoo-server.conf file:
logfile = /var/log/odoo/odoo-server.log
Use your favourite text editor here. I tend to use nano, e.g.
sudo nano /etc/odoo-server.conf
Once the configuration file is edited and saved, you can start the server just to check if it actually runs.
sudo su - odoo -s /bin/bash
/opt/odoo/openerp-server
If you end up with a few lines eventually saying OpenERP (Yes. The log still says OpenERP and not Odoo) is running and waiting for connections then you are all set.
If there are errors, you’ll need to go back and find out where the problem is.
Otherwise simply enter CTL+C to stop the server and then exit to leave the openerp user account and go back to your own shell.
Step 7. Installing the boot script
For the final step we need to install a script which will be used to start-up and shut down the server automatically and also run the application as the correct user. There is a script you can use in /opt/odoo/debian/init but this will need a few small modifications to work with the system installed the way I have described above. Here’s a link to the one I’ve already modified for Odoo version 8.
Similar to the configuration file, you need to either copy it or paste the contents of this script to a file in /etc/init.d/ and call it odoo-server. Once it is in the right place you will need to make it executable and owned by root:
sudo chmod 755 /etc/init.d/odoo-server
sudo chown root: /etc/init.d/odoo-server
In the configuration file there’s an entry for the server’s log file. We need to create that directory first so that the server has somewhere to log to and also we must make it writeable by the openerp user:
sudo mkdir /var/log/odoo
sudo chown odoo:root /var/log/odoo
Step 8. Testing the server
To start the Odoo server type:
sudo /etc/init.d/odoo-server start
You should now be able to view the logfile and see that the server has started.
less /var/log/odoo/odoo-server.log
If there are any problems starting the server you need to go back and check. There’s really no point ploughing on if the server doesn’t start…

Odoo 8 New Database
If the log file looks OK, now point your web browser at the domain or IP address of your Odoo server (or localhost if you are on the same machine) and use port 8069. The url will look something like this:
http://IP_or_domain.com:8069
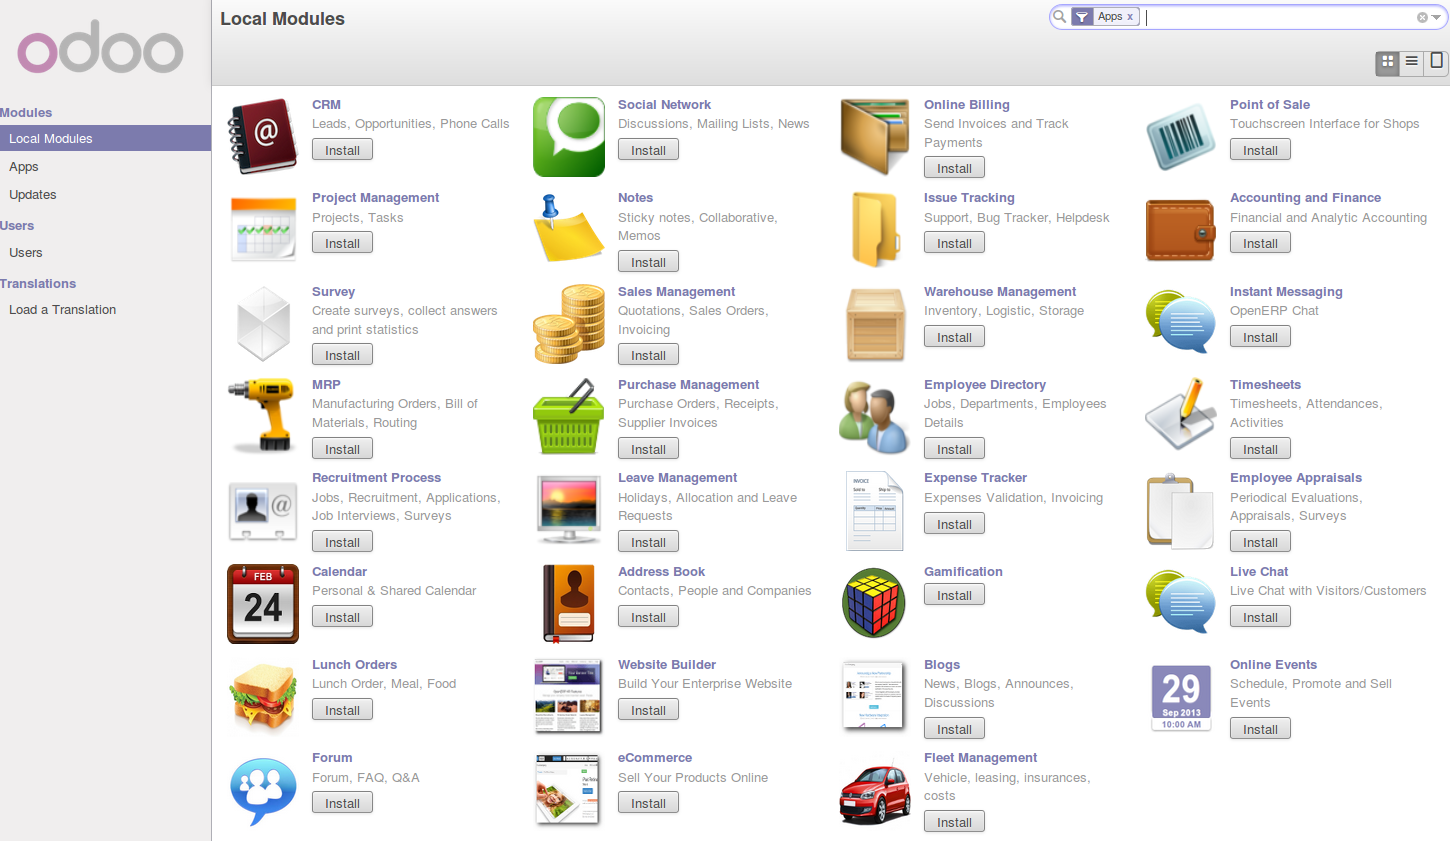
What you should see is a screen like this one (it is the Database Management Screen because you have no Odoo databases yet):
What I do recommend you do at this point is to change the super admin password to something nice and strong (Click the “Password” menu). By default this password is just “admin” and knowing that, a user can create, backup, restore and drop databases! This password is stored in plain text in the /etc/odoo-server.conf file; hence why we restricted access to just odoo and root. When you change and save the new password the /etc/odoo-server.conf file will be re-written and will have a lot more options in it.
Now it’s time to make sure the server stops properly too:
sudo /etc/init.d/odoo-server stop
Check the log file again to make sure it has stopped and/or look at your server’s process list.
Step 9. Automating Odoo startup and shutdown
If everything above seems to be working OK, the final step is make the script start and stop automatically with the Ubuntu Server. To do this type:
sudo update-rc.d odoo-server defaults
You can now try rebooting you server if you like. Odoo should be running by the time you log back in.
If you type ps aux | grep odoo you should see a line similar to this:
odoo 1491 0.1 10.6 207132 53596 ? Sl 22:23 0:02 python /opt/odoo/openerp-server -c /etc/odoo-server.conf
Which shows that the server is running. And of course you can check the logfile or visit the server from your web browser too.
Odoo 8 Opening Screen
That’s it! Next I would suggest you create a new database filling in the fields as desired. Once the database is initialised, you will be directed straight to the new main configuration screen which gives you a feel for the new User Interface in Odoo 8 and shows you how easy it is to set up a basic system.
vtiger 6.1.0 Released

After several months of development the latest version of the most popular open source CRM, vtiger CRM is released today.
vtiger 6.1.0 provides new features, over 150 bug fixes and support for newer versions of PHP and MySQL, as well as the new all Extension Store & vtiger Marketplace where our own Geographic Information System extension, GeoTools, was the first to be approved and published.
Release notes for vtiger are here.
Downloads are here.

As always, the UK’s most experienced vtiger partner Libertus Solutions is available for support and assistance with any vtiger implementation.
GeoTools re-visited
 Remember our first release of GeoTools? Libertus Solutions are delighted to announce the release of a completely re-written GIS (Geographical Information System) extension module for the soon-to-be-released vtiger 6.1.0.
This new version of GeoTools integrates services from OpenStreetMap with whatever business data is configured and available in your CRM application.

One of the big changes in the forthcoming 6.1.0 release of vtiger is a brand new integrated Extension Store feature that makes it simple for users to install and manage new extension modules for their vtiger installation:
- 1 Click install of commercial or free applications
- Confidence that apps are verified by vtiger before publication
- Contact information of publisher is immediately available
- See and contribute Ratings and Reviews of extensions
GeoTools is the first new extension module to be approved and published in vtiger’s new Marketplace and offers a host of new features that take full advantage of the new MVC architecture of vtiger 6.
- Use existing search filters and geographic parameters simultaneously in search results
- Manually update the location coordinates of records when they have not been Geocoded correctly by drag & drop
- Drag & drop the radius centre to re-calculate distance searches instantly
- Automatically detect the users actual location for an instant “any Leads nearby?” type enquiry
- Arbitrary manual address entry for on-the-fly geocoding
- Ability to add records directly to the Geocoding database cache using drag & drop
The techy bit
This version of GeoTools has been totally re-written from the ground up. We fixed a few bad design decisions that kind of “just happened” in the first version and have re-architected the internal Geocoding and Tile service APIs so these are now vendor agnostic. In the first GeoTools release we used the Google Maps API for both Tile and Geocoding services but these are now subject to terms & conditions which are probably not appropriate for the majority of businesses that would wish to use GeoTools. Consequently, this release now uses services from OpenStreetMap but other services from commercial vendors could just as easily be supported too; such as Google or MapQuest or MapBox.
We used the amazing Leaflet JS library to handle the majority of the mapping user interface. It’s a pleasure to use, well documented and is highly featured.
GeoTools is Open Source Software. We decided however to sell the extension via vtiger’s Marketplace for a nominal fee as we have spent considerable effort developing this product and believe it represents great value for money. Installation from the vtiger marketplace is a 1-click affair and we will provide support to paying customers. The GeoTools code will be available shortly on the vtiger forge but users will be on their own in terms of installation and support.
There isn’t a straightforward upgrade path between the version of GeoTools for vtiger 5.4.0 and this release unfortunately, although it should be possible to do for customers who have a large amount of data they’d rather not have to re-geocode. If you are interested in migrating please contact Libertus Solutions directly.
There will be a video showing GeoTools for vtiger 6.1.0 coming soon 🙂
UPDATE: There is now a demo system available here: http://geotools.libertus.co.uk. Login with a username and password of GeoTools. (This demo database is dropped and restored every 4 hours)
Cluster update
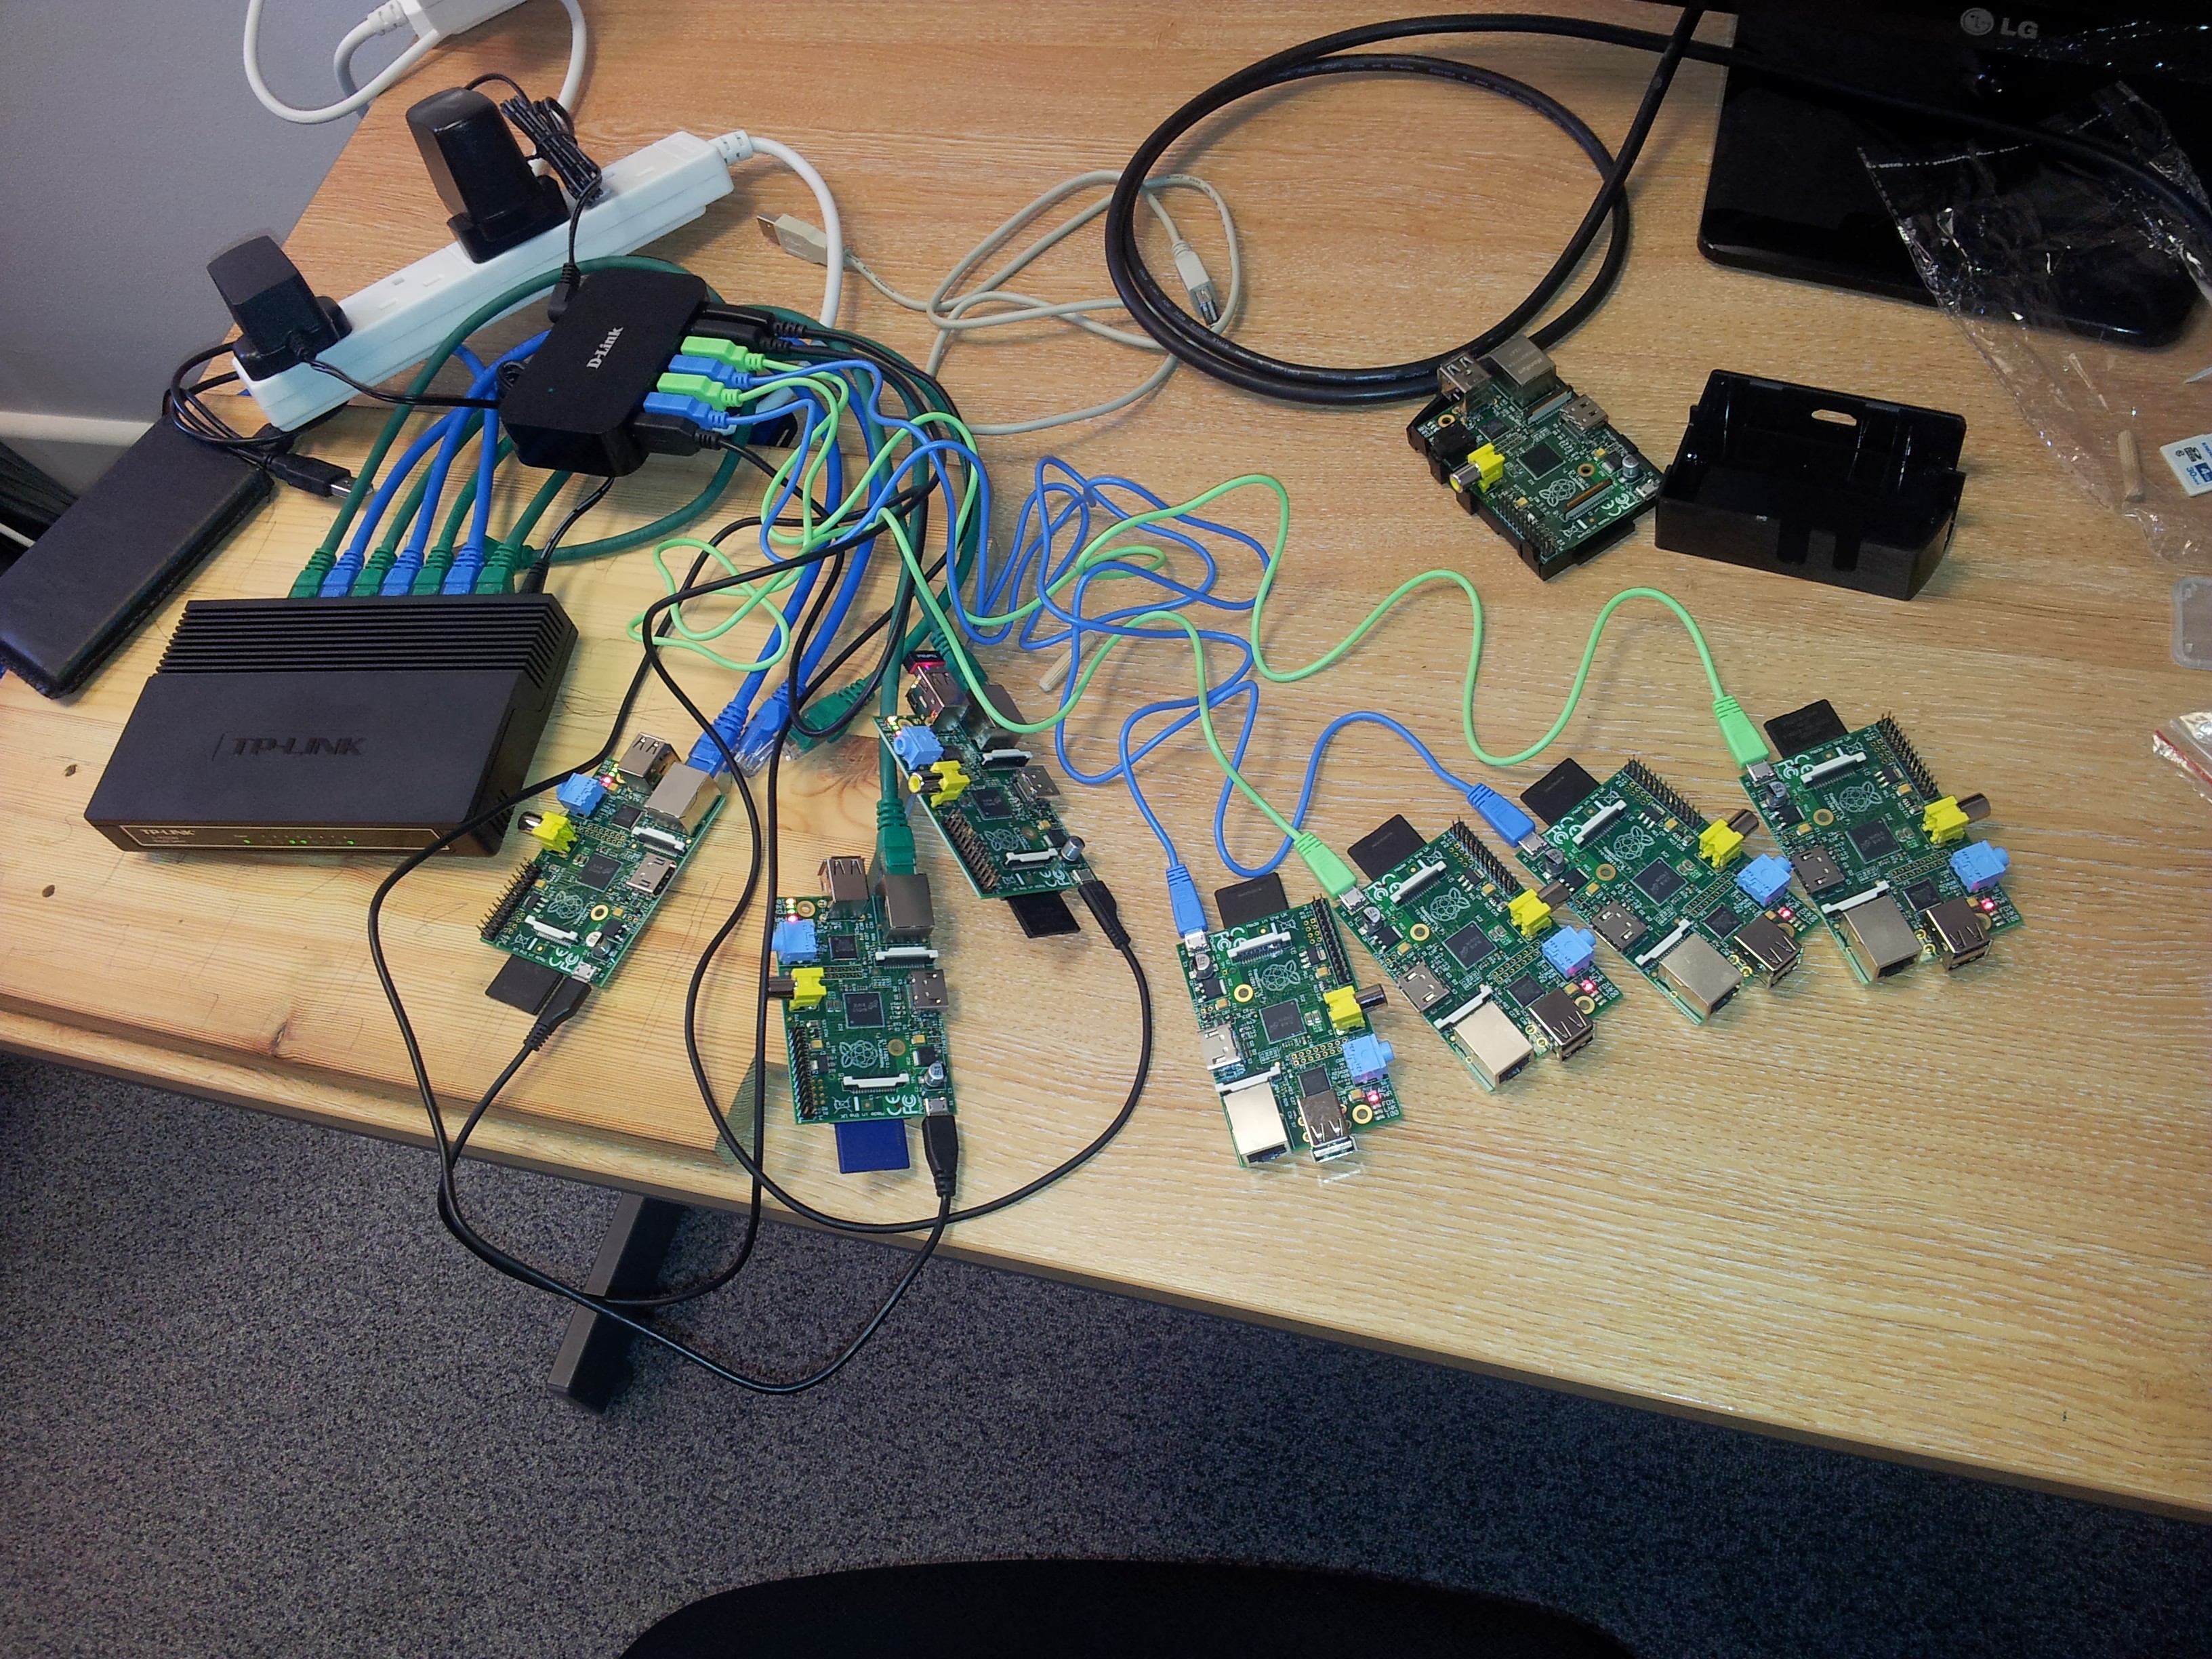
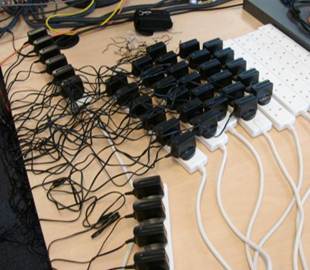
I am  delighted to say that the Raspberry Pi cluster project is now fully funded to the first target of £2,500, this means that the Indiegogo fees will be 4% of the total rather than the 9% which applies to partly funded flexible campaigns. The money received by Paypal has already partially cleared, so we have been out spending some of it, here is a collection of Raspberry Pi units doing some load testing.
There are many ways to build a cluster and many decisions to take along the way, like how to power them, what SD cards to use, whether to overclock them, how to do networking, how to fix them together etc. I will try to explain some of the reasons behind what we are doing and what we tried and didn’t like so much.
Powering the Pis
The first two criteria for powering the cluster was that it must be safe, and it must look safe. These are not the same thing at all, it is quite easy to have something with bare wires all over the place that looks a bit scary, but is entirely safe. It is also possible to have it looking great, but overloading some components and generating too much heat in the wrong place and build something that is a good looking fire risk. A single large transformer was one approach, difficulties would be handling the connection from 20A cable or rail (basically like mains flex, the current decides the wire gauge, not the voltage) down to MicroUSB, most electronics components like a USB socket or stripboard are rated for 2.5A max so we would end up with chunky mains grade connectors all over the place, which looks scary, even if it is entirely safe. After a bit of experimentation we found a D-Link 7 port USB hub with a 3A power supply and decided to see how many Raspberry Pi  devices we could power from it, turns out that it can do all 7, which was a bit of a surprise. We know the Pi should be able to draw 700mA for a reliable supply, but that is when it has two 100mA USB peripherals plugged into it and is running the CPU and GPU flat out. As we are not using the USB ports and we won’t be using the GPU at all, our little Pi units only draw about 400mA each. This simplifies the power setup a lot, we just need several of these high powered hubs giving us a neat, safe and safe looking setup. The power supply for the hub does get a little warm, but I have tested the current draw at the plug and we are not exceeding the rated supply.
Networking
Initially I wanted to find out if we could do it all with WiFi. This would cut out the wires, would give us a decent theoretical peak speed and could in theory be supported by a single wifi router. After testing Pi compatible Wireless N dongles the performance just wasn’t there, the max we could get was 20Mbit/sec, whilst with wired networking 74Mbit/sec was achievable. I am not sure if this was a limitation of the USB system or the drivers, but it became clear that wired networking would be significantly quicker. Having decided that wires are the way forward it came to choosing switches. One big switch or lots of little ones? Well price/performance ratio of the small home switches is just unbeatable. We settled on some TP-Link 8 port gigabit switches. Obviously the Pi would only be connecting at 100Mbit (link speed) but the uplink to the backbone switch is at gigabit speeds. Choosing the 8 port switch meant that we were going to have groups of 7 Raspberry Pi units and one port for the uplink. This approach of multiple hubs has the excellent side effect that the cluster is modular. Every shelf can run as a self-contained cluster of 7 devices networked together, we then join them together using a backbone hub to make a bigger cluster.
Physical setup
Here is the first layout attempt. It uses a 30cm x 50cm shelf, with the pi units screwed to wooden dowels pushed into holes drilled in the shelf. There are holes drilled through for the network cables, which were snipped and re-crimped on the other side.

The router and power setup were screwed to the underside of the shelf. This setup was a bit fiddly to build, crimping network cables is a bit time consuming and the dowel arrangement wasn’t as neat as I wanted.
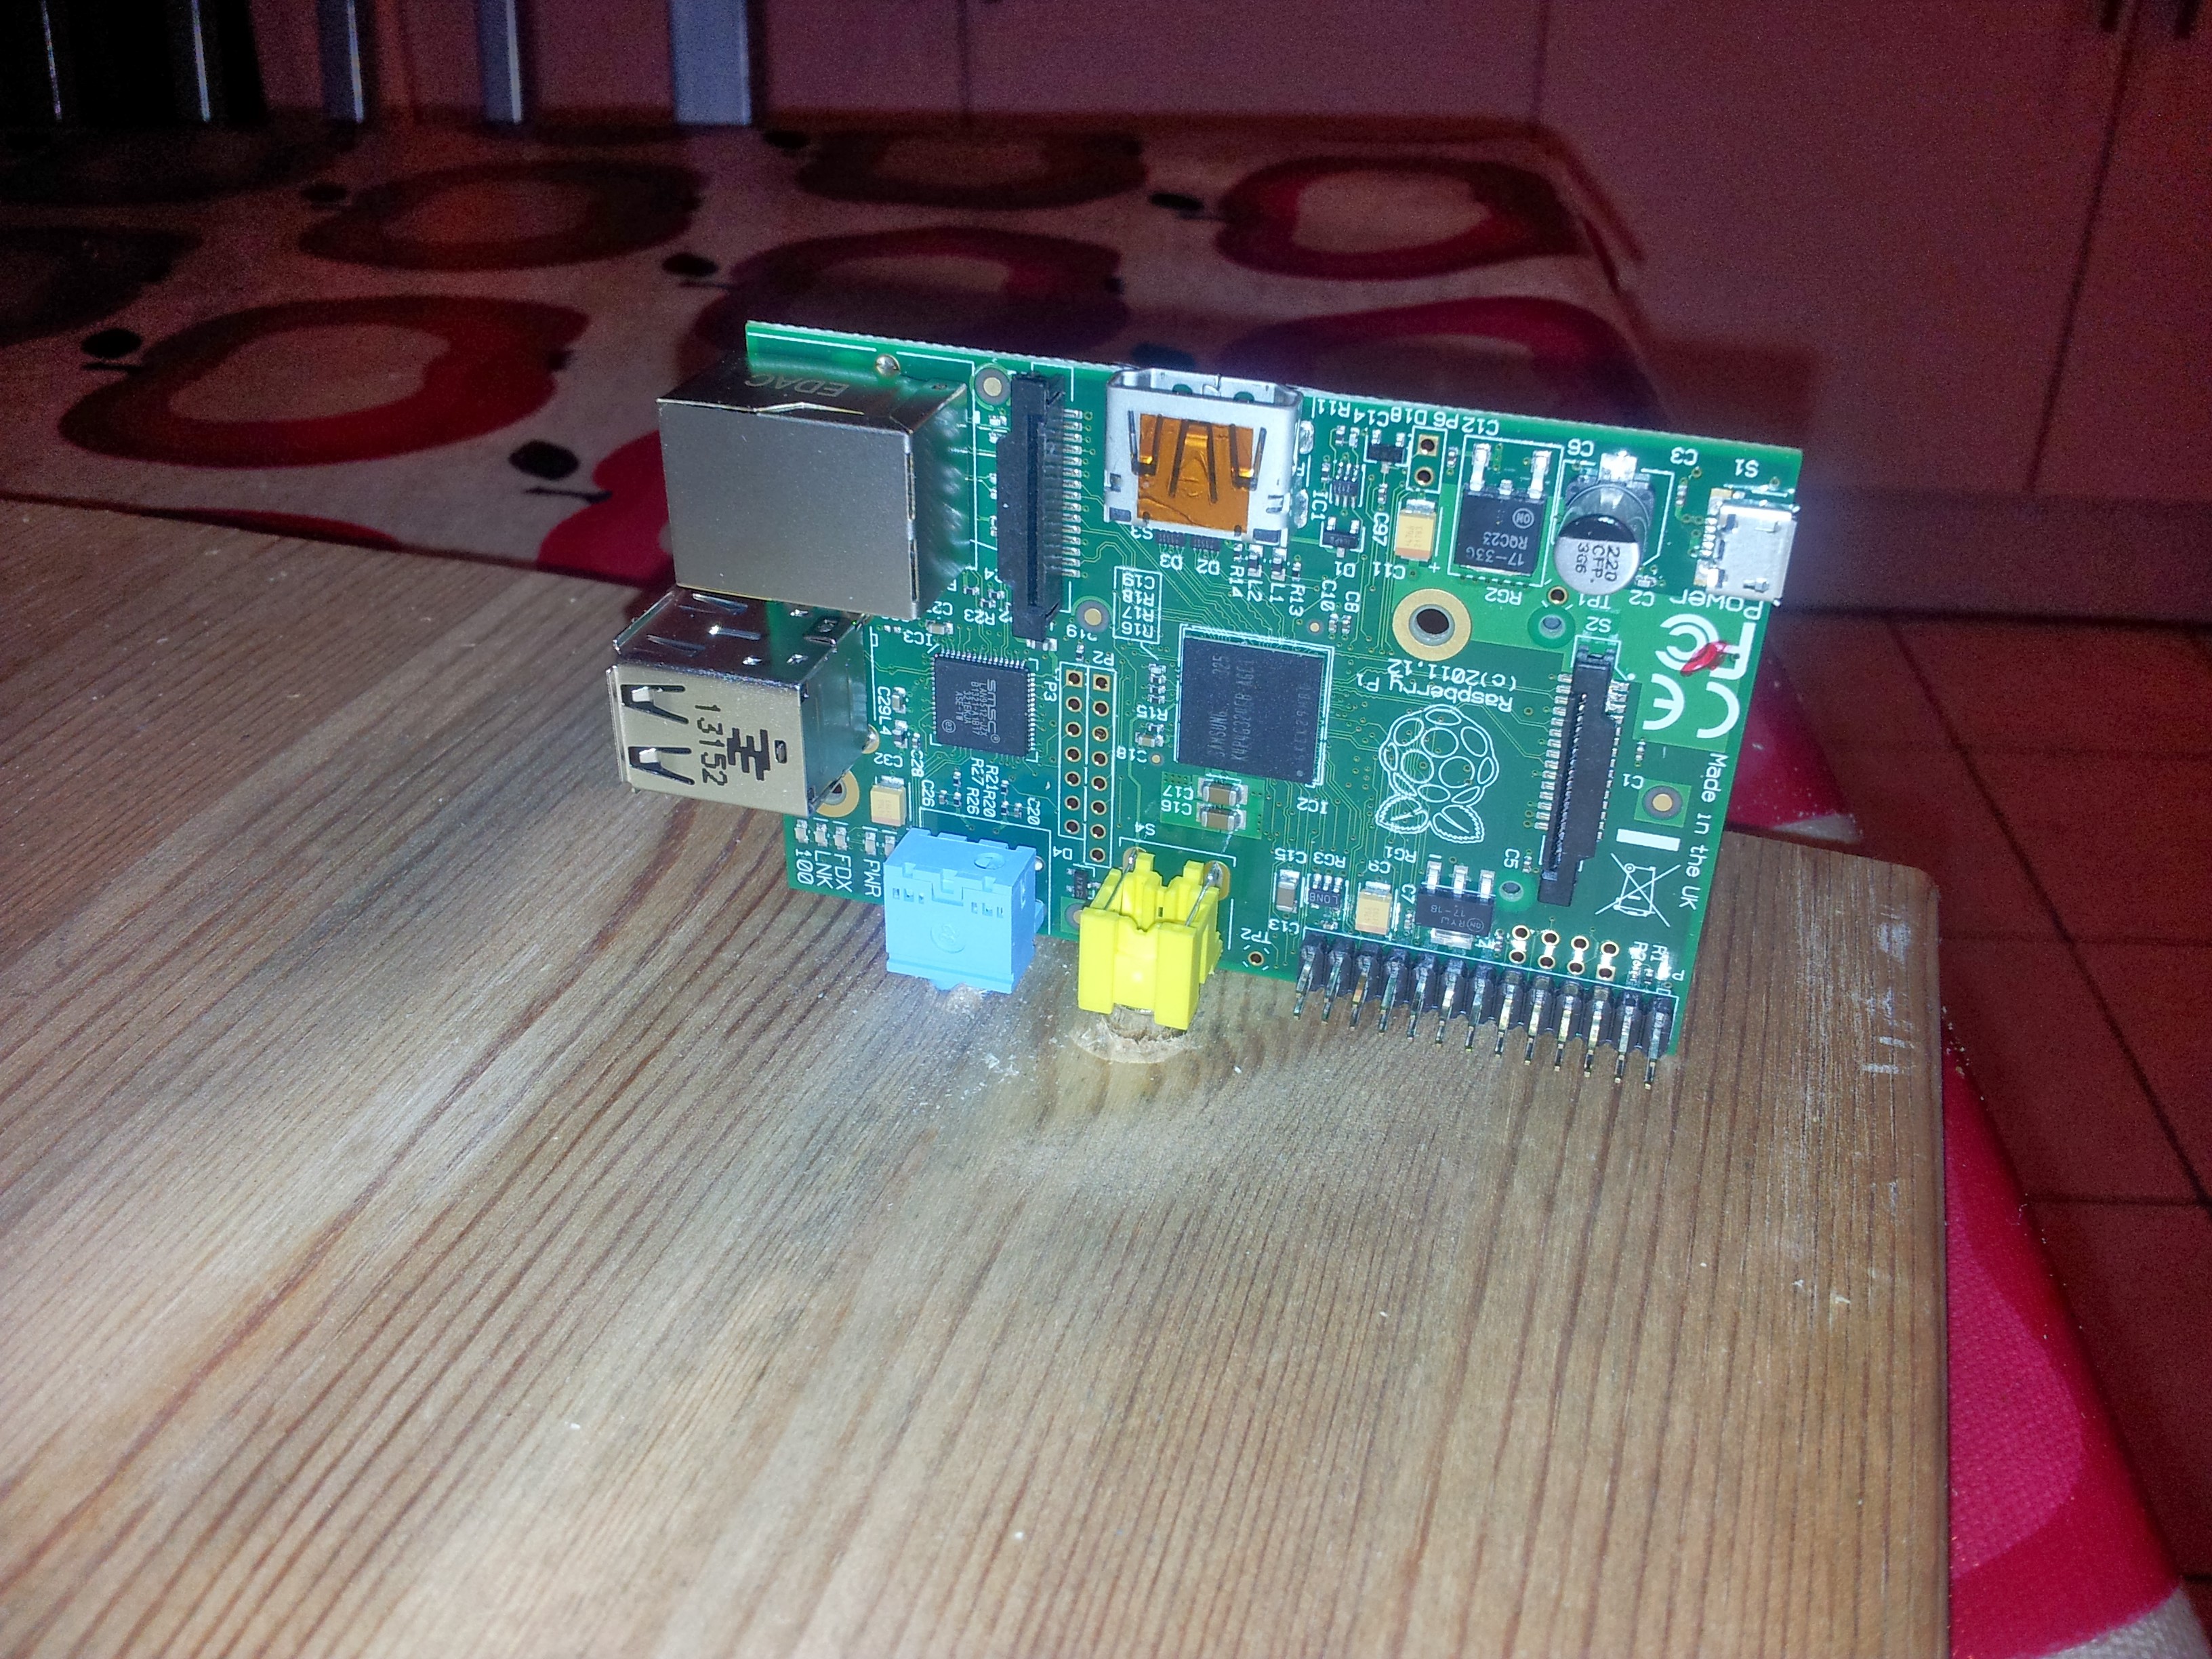
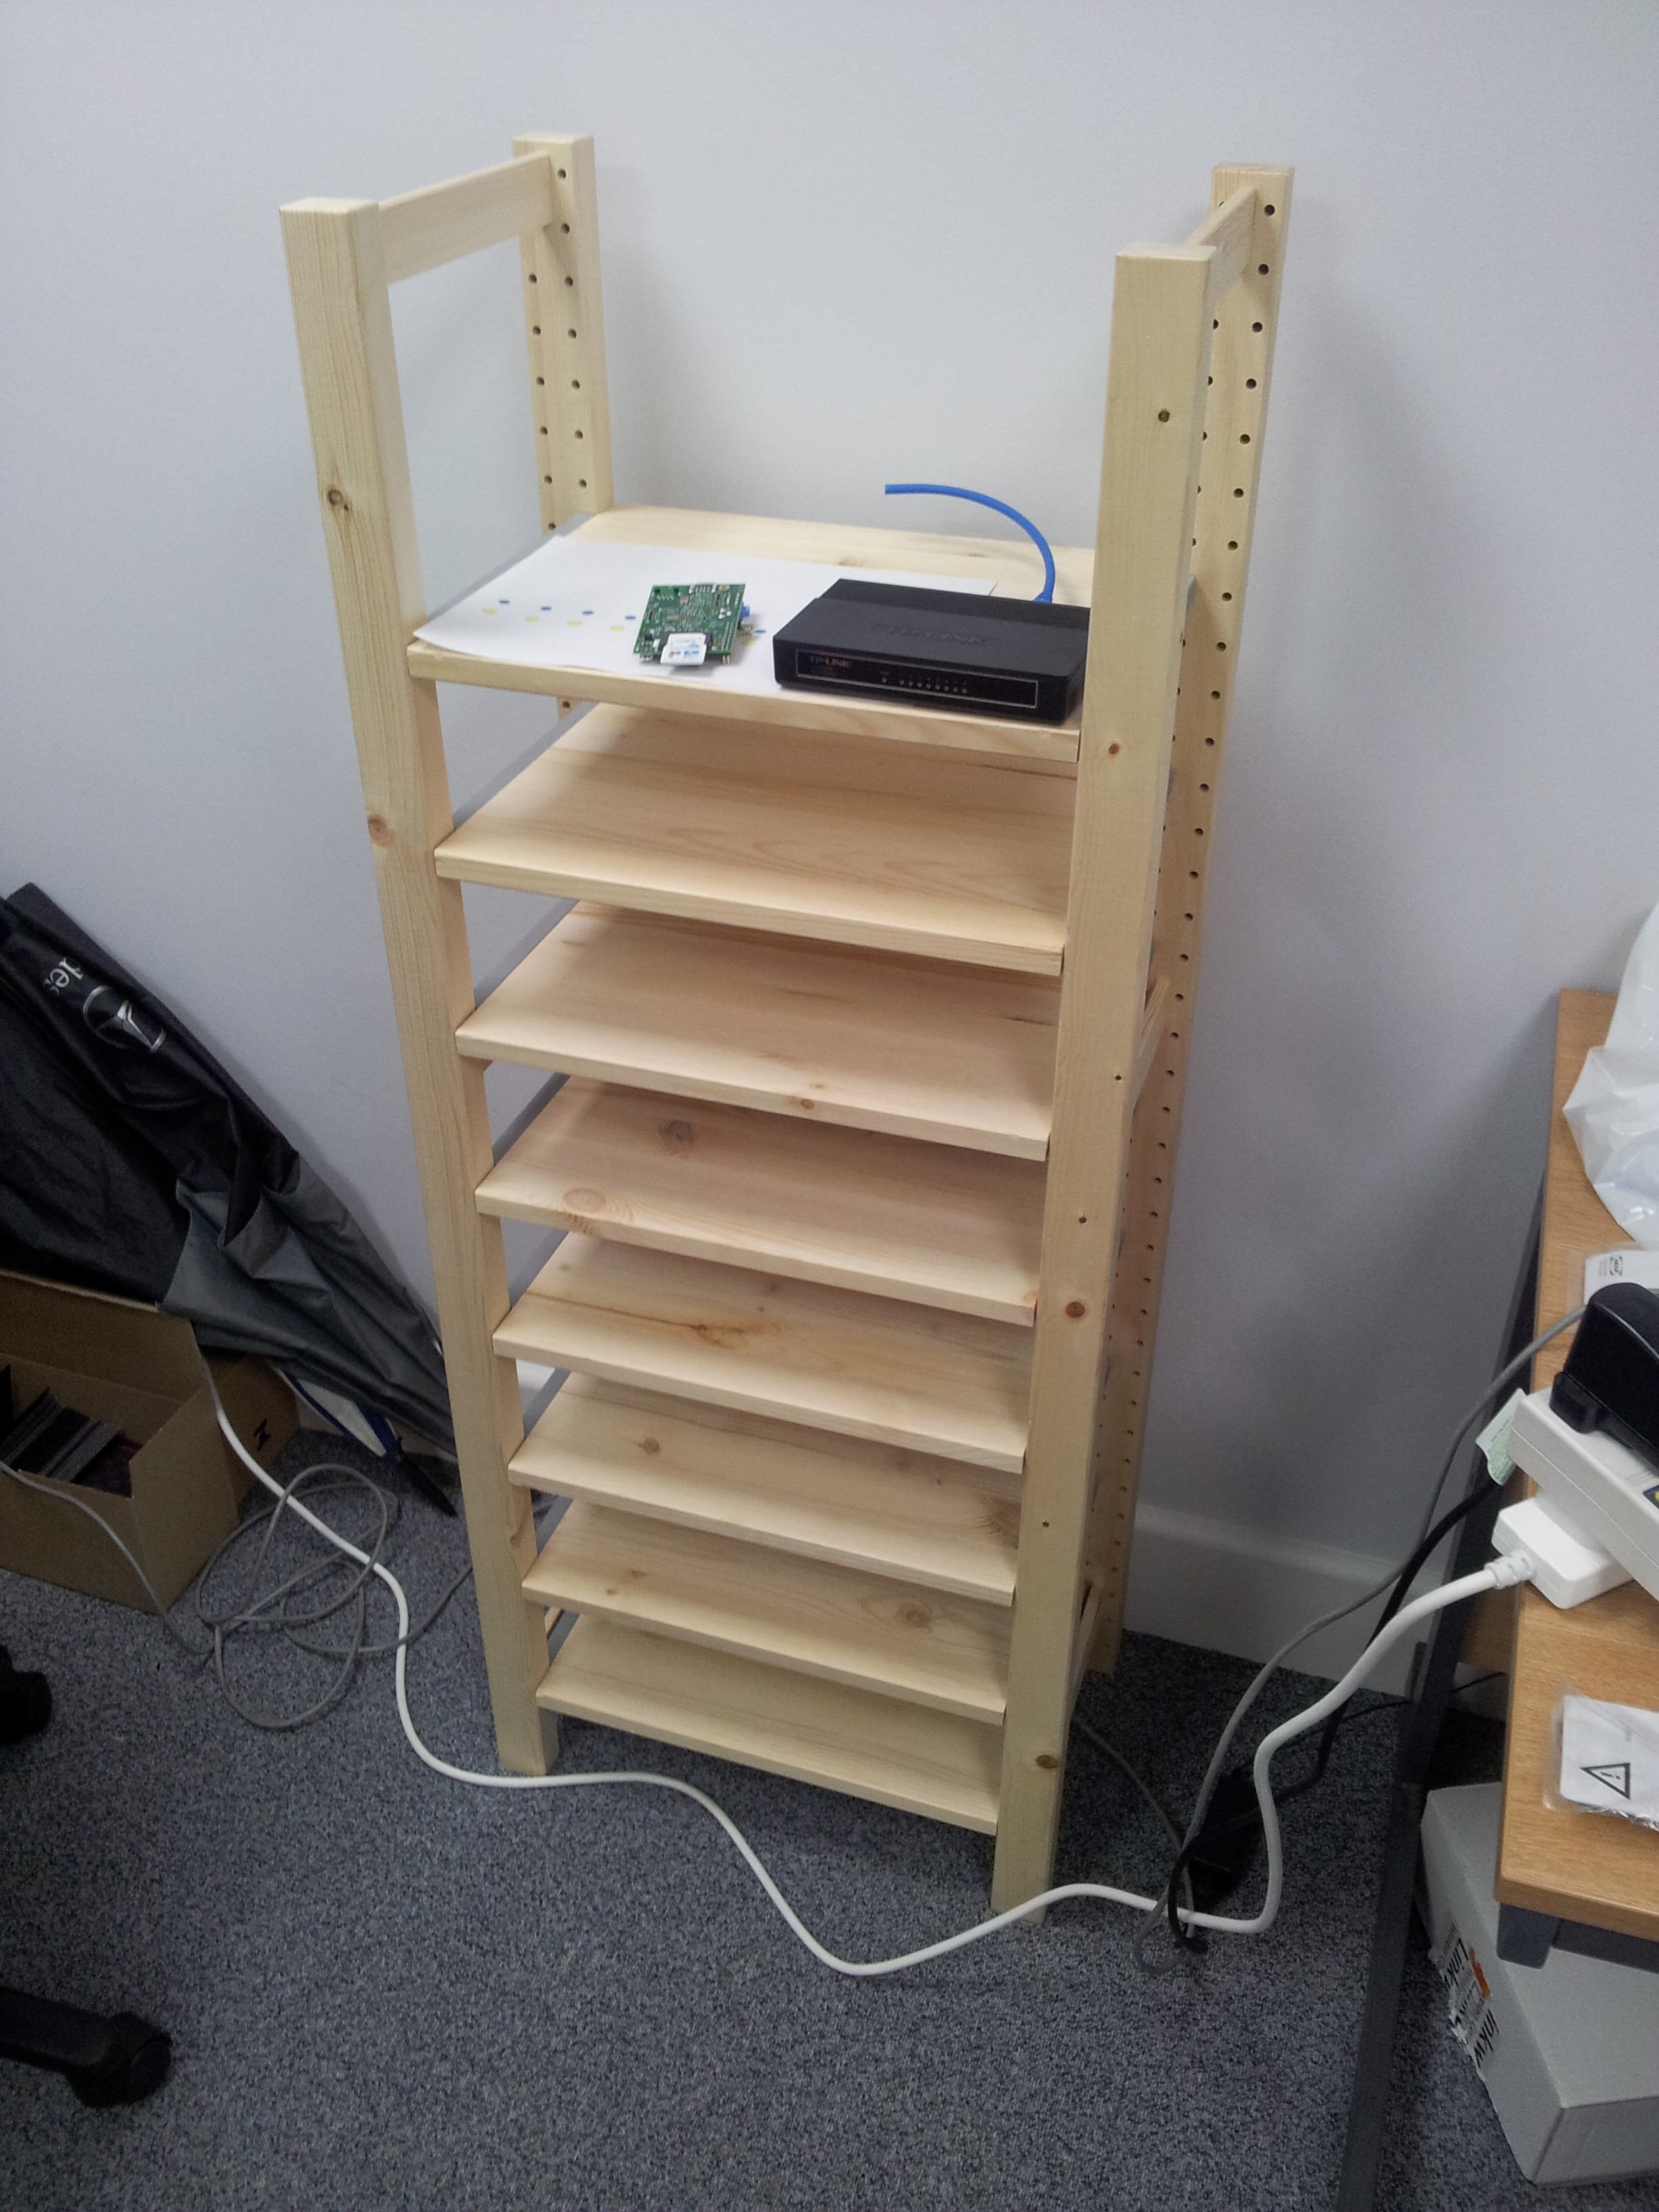
The Raspberry Pi doesn’t really have a flat available side to it, I was thinking of removing the composite video and audio out connectors to produce a flat side for fixing things to, then I noticed that if I drill some holes just the right size then the composite connection makes quite a reasonable push-fit fixing for a sideways mounted unit. Here is the shelving unit they are going to be fixed to, it is an IKEA Ivar set with 8 30×50 shelves. One design goal is to use easily available parts so that other people can replicate the design without sourcing obscure or expensive components. Wood is a great material for this kind of project, it is easy to cut, drill and fix things to, and it is a good thermal and electrical insulator – I wouldn’t want to accidentally put a Raspberry Pi down on a metal surface!
More updates will follow as the build progresses, if you have any suggestions on different approaches to any of the decisions on power/networking/fixing then do leave a comment, the design isn’t fixed in stone and we could end up changing it if a better idea comes along. Any further contributions to the campaign would also be gratefully appreciated, they will go towards filling up more shelves!
Building Ubuntu for the Raspberry Pi
As a result of the prior musings about crowdfunding and the rather shaky VAT status of the whole sector I have been thinking quite a bit about crowdfunding and where it might be useful and how we could get involved in some way. For our normal consultancy business we have no need of capital investments and we don’t produce anything that lends itself to the crowdfunding model, however I did come up with a project I have been wanting to do for quite a long time. Allow me to introduce it by way of a little video . . .
Back when the Raspberry Pi was in development it was shown running Ubuntu 9.04, Jaunty Jackalope. This was the last Ubuntu release that supported the ARMv6 instruction set, from that point on Ubuntu was optimised for newer ARM chips and would not run on the Broadcom chip that the Pi used. I am the point of contact of the Ubuntu UK Local Community team and I was dead excited about this little computer with it’s exposed PCB and low price point. I asked some of the Ubuntu ARM folk if they could support it going forward, but that wasn’t going to be possible, they didn’t have the resources to build for two ARM platforms and the bottom line was that the Pi probably wasn’t going to provide a good user experience for the increasingly heavy Ubuntu user interface. This was sad, but it was the situation. I was a bit concerned that the Raspberry Pi foundation was proceeding on the basis that Jaunty was available – it was already old, going out of support and was a dead end, there were going to be no future updates for it. I was concerned that the UK Local community was going to be landed with a lot of new users who were having a poor user experience and there would be nothing we could do about it. Reluctantly I approached the Raspberry Pi foundation (I met the lovely Liz and Eben at an event in Oxford) and shared my concerns with them, and suggested Debian was the way forward, so the Pi would have a system based on a platform Ubuntu users would be familiar with, that would get updates.
So this was sad, I wasn’t happy about it, the foundation wasn’t happy about it, many users were not happy about it, but it was much better to have a new Debian with updates and prospects than an old dead end Ubuntu release.
Moving on to the present, the Raspberry Pi is a huge success, Rasbian is a great operating platform for it, the LXDE desktop is fine, the Wayland demo was brilliant and loads of cool projects are happening based on the Pi. We still want Ubuntu on it though. We are using it in embedded projects, it is also turning up in things like the OpenERP Point of Sale kit, situations where it doesn’t need a responsive user interface (or a user interface at all). It would be great to know that all the libraries we are using on it are the same versions we are using on other computers that are running Ubuntu. It might be nice to see what the Ubuntu Unity desktop looks like on the Pi, especially Unity 8 running in Mir, but that explicitly isn’t a goal. This project aims to build everything that will build from source without too much hassle. If that gets us a desktop then great, if it gets us a command line with python, that is great too.
Now for the armchair accountants in the audience, having seen the admin end of a campaign I can explain it a little better than before. This is a flexible funding setup rather than the all-or-nothing option and we are accepting paypal and credit card pledges. The paypal pledges happen instantly, the money goes from the end user direct to our paypal account and then there is an immediate debit of 9% of the amount which goes from us to indiegogo – so the money is not held in escrow at all, and it isn’t a big payment at the end. This is fairly clearly a purchase of a pledge to the full pledge value and a subsequent payment to indiegogo which is either a purchase of campaign hosting services, or some kind of financial services fee, not sure about that bit yet. Credit card payments are slightly different, we don’t have the money for those yet, after the campaign ends Indiegogo will do a bank transfer to us for the funds (less the 4% or 9% commission presumably). Paypal is regulated as a bank now, so I think the money should turn up in our financials when it is in the paypal account, not just when we make a transfer of it to a bricks and mortar bank. We will enter all the pledges as sales and pay VAT on them and we will reclaim the VAT on the materials purchased to build the cluster. If anyone wants a VAT invoice for a paypal pledge I can sort that out. Credit card pledges are a bit more interesting as it is questionable whether they have happened yet.
If you want to contribute to the cluster and help us build Ubuntu for the Raspberry Pi then do head on over to Indiegogo and join the 40 or so other contributors we have so far.
From the technical side of things, designing the cluster feel free to pitch in your comments and suggestions below. We have had a lot of people suggesting that we don’t use the Raspberry Pi and use some other platform instead. These suggestions include: cross compile it from Intel machines, use QEMU on fast Intel computers, use cloud computing, use a Power Mac (whut!), use the OpenSUSE Build Service, Use a Calxeda box, use Pandaboards, use Wandboard quad core arm boards. Feel free to add to the list of other platforms we should be using instead, I think I will add the yet to be delivered Parallela board to the list of things we should be using. All these suggestions are great, they would work and they might even be faster or easier. They just are not things I really want (apart from the Parallela which I don’t have) and I don’t think it works as a crowdfunding concept to raise funds to build it out of anything but the Raspberry Pi.
To provide power to lots of Pis there are a few approaches, Southampton University did this:
and other cluster projects have build custom 5v electronics for feeding the USB or direct to the GPIO pins. The custom supply option doesn’t work out particularly cheap and to run the whole cluster you are looking at parts of the circuit supporting a current heading towards 32 amps, which gets kinda complicated. At the moment I am leaning towards using a special powered hub, the Pihub which can cope with powering 4 Pi devices from a single slightly beefy supply. This keeps the plug count down (they will all need PAT testing at some point so I don’t want to go completely wild on plugs) and keeps everything neat and safe and fanless.
Networking is another area where there are options. WiFi sounds mad for a cluster, but is it really? The Pi Ethernet port kind of hangs off USB internally, so wouldn’t a 150Mbit USB wifi dongle be comparable to a 100Mbit ethernet? Lets solve this using science. Initial testing with iperf shows 74Mbit throughput on the ethernet between two Pi devices, over WiFi just 20Mbit. This is rather less than I would expect, maybe there is more performance that can be teased out of the wifi, or maybe the initial feeling is right and ethernet is the way forward. Maybe you have an opinion or advice in this area?
The funding campaign runs through to Christmas but as we have some of the money available already I am thinking we will probably start getting some bits fairly soon and start setting up the cluster controllers and do some power measurements and more detailed performance testing.

