How to install a Squid & Dansguardian content filter on Ubuntu Server
Being a family man and a geek, our household has both children and lots of tech; there are 6 or so computers, various tablets, smartphones and other devices capable of connecting to, and displaying content from, the Internet.
For a while now I’ve wanted to provide a degree of content filtering on our network to prevent accidental, or deliberate, access to some of the worst things the Internet has to offer. What I didn’t want to do however was blindly hand control of this very important job to my ISP (as our beloved leader would like us all to do). Also, I absolutely believe this is one of my responsibilities as a parent; it is not anyone else’s. In addition, there are several problems I have with our government’s chosen approach:
- Filtering at the ISP network-side means the ISP must try and inspect all my internet traffic all of the time (what else could they potentially do with this information I wonder?)
- If the ISP’s filter prevents access to content which we feel that our kids should be able access, how can I change that? Essentially I can’t.
- I reckon that most kids of mid-teenage years will have worked out ways to bypass these filters anyway (see footnote) leaving more naive parents in blissful ignorance; thinking their kids are protected when in fact they are not.
With the above in mind I set about thinking how I could provide a degree of security on our home network using tried and trusted Open Source tools…
Firstly this is how our networked looked before.
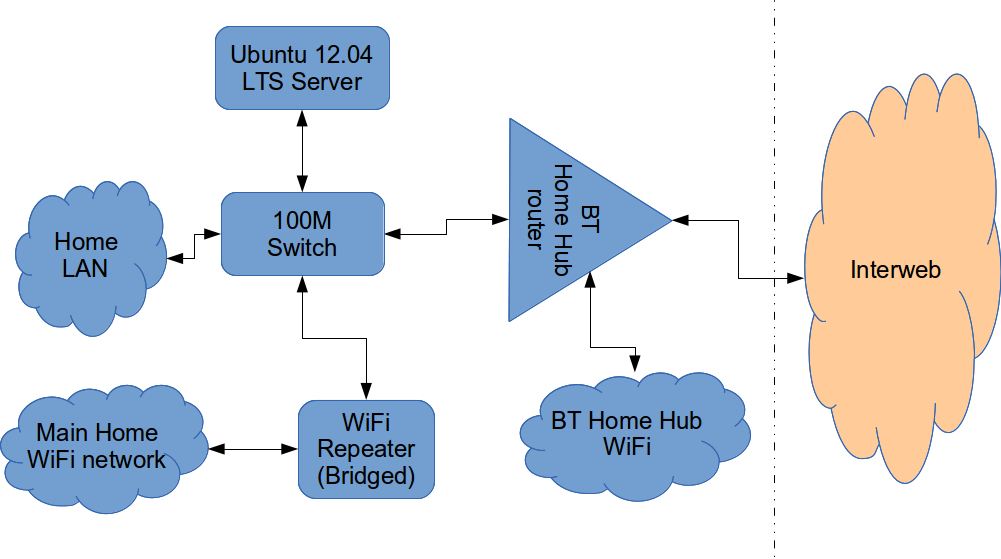
The BT Router is providing the DHCP service in the above diagram.
The Ubuntu 12.04 Server is called vimes (after Commander Vimes in the Discworld novels by Terry Pratchett) and is still running the same hardware that I described way back in 2007! It’s a low power VIA C7 processor, 1G of RAM and it now has a couple of Terabytes of disk. It’s mainly used as a central backup controller and dlna media store/server for the house.
I never did get Untangle working on it, but now it seemed like a good device to use to do some filtering… There are loads of instructions on the Internet about using Squid & Dansguardian but none covered quite what I wanted to achieve: A dhcp serving, bridging, transparent proxy content filter.
Architecturally, my network needed to look like this:
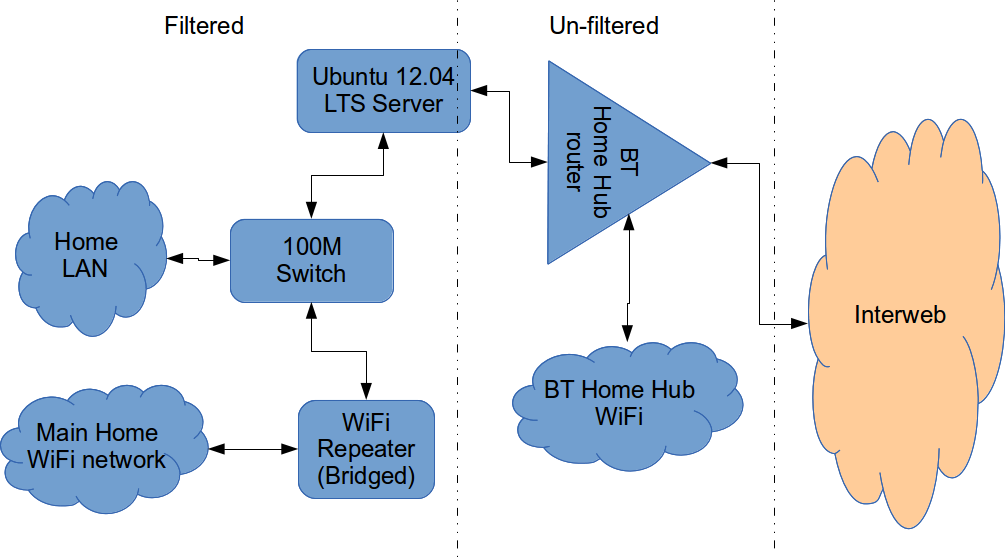
As you can see above, the physical change is rather negligible. The Ubuntu server now sits between the home LAN and the broadband router rather than as just another network node on the LAN as it was before.
The configuration of the server to provide what I required can be broken down into several steps.
1. Get the Ubuntu server acting as a transparent bridge
This is relatively straightforward. First install the bridge-utils package: sudo apt-get install bridge-utils
Then I made a backup of my /etc/network/interfaces file and replaced it with this one:
# This file describes the network interfaces available on your system
# and how to activate them. For more information, see interfaces(5).

# The loopback network interface
auto lo
iface lo inet loopback

# Set up interfaces
iface eth0 inet manual
iface eth1 inet manual

# Bridge setup
auto br0
iface br0 inet static
  bridge_ports eth0 eth1
  address 192.168.1.2
  broadcast 192.168.1.255
  netmask 255.255.255.0
  gateway 192.168.1.1
Probably the most interesting part of this file is where we assign a static IP address to the bridge itself. Without this I would not be able to connect to this server as both ethernet ports are now just transparent bridge ports so not actually listening for IP traffic at all.
(Obviously you will need to determine the correct IP address scheme for your own network)
2. Disable DHCP on the router and let Ubuntu do it instead
The reason for this is mostly down to the BT Home Hub… For some bizarre reason, BT determined that they should control what DNS servers you can use. Although I’m not using it right now, I might choose to use OpenDNS for example, but I can’t change the DNS addresses served by the BT Home Hub router so the only way I can control this is to turn off DHCP on the router altogether and do it myself.
Install the dhcp server: sudo apt-get install dhcp3-server
Tell the dhcp server to listen for requests on the bridge port we created before by editing the file /etc/default/isc-dchp-server so that the INTERFACES line reads: INTERFACES="br0".
Then edit the dhcp configuration file /etc/dhcp/dhcpd.conf so we allocate the IP addresses we want to our network devices. This is how mine looks:
ddns-update-style none;

default-lease-time 600;
max-lease-time 7200;

# If this DHCP server is the official DHCP server for the local
# network, the authoritative directive should be uncommented.
authoritative;

# Use this to send dhcp log messages to a different log file (you also
# have to hack syslog.conf to complete the redirection).
log-facility local7;

subnet 192.168.1.0 netmask 255.255.255.0 {
        range 192.168.1.16 192.168.1.254;

        option subnet-mask 255.255.255.0;
        option routers 192.168.1.1;

        #Google DNS
        option domain-name-servers 8.8.8.8, 8.8.4.4;
        #OpenDNS
        #option domain-name-servers 208.67.222.222, 208.67.220.220;

        option broadcast-address 192.168.1.255;
}
There are many options and choices to make regarding setting up your DHCP server. It is extremely flexible; you will probably need to consult the man pages and other on-line resources to determine what is best for you. Mine is very simple. It serves one block of IP addresses within the range 192.168.1.16 to 192.168.1.254 to all devices. Currently I’m using Google’s DNS servers but as you can see I’ve also added OpenDNS as a comment so I can try it later if I want to.
3. Install Squid and get it working as a transparent proxy using IPTables
This bit took a while to get right but, as with most things it seems to me, in the end the actual configuration is fairly straightforward.
Install Squid: sudo apt-get install squid.
Edit the Squid configuration file /etc/squid3/squid.conf… By default this file contains a lot of settings. I made a backup and then reduced it to just those lines that needed changing so it looked like this:
http_port 3128 transparent
acl localnet src 192.168.1.0/24
acl localhost src 127.0.0.1/255.255.255.255
acl CONNECT method CONNECThttp_access allow localnet
http_access allow localhost
always_direct allow allcache_dir aufs /var/spool/squid3 50000 16 256
Probably the most interesting part in the above is the word “transparent” after the proxy port. Essentially this means we do not have to configure every browser on our network: http://en.wikipedia.org/wiki/Proxy_server#Transparent_proxy. The final line of the file is just some instructions to configure where the cache is stored and how big it is. Again, there are tons of options available which the reader will need to find out for themselves…
To actually cause all the traffic on our LAN to go through the proxy rather than just passing through the bridge transparently requires a bit of configuration on the server using ebtables to allow easier configuration of the Linux kernel’s bridge & iptables to redirect particular TCP/IP ports to the proxy.
First I installed ebtables: sudo apt-get install ebtables
My very simplistic understanding of the following command is that it essentially tells the bridge to identify IP traffic for port 80 (http) and pass this up to the kernel’s IP stack for further processing (routing) which we then use iptables to handle.
sudo ebtables -t broute -A BROUTING -p IPv4 --ip-protocol 6 --ip-destination-port 80 -j redirect --redirect-target ACCEPT
Then we tell iptables to forward all port 80 traffic from the bridge to our proxy:
sudo iptables -t nat -A PREROUTING -i br0 -p tcp --dport 80 -j REDIRECT --to-port 3128
Restart Squid: sudo service squid3 restart
At this point http browser traffic should now be passing through your bridge and squid proxy before going on to the router and Internet. You can test to see if it is working by tailing the squid access.log file.
I found that squid seemed to be very slow at this juncture. So I resorted to some google fu and looked for some help on tuning the performance of the system. I came across this post and decided to try the configuration suggestions by adding the following lines to my squid.conf file:
#Performance Tuning Options
hosts_file /etc/hosts
dns_nameservers 8.8.8.8 8.8.4.4
cache_replacement_policy heap LFUDA
cache_swap_low 90
cache_swap_high 95
cache_mem 200MB
logfile_rotate 10
memory_pools off
maximum_object_size 50 MB
maximum_object_size_in_memory 50 KB
quick_abort_min 0 KB
quick_abort_max 0 KB
log_icp_queries off
client_db off
buffered_logs on
half_closed_clients off
log_fqdn off
This made an immediate and noticeable difference to the performance; enough so in fact that I haven’t yet bothered to go any further with tuning investigations. Thanks to the author Tony at last.fm for the suggestions.
4. Install Dansguardian and get it filtering content
sudo apt-get install dansguardian is all you need to install the application.
To get it to work with our proxy I needed to make a couple of changes to the configuration file /etc/dansguardian/dansguardian.conf.
First, remove or comment out the line at the top that reads UNCONFIGURED - Please remove this line after configuration I just prefixed it with a #.
Next we need to configure the ports by changing two lines so they look like this:
filterport = 8080
proxyport = 3128
Finally, and I think this is right, we need to set it so that Dansguardian and squid are both running as the same user so edit these two lines:
daemonuser = ‘proxy’
daemongroup = ‘proxy’
As you will see in that file, there are loads of other configuration options for Dansguardian and I will leave it up to the reader to investigate these at their leisure.
One suggestion I came across on my wanderings around the Interwebs was to grab a copy of one of the large collections of blacklisted sites records and install these into /etc/dansguardian/blacklists/. I used the one linked to from the Dansguardian website here http://urlblacklist.com/ which says it is OK to download once for free. As I understand it, having a list of blacklist sites will reduce the need for Dansguardian to parse every url or all content but this shouldn’t be relied on as the only mechanism as obviously the blacklist will get out-of-date pretty quickly.
Dansguardian has configurable lists of “phrases” and “weights” that you can tailor to suit your needs.
Now that’s installed we need to go back and reconfigure one of the iptables rules so that traffic is routed to Dansguardian rather than straight to Squid first and also enable communication between Squid and Dansguardian. You can flush (empty) the existing iptables rules by running iptables -F.
Now re-enter the rules as follows:
sudo iptables -t nat -A PREROUTING -i br0 -p tcp –dport 80 -j REDIRECT –to-port 8080
sudo iptables -t nat -A OUTPUT -p tcp –dport 80 -m owner –uid-owner proxy -j ACCEPT
sudo iptables -t nat -A OUTPUT -p tcp –dport 3128 -m owner –uid-owner proxy -j ACCEPT
sudo iptables -t nat -A OUTPUT -p tcp –dport 3128 -j REDIRECT –to-ports 8080
Restart Squid and Dansguardian: sudo service squid3 restart & sudo service dansguardian restart.
Now if you try to connect to the internet from behind the server your requests should be passed through Dansguardian and Squid automatically. If you try and visit something that is inappropriate your request should be blocked.
If it all seems to be working OK then I suggest making your ebtables and iptables rules permanent so they are restored after a reboot.
This can be achieved easily for iptables by simply running sudo iptables-save.
I followed these very helpful instructions to achieve a similar thing for the ebtables rule.
And that’s it. Try rebooting the server to make sure that it all still works without you having to re-configure everything. Then ask your kids and wife to let you know if things that they want to get to are being blocked. YOU now have the ability to control this – not your ISP… 😀
Footnotes
Be aware that on the network diagrams above the Wifi service provided by the BT Homehub router, and the LAN on the router side of the server, are not protected by these instructions. For me this is fine as the coverage of that Wifi network only makes it as far as the Kitchen anyway. And if it was more visible I could always change the key and only let my wife and I have access.
Also, I should make it clear that I know what I have above is not foolproof. I am completely aware that filtering/monitoring encrypted traffic is virtually impossible and there are plenty of services available that provide ways to circumvent what I have here. But I am also not naive and I reckon that if my kids have understood enough about networking and protocols etc. to be able to use tunnelling proxies or VPN services then they are probably mature enough to decide for themselves what they want to look at.
Of course there are plenty of additional mechanisms one can put in place if desired.
- Time-based filters preventing any Internet access at all at certain times
- Confiscation of Internet connected devices at bedtime
- Placing computers and gaming consoles in public rooms of the house and not in bedrooms
- And many more I’m sure you can think of yourself
As I see it, the point is simply this: As a parent, this is your responsibility…
SSH Sessions Timing Out?
Now this might be common knowledge but it took me while searching and scratching about to find the right solution.
As many others do I’m sure, I use ssh terminal sessions a lot. I’ve often got half a dozen open at once either in separate terminals or in Terminator for example. Sometimes if I don’t update them for a reasonable length of time they simply lock up so that I have no response at all. I’ve not actually timed this issue but I expect it is happening somewhere between 10 and 30 minutes of inactivity.
After getting annoyed for the umpteenth time today I finally did some serious searching… I concluded that this lock-up is probably due to my broadband router. It wasn’t happening across the local LAN or when I was connecting from other locations so I already suspected my broadband service. I suspect that it’s a NAT cache timeout or something but that’s not really important.
Several howtos I found discussing various timeout problems suggested editing the ssh config file on the server. This is fine if you know which server(s) you will be connecting too all the time and of course if there don’t happen to be hundreds of them that you need to re-configure. But if you don’t know or do use many machines then that’s not an ideal solution at all.
I think this is though 🙂
If you haven’t already got one, make a file in your home ssh directory (on Ubuntu it is normally found in ~/.ssh):
touch ~/.ssh/config
Open it with your favourite editor and enter a line something like this:
ServerAliveInterval 120
Then save and close it. From my initial tests this seems to do the trick nicely.
According to the manual it:
Sets a timeout interval in seconds after which if no data has been received from the server, ssh(1) will send a message through the encrypted channel to request a response from the server. The default is 0, indicating that these messages will not be sent to the server, or 300 if the BatchMode option is set. This option applies to protocol version 2 only. ProtocolKeepAlives and SetupTimeOut are Debian-specific compatibility aliases for this option.
This is one of those things I should have done ages ago. I hope this help others who find their ssh sessions mysteriously hanging.
A Good Pub Guide: The White Hart, Sherington

The White Hart, Sherington
Earlier this week, we had a bit of a road trip on our hands… A day discussing OpenERP in Cambridge and the next day vtiger CRM consulting in Milton Keynes which is not too far away, so we needed somewhere to stay to avoid driving a 200+ mile round trip.
We found a real gem of place! A very attractive country pub with extremely pleasant rooms, very friendly service, fantastic food (the Mixed Grill was really, really excellent), good beer and entertaining and congenial locals too.
If you happen to be working around the Bedford, Milton Keynes, Newport Pagnell area and want somewhere to stay, I whole-heartedly recommend you check out The White Hart in Sherington.
How to remove Mono from Ubuntu 10.10 Maverick Meerkat
sudo apt-get purge libmono* cli-common
The following packages will be REMOVED

  cli-common* gbrainy* libappindicator0.1-cil* libart2.0-cil* libgconf2.0-cil*

  libglade2.0-cil* libglib2.0-cil* libgmime2.4-cil* libgnome-vfs2.0-cil*

  libgnome2.24-cil* libgnomepanel2.24-cil* libgtk2.0-cil*

  liblaunchpad-integration1.0-cil* libmono-addins-gui0.2-cil*

  libmono-addins0.2-cil* libmono-cairo2.0-cil* libmono-corlib2.0-cil*

  libmono-i18n-west2.0-cil* libmono-management2.0-cil* libmono-posix2.0-cil*

  libmono-security2.0-cil* libmono-sharpzip2.84-cil* libmono-system2.0-cil*

  libndesk-dbus-glib1.0-cil* libndesk-dbus1.0-cil* mono-2.0-gac*

  mono-csharp-shell* mono-gac* mono-gmcs* mono-runtime* tomboy*

0 upgraded, 0 newly installed, 31 to remove and 0 not upgraded.
LibreOffice
So the news yesterday was that The Document Foundation has been set up by a consortium of interested parties who are unimpressed with Oracle’s stewardship of the OpenOffice.org codebase and project. In short, the project has forked. This isn’t the first time a prominent open source project has decided as a community that the direction of a controlling company is not they way they want to go. In 2005 Mambo was an up and coming web content management system, but there were issues in the community and the strategy of the company. It forked. A foundation was set up, OpenSourceMatters and the codebase was forked into Joomla! So taking a lesson from history, what happened next to the two halves of the fork? Well I find Google Trends illustrates it rather well. Mambo is the blue line, Joomla! is the red line. If the fork had not happened would the blue line continued to a higher point today than the red line? Hard to say, in the bigger picture it looks like forking it was a setback, but it is clear that the fork managed by the foundation quickly gained more popular relevance (and no, this is not very scientific) than the one managed by a single company.
Lets have a look at OpenOffice.org vs LibreOffice. Clearly not much on the chart yet for LibreOffice except for a media spike at the end, it will be interesting to look at this chart in a year or so and see when the red line crosses the blue line.
PCs with Compulsorily Bundled Software Should Be Outlawed

The Windows Tax
Now a fellow Open Source blogger and businessman, Dr Adrian Steel of Mercian Labels, is trying, so far without luck, to get the cost of an unwanted Windows License refunded from a company called Fonestop Ltd. He’s kindly providing an ongoing record of the correspondence between himself and the supplier whilst he seeks a fair refund for the software that he does not want nor require.
This example goes a long way to indicate why the bundling of software and hardware in this way is so wrong. It is incredibly hard to buy a computer in the UK that is not already infected with an inefficient, outdated, expensive, bloated and, still alarmingly, insecure operating system called Microsoft® Windows™. It is also becoming increasingly difficult to get even a partial refund due to the updated terms in the EULA that comes with version 7 of the OS (you can read most of the license agreements here):
By using the software, you accept these terms. If you do not accept them, do not use the software. Instead, contact the manufacturer or installer to determine its return policy. You must comply with that policy, which might limit your rights or require you to return the entire system on which the software is installed.
In earlier versions the statement about returning the entire system was not there. Here’s what the Vista EULA said:
By using the software, you accept these terms. If you do not accept them, do not use the software. Instead, contact the manufacturer or installer to determine their return policy for a refund or credit.
Reading Adrian’s struggle to get back the money that is rightfully his makes me quite angry. There are plenty of computer users that do not want or need Windows software when they buy a new computer. Even if they are not aware of the great Free Software operating systems such as Ubuntu or Fedora or many others, they probably already have a perfectly legal and valid CD of Windows in a drawer or cupboard anyway. Even I have a legal and valid Windows XP CD in my office; not that it ever gets used nowadays…
So what’s to be done? I really feel like starting some kind of campaign to get the lawmakers here and across the EU to make this kind of practice illegal. I as a consumer should be able to select and buy any computer I like and decide for myself if I wish to pay for a pre-installed operating system or not. That should be a choice I am free to make. Currently, apart from a few very brave and admirable vendors, I do not have this choice. And now it’s even harder to obtain a refund due to the change in the wording of Microsoft’s EULA.
These Brave and Admirable vendors deserve a mention:
- Brave because I’m sure that they will come under pressure from businesses like Microsoft to bundle their software and conform to the way that they want you to sell Computers.
- Admirable because they are standing up for something which is good and noble and may not be the most profitable course for their company to take.
As many of you know we started a website some time ago called Naked Computers to track these Brave and Admirable suppliers around the world. It’s been useful to many but it has been quite quiet recently and it could definitely do with a revamp to make it look more appealing (any WordPress Theme designers fancy knocking up a new look and feel for the site?).
In the UK there is one computer supplier that, in my humble opinion, should be applauded for their attitude: Novatech. I think that every machine they sell from their website or retail outlets are offered with or without an Operating System; it’s your choice. It’s quite interesting to look on their site and see just how expensive Windows really is: ~£70 to ~£800 or more!
Recently I noticed Novatech making a few noises on Twitter and I commented positively on their approach to selling naked computers. This was their reply to me:
@opensourcerer Thanks for recommending us, we sell all systems without operating systems as we like to give our customers a choice.
So come on you lot! Let’s try and come up with a plan, ideas and suggestions as to how to go about fixing this problem once and for all… Our company, The Open Learning Centre can host a wiki or something if needed but please use the comments here to start the ball rolling.
Are there any lawyers out there who fancy a challenge? Want to fight for Freedom and allow consumers to make their own choice rather than be forced to pay for something they frequently neither need nor want?
Finally, for those naive souls who believe that an EULA gives you some protection or guarantees, think again…

