Untangle, Asterisk PBX and File Server; All-in-One. Part 3
In this third instalment, the hardware is all running and I have a nice and shiny new LFS-6.3 running happily with xorg-7.2 and the very cool and lightweight fluxbox Window Manager. I have also installed the latest JDK, and Ruby & Rake to support the untangle build process.
A first try at building the untangle source failed (as I expected really). Initially this was due to the JAVA_HOME environment variable being hard-coded into various “.rb” rake build files. Needless to say, where they expected the JDK to be (/usr/lib/jvm/java-1.5.0-sun/jre), mine is somewhere else entirely (/opt/jdk).
I edited the top level rakefile, so that JAVA_HOME pointed to my JDK, to see how this affected the build. It ran for a bit longer but then aborted with some unintelligible errors.
Realising that I know nothing of Ruby, and consequently Rake, I thought I’d try a different tack. My main desktop machine runs Ubuntu Feisty. As an experiment, I installed VirtualBox (A virtualisation application) and installed the Untangle ISO into that as a virtual machine.
Really neat – it worked without any hiccups or issues whatsoever. Now I can play around with Untangle, see what goes where and what it’s dependencies are, before I go back to try and build it from source on my new server platform.
Here’s a screen shot of Untangle running as a VM (Virtual Machine) on my Ubuntu Desktop 🙂 You can see I have opened a

terminal in Untangle so I can start investigating the environment.
In terms of the dependencies I know I am missing: Postgresql is definate, and I may need ANT too. It might also be that I will need to downgrade the JDK to version 5 rather than 6; but I’ll confirm that later.
I have also just ordered the FXO card for Asterisk. The card I ended up going for was for sale on eBay in the USA. It sounds like it should do the trick nicely and has a low profile bracket so it will install into my little case. Including shipping it worked out at just over £17.00. Not too bad.
This may end up being a slightly longer series that I first thought. But hopefully it will still be interesting…
Untangle, Asterisk PBX and File Server; All-in-One. Part 2
The rest of the hardware finally arrived this afternoon (the courier seemed to be asleep yesterday).
The physical installation was simple and quick. Everything worked first time. I connected it all up, checked it POSTed O.K. and verified in the BIOS that the new RAM, HDD and CD were visible and identified correctly. No problems.
I tidied up the cabling and put the lid on 🙂
Unfortunately I’ve just noticed that when I come to install the FXO line card for the PBX I’ll have to move some of the cables, but it shouldn’t be too much trouble.
As things were going so well, I though I’d just see how the Untangle install from their ISO went. It installed fine really but there were a couple of issues for me with it:
- It didn’t give me any opportunity to partition the hard disk,
- It didn’t do any sort of locale checks so I ended up with a default US keyboard layout,
- It couldn’t identify the network chipset hardware. Their kernel is quite old and doesn’t have the drivers built in.
To be honest, this isn’t really a problem though. As this will be a heavily customised server anyway, I had always really planned to build a new LFS system on the box, partition it how I want and then build the untangle source and on top of my own host Linux. That way I will have much more control over what goes on, and I should be able to add asterisk and anything else as and when I see fit… That’s the theory anyway 😉
In terms of partitioning, I reviewed my original plan and have come up with a new and much simpler scheme:
| Machine | Part Type | Drive | Grub | Mount Point | File System | OS | Size (GB) |
| vimes | sda | hd0 | 320.000 | ||||
| Linux | sda1 | hd0,0 | /boot | ext2 | Linux | 0.2 | |
| Linux Swap | sda2 | hd0,1 | /swap | swap | 1.000 | ||
| Linux | sda3 | hd0,2 | / | ext3 | 5.000 | ||
| Extended | sda4 | ext part | |||||
| Linux | sda5 | hd0,4 | /opt | ext3 | 5.000 | ||
| Linux | sda6 | hd0,5 | /usr | ext3 | 5.000 | ||
| Linux | sda7 | hd0,6 | /srv | ext3 | 5.000 | ||
| Linux | sda8 | hd0,7 | /var | ext3 | 5.000 | ||
| Linux | sda9 | hd0,8 | /home | ext3 | 280.000 | ||
| Linux | sda10 | hd0,9 | /mnt/lfs | ext3 | 10.000 | ||
| 316.2 |
The figures won’t be exact as formatting will remove some of the usable space, but the idea is about right.
As you may also have noticed, I have chosen “vimes” for the name of this box. He is, after all, the Discworld’s first and only true “policeman”. I thought that Vetinari (the patrician of Ankh Morpork) would also be appropriate but vimes is quite a friendly chap, not how I would describe Vetinari.
More later…
Untangle, Asterisk PBX and File Server; All-in-One.
Here’s the first instalment of what hopefully will be a short series. I am building a low-power PC for use as a home server, firewall, net-filter, and IP-PBX.
Our house is flood-wired with CAT5e cabling to almost every room, and with me, my wife and eldest son we can have up to 4 or 5 PCs active on our network at any one time.
My eldest son (James) is about to turn 7 and has already started to use Google. So it is time to put some content filtering on the network, and maybe some caching too. Plus I want a decent, low power device that could be left on pretty much 24/7 with sufficient hard disk capacity to act as a backup host for our desktop machines’ data. Also my business partner and I both work from our respective homes currently and it would be useful if the single analogue line coming into my office could be switched (via Asterisk) so calls can be routed to whoever happens to be available using VOIP.
After reading up on the Untangle product, I decided that would be a great foundation for my project as it is a bundle of all the main network security applications built into one software appliance. The interesting task will be to get it, happily living along side Asterisk, Samba/FTP and hopefully Apache for a public web server.
After ensuring that Untangle would be happy with a low-power VIA type PC for our use, the next step was to identify suitable hardware. Much research led me to choosing this board – a Jetway J7F4K which has dual GigE Lan ports, a couple of sata ports, IDE, USB and the usual other interfaces. This board is available in two models:
- a 1.5Ghz VIA CN700 fan cooled (available as either a 25W or 12W mobo)
- or a 1.2Ghz VIA CN700 fanless and rated at an amazingly meagre 7W.
The 1.2Ghz model was the one I chose as power drain is more important to me than 300Mhz of processing power. To fill it out, I ordered, a 1Gb stick of DDR2 533Mhz ram, a 320Gb Hitachi Sata Hard Disk and a DVD+/-RW/RAM anything drive.
For those interested, the motherboard I ordered from LinITX.com and the rest of bits I got from SCAN Computers. After reading a couple of forums, there were good comments about LinITX and they had the latest rev of the Jetway board in stock which has a new heatsink and latest BIOS to cure some reported reliability problems with earlier models. SCAN I have used before and always offer good prices and service.
I bought a really neat case on eBay for £15.oo which was a real bargain. Brand new, including PSU, quite small and nicely engineered, and designed for uATX boards, but Mini-ITX are fine too. It is made by a company I’d not heard of before; In-WIN.

The motherboard arrived before all the rest of hardware so I have just loosely fitted the mobo, and am thinking about how to route the cables neatly. For that I’ll need some cable ties and some of the sticky pads for fixing cable ties to as there aren’t many useful holes in the case to tie onto.

The motherboard itself is really quite amazing. being the Mini-ITX format – it is really tiny, just 17cm (6.6in) square! Here’s a close up of it and you can clearly see the large heatsink that covers the processor, VRMs and northbridge I believe.
On Monday I should be getting the rest of the hardware so I’ll post some more as I complete the physical assembly.
Then we’ll get into the good stuff – installing lots of Open Source software…
Update: Whilst waiting for the hardware to arrive, I started thinking about a partitioning scheme. I am not a fan of LVM for performance reasons so I will be using physical partitions. Here’s my first draft.
| Machine | Part Type | Drive | Grub | Mount Point | File System | OS | Size (GB) |
| TBC | sda | hd0 | 320.000 | ||||
| Linux | sda1 | hd0,0 | /boot | ext2 | Linux | 0.243 | |
| Linux Swap | sda2 | hd0,1 | /swap | swap | 1.870 | ||
| Linux | sda3 | hd0,2 | / | ext3 | 4.000 | ||
| Extended | sda4 | ext part | |||||
| Linux | sda5 | hd0,4 | /usr | ext3 | 10.000 | ||
| Linux | sda6 | hd0,5 | /var | ext3 | 10.000 | ||
| Linux | sda7 | hd0,6 | /opt | ext3 | 10.000 | ||
| Linux | sda8 | hd0,7 | /srv | ext3 | 10.000 | ||
| Linux | sda9 | hd0,8 | /home | ext3 | 100.000 | ||
| Linux | sda10 | hd0,9 | /home/alord | ext3 | 40.000 | ||
| Linux | sda11 | hd0,10 | /home/hjlord | ext3 | 40.000 | ||
| Linux | sda12 | hd0,11 | /home/jlord | ext3 | 40.000 | ||
| Linux | sda13 | hd0,12 | /home/mlord | ext3 | 40.000 | ||
| Linux | sda14 | hd0,13 | /mnt/lfs | ext3 | 10.000 | ||
| 316.11 |
Also, I’m thinking about a name for the new server… All the computers in our network are named after characters from Terry Pratchett’s Discworld novels. So Far I have used: Twoflower, Rincewind, Moist, Binky, Gaspode and Mort. I am thinking about using: Eroll (the dragon), Ludmilla (a werewolf), Angua (another werewolf), Vimes (the commander of the watch), or Magrat (the young witch).
Anyone got any more good suggestions?
How to install a Squid & Dansguardian content filter on Ubuntu Server
Being a family man and a geek, our household has both children and lots of tech; there are 6 or so computers, various tablets, smartphones and other devices capable of connecting to, and displaying content from, the Internet.
For a while now I’ve wanted to provide a degree of content filtering on our network to prevent accidental, or deliberate, access to some of the worst things the Internet has to offer. What I didn’t want to do however was blindly hand control of this very important job to my ISP (as our beloved leader would like us all to do). Also, I absolutely believe this is one of my responsibilities as a parent; it is not anyone else’s. In addition, there are several problems I have with our government’s chosen approach:
- Filtering at the ISP network-side means the ISP must try and inspect all my internet traffic all of the time (what else could they potentially do with this information I wonder?)
- If the ISP’s filter prevents access to content which we feel that our kids should be able access, how can I change that? Essentially I can’t.
- I reckon that most kids of mid-teenage years will have worked out ways to bypass these filters anyway (see footnote) leaving more naive parents in blissful ignorance; thinking their kids are protected when in fact they are not.
With the above in mind I set about thinking how I could provide a degree of security on our home network using tried and trusted Open Source tools…
Firstly this is how our networked looked before.
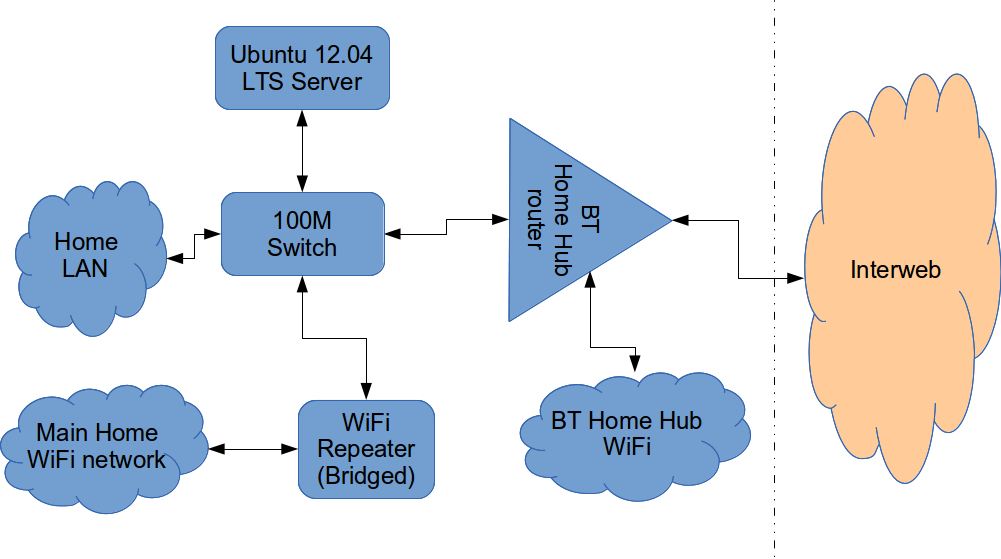
The BT Router is providing the DHCP service in the above diagram.
The Ubuntu 12.04 Server is called vimes (after Commander Vimes in the Discworld novels by Terry Pratchett) and is still running the same hardware that I described way back in 2007! It’s a low power VIA C7 processor, 1G of RAM and it now has a couple of Terabytes of disk. It’s mainly used as a central backup controller and dlna media store/server for the house.
I never did get Untangle working on it, but now it seemed like a good device to use to do some filtering… There are loads of instructions on the Internet about using Squid & Dansguardian but none covered quite what I wanted to achieve: A dhcp serving, bridging, transparent proxy content filter.
Architecturally, my network needed to look like this:
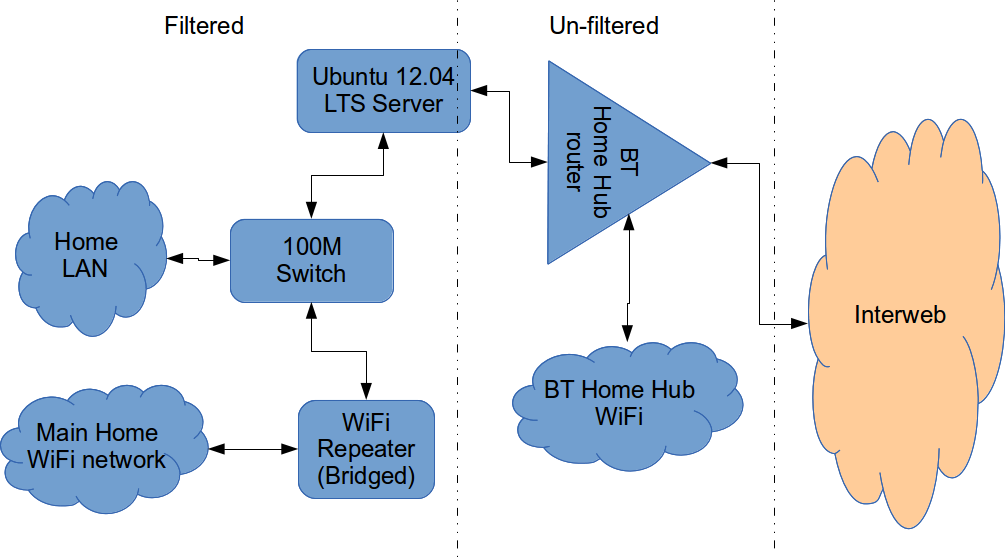
As you can see above, the physical change is rather negligible. The Ubuntu server now sits between the home LAN and the broadband router rather than as just another network node on the LAN as it was before.
The configuration of the server to provide what I required can be broken down into several steps.
1. Get the Ubuntu server acting as a transparent bridge
This is relatively straightforward. First install the bridge-utils package: sudo apt-get install bridge-utils
Then I made a backup of my /etc/network/interfaces file and replaced it with this one:
# This file describes the network interfaces available on your system
# and how to activate them. For more information, see interfaces(5).

# The loopback network interface
auto lo
iface lo inet loopback

# Set up interfaces
iface eth0 inet manual
iface eth1 inet manual

# Bridge setup
auto br0
iface br0 inet static
  bridge_ports eth0 eth1
  address 192.168.1.2
  broadcast 192.168.1.255
  netmask 255.255.255.0
  gateway 192.168.1.1
Probably the most interesting part of this file is where we assign a static IP address to the bridge itself. Without this I would not be able to connect to this server as both ethernet ports are now just transparent bridge ports so not actually listening for IP traffic at all.
(Obviously you will need to determine the correct IP address scheme for your own network)
2. Disable DHCP on the router and let Ubuntu do it instead
The reason for this is mostly down to the BT Home Hub… For some bizarre reason, BT determined that they should control what DNS servers you can use. Although I’m not using it right now, I might choose to use OpenDNS for example, but I can’t change the DNS addresses served by the BT Home Hub router so the only way I can control this is to turn off DHCP on the router altogether and do it myself.
Install the dhcp server: sudo apt-get install dhcp3-server
Tell the dhcp server to listen for requests on the bridge port we created before by editing the file /etc/default/isc-dchp-server so that the INTERFACES line reads: INTERFACES="br0".
Then edit the dhcp configuration file /etc/dhcp/dhcpd.conf so we allocate the IP addresses we want to our network devices. This is how mine looks:
ddns-update-style none;

default-lease-time 600;
max-lease-time 7200;

# If this DHCP server is the official DHCP server for the local
# network, the authoritative directive should be uncommented.
authoritative;

# Use this to send dhcp log messages to a different log file (you also
# have to hack syslog.conf to complete the redirection).
log-facility local7;

subnet 192.168.1.0 netmask 255.255.255.0 {
        range 192.168.1.16 192.168.1.254;

        option subnet-mask 255.255.255.0;
        option routers 192.168.1.1;

        #Google DNS
        option domain-name-servers 8.8.8.8, 8.8.4.4;
        #OpenDNS
        #option domain-name-servers 208.67.222.222, 208.67.220.220;

        option broadcast-address 192.168.1.255;
}
There are many options and choices to make regarding setting up your DHCP server. It is extremely flexible; you will probably need to consult the man pages and other on-line resources to determine what is best for you. Mine is very simple. It serves one block of IP addresses within the range 192.168.1.16 to 192.168.1.254 to all devices. Currently I’m using Google’s DNS servers but as you can see I’ve also added OpenDNS as a comment so I can try it later if I want to.
3. Install Squid and get it working as a transparent proxy using IPTables
This bit took a while to get right but, as with most things it seems to me, in the end the actual configuration is fairly straightforward.
Install Squid: sudo apt-get install squid.
Edit the Squid configuration file /etc/squid3/squid.conf… By default this file contains a lot of settings. I made a backup and then reduced it to just those lines that needed changing so it looked like this:
http_port 3128 transparent
acl localnet src 192.168.1.0/24
acl localhost src 127.0.0.1/255.255.255.255
acl CONNECT method CONNECThttp_access allow localnet
http_access allow localhost
always_direct allow allcache_dir aufs /var/spool/squid3 50000 16 256
Probably the most interesting part in the above is the word “transparent” after the proxy port. Essentially this means we do not have to configure every browser on our network: http://en.wikipedia.org/wiki/Proxy_server#Transparent_proxy. The final line of the file is just some instructions to configure where the cache is stored and how big it is. Again, there are tons of options available which the reader will need to find out for themselves…
To actually cause all the traffic on our LAN to go through the proxy rather than just passing through the bridge transparently requires a bit of configuration on the server using ebtables to allow easier configuration of the Linux kernel’s bridge & iptables to redirect particular TCP/IP ports to the proxy.
First I installed ebtables: sudo apt-get install ebtables
My very simplistic understanding of the following command is that it essentially tells the bridge to identify IP traffic for port 80 (http) and pass this up to the kernel’s IP stack for further processing (routing) which we then use iptables to handle.
sudo ebtables -t broute -A BROUTING -p IPv4 --ip-protocol 6 --ip-destination-port 80 -j redirect --redirect-target ACCEPT
Then we tell iptables to forward all port 80 traffic from the bridge to our proxy:
sudo iptables -t nat -A PREROUTING -i br0 -p tcp --dport 80 -j REDIRECT --to-port 3128
Restart Squid: sudo service squid3 restart
At this point http browser traffic should now be passing through your bridge and squid proxy before going on to the router and Internet. You can test to see if it is working by tailing the squid access.log file.
I found that squid seemed to be very slow at this juncture. So I resorted to some google fu and looked for some help on tuning the performance of the system. I came across this post and decided to try the configuration suggestions by adding the following lines to my squid.conf file:
#Performance Tuning Options
hosts_file /etc/hosts
dns_nameservers 8.8.8.8 8.8.4.4
cache_replacement_policy heap LFUDA
cache_swap_low 90
cache_swap_high 95
cache_mem 200MB
logfile_rotate 10
memory_pools off
maximum_object_size 50 MB
maximum_object_size_in_memory 50 KB
quick_abort_min 0 KB
quick_abort_max 0 KB
log_icp_queries off
client_db off
buffered_logs on
half_closed_clients off
log_fqdn off
This made an immediate and noticeable difference to the performance; enough so in fact that I haven’t yet bothered to go any further with tuning investigations. Thanks to the author Tony at last.fm for the suggestions.
4. Install Dansguardian and get it filtering content
sudo apt-get install dansguardian is all you need to install the application.
To get it to work with our proxy I needed to make a couple of changes to the configuration file /etc/dansguardian/dansguardian.conf.
First, remove or comment out the line at the top that reads UNCONFIGURED - Please remove this line after configuration I just prefixed it with a #.
Next we need to configure the ports by changing two lines so they look like this:
filterport = 8080
proxyport = 3128
Finally, and I think this is right, we need to set it so that Dansguardian and squid are both running as the same user so edit these two lines:
daemonuser = ‘proxy’
daemongroup = ‘proxy’
As you will see in that file, there are loads of other configuration options for Dansguardian and I will leave it up to the reader to investigate these at their leisure.
One suggestion I came across on my wanderings around the Interwebs was to grab a copy of one of the large collections of blacklisted sites records and install these into /etc/dansguardian/blacklists/. I used the one linked to from the Dansguardian website here http://urlblacklist.com/ which says it is OK to download once for free. As I understand it, having a list of blacklist sites will reduce the need for Dansguardian to parse every url or all content but this shouldn’t be relied on as the only mechanism as obviously the blacklist will get out-of-date pretty quickly.
Dansguardian has configurable lists of “phrases” and “weights” that you can tailor to suit your needs.
Now that’s installed we need to go back and reconfigure one of the iptables rules so that traffic is routed to Dansguardian rather than straight to Squid first and also enable communication between Squid and Dansguardian. You can flush (empty) the existing iptables rules by running iptables -F.
Now re-enter the rules as follows:
sudo iptables -t nat -A PREROUTING -i br0 -p tcp –dport 80 -j REDIRECT –to-port 8080
sudo iptables -t nat -A OUTPUT -p tcp –dport 80 -m owner –uid-owner proxy -j ACCEPT
sudo iptables -t nat -A OUTPUT -p tcp –dport 3128 -m owner –uid-owner proxy -j ACCEPT
sudo iptables -t nat -A OUTPUT -p tcp –dport 3128 -j REDIRECT –to-ports 8080
Restart Squid and Dansguardian: sudo service squid3 restart & sudo service dansguardian restart.
Now if you try to connect to the internet from behind the server your requests should be passed through Dansguardian and Squid automatically. If you try and visit something that is inappropriate your request should be blocked.
If it all seems to be working OK then I suggest making your ebtables and iptables rules permanent so they are restored after a reboot.
This can be achieved easily for iptables by simply running sudo iptables-save.
I followed these very helpful instructions to achieve a similar thing for the ebtables rule.
And that’s it. Try rebooting the server to make sure that it all still works without you having to re-configure everything. Then ask your kids and wife to let you know if things that they want to get to are being blocked. YOU now have the ability to control this – not your ISP… 😀
Footnotes
Be aware that on the network diagrams above the Wifi service provided by the BT Homehub router, and the LAN on the router side of the server, are not protected by these instructions. For me this is fine as the coverage of that Wifi network only makes it as far as the Kitchen anyway. And if it was more visible I could always change the key and only let my wife and I have access.
Also, I should make it clear that I know what I have above is not foolproof. I am completely aware that filtering/monitoring encrypted traffic is virtually impossible and there are plenty of services available that provide ways to circumvent what I have here. But I am also not naive and I reckon that if my kids have understood enough about networking and protocols etc. to be able to use tunnelling proxies or VPN services then they are probably mature enough to decide for themselves what they want to look at.
Of course there are plenty of additional mechanisms one can put in place if desired.
- Time-based filters preventing any Internet access at all at certain times
- Confiscation of Internet connected devices at bedtime
- Placing computers and gaming consoles in public rooms of the house and not in bedrooms
- And many more I’m sure you can think of yourself
As I see it, the point is simply this: As a parent, this is your responsibility…
Book Review: Trixbox CE 2.6 from Packt
[Please Note: If you use the book links from this site to Packt’s and decide to buy *any* book from their site, we will get a small commission that we’ll use towards the upkeep of our servers etc.]

Trixbox CE 2.6
Following on the heels of the Asterisk AGI Programming book review, Packt asked me to take a look at this one.
trixbox itself is a “packaged solution” comprising the operating system, Asterisk and a back-end/front-end configuration tool based on FreePBX. Personally, I’m from the “old school” when it comes to applications and I do like to know what makes them tick. So with Asterisk for example, when I first started looking at it I wanted to try and understand the configuration files and how it really worked so I installed from source and built everything from scratch. trixbox CE (Community Edition) on the other hand provides a user-friendly front end to Asterisk and wraps the whole thing up with an OS and delivers the bundle as a free download which is a ready-to-run ISO.
I guess one downside to the appliance package like trixbox is that you are tied into using the vendor’s choice of OS (CentOS in this instance) rather than your own. However, there are several advantages too: you know it works, has been tested all together and is supported, to whatever extent the community provides, by the producer. Anyway, this post isn’t a plug for Ubuntu or a review of the trixbox product itself. This is a review of a book about trixbox.
Before we get into the book though, for those who are unfamiliar with what trixbox is, their website tells us:
Beginning in 2004 as Asterisk@Home, the trixbox® Community Edition (CE) telephony application platform is the open source software that has quickly become the most popular Asterisk®-based distribution in the world. trixbox CE combines the best of the open source telephony tools into one easy-to-install package, along with the trixbox dashboard which provides a web-based interface to configure and manage a complete IP-PBX system. The most flexible and customizable communications platform available, trixbox CE averages over 65,000 downloads a month.
And the Wikipedia, in what must be one of the shortest pages in the entire Wikiverse, states:
Trixbox CE is 100% free and licensed under the GPLv2. Founding members of the trixbox CE project are Kerry Garrison and Andrew Gillis.
The trixbox CE brand is now owned by Fonality. Documentation, help and community forums can be found at www.trixbox.org
So that’s what the book is supposed to be telling us about. Let’s see if does…
It is subtitled “Implementing, managing, and maintaining an Asterisk-based telephony system” and written by Kerry Garrison. It’s quite a hefty tome weighing in at around 300 pages and is produced with Packt’s professional and easy-to-read layout & styling.
Chapter 1 is a brief introduction into the whole telephony scene covering subject such as what a PBX is. It then moves the reader toward an overview of the key features of Asterisk. For the most part the author has a good writing style and gets the information over with clarity. There is some good advice too; whilst obviously the author wants to explain why trixbox is the bees knees, he does make a very sensible comment early on:
While trixbox CE does make using Asterisk dramatically easier, it is certainly a good idea to really get in and learn all you can about the Asterisk configuration files. The more you know about how the system works under the hood the easier it will be for you to troubleshoot problems and even add features to your systems that aren’t available in trixbox CE.
Chapter 2 introduces the reader to trixbox itself:
- Going over some of it’s history,
- briefly mentioning the commercial trixbox packages available from Fonality,
- looking at the core components that make up trixbox
- trixbox features with lots of screenshots
- and what you will need to try out trixbox such as a PC, perhaps an analogue line card and a SIP phone.
There are lots of URLs scattered about where necessary directing the reader to further sources of reading or links to relevant vendors and downloads etc. For someone who is getting started this is a good resource and introduction.

trixbox console after first boot
In Chapter 3 we get shown how to install trixbox, even showing novice readers how to burn a CD if you happen to be unfortunate enough to be using Windows.
I followed this chapter through myself and installed trixbox CE 2.6 in a VirtualBox VM. The instructions were good with plenty of screenshots and comments guiding the reader through the process. (Just FYI, on my PC Lobsang, the entire install in a Virtual Machine took just about 3 minutes!. During the first boot up I noticed that it uses the excellent OSLEC echo canceller by default. That’s a plus mark from me.)

The trixbox status screen
Continuing through the chapter, after installing and doing a
yum update we are guided to the browser interface of trixbox…
The rest of Chapter 3 explains the various screens and basic navigation techniques to get around. Once again, I’d say the book is comprehensive and has plenty of screenshots and comments.
I’m not going to write about every chapter because, to be honest, the rest of the book is equally well put together and covers the subject in detail. Chapters 3 to 11 are what a good manual would be like. Having digested these chapters, the reader will know a good deal of how (and perhaps more importantly why) to plan, select hardware, install, setup, configure and maintain a trixbox system. There is plenty of “extra” information thrown in that explains what various features or aspects of the system are for and how they work. References to external sources abound and other vendors are given a decent mention where appropriate. Simply put, it’s good. If you want to use or manage a trixbox CE system this book would be an excellent resource in my opinion.
The final part of the book, Chapters 12 to 17, provide somewhat more orthogonal, but nevertheless valuable, information. We get to find out a little about:
- troubleshooting techniques and also where else to go to learn further skills,
- some of the additional trixbox utilities that are available like the endpoint manager,
- the basics of designing a decent callflow for the IVR,
- an introduction to a new end-user interface called HUD (Head Up Display),
- and an overview of the commercial trixbox Pro products.
In summary then, this is another good book from Packt that hits all the right buttons. It is well written, very detailed, and has good explanations of technologies and applications related to IP telephony.
As to it’s main purpose, that is explaining how to deploy and use trixbox CE, in my opinion this what a decent product manual should be like.
A shared “drop-box” using Samba [Updated]
Here’s a neat thing I managed to sort out the other day.
If you have read any of the “Untangle, Asterisk and File Server; All-in-One” series of posts before, then you will know that I’ve got a neat little VIA CN700 server for our home that is running all sorts of good stuff.
One of the things I have wanted to do for a while was to create a shared directory on the server so any family member can put stuff in there (like music files etc) but not be able to delete anything so as to prevent accidentally removing thousands of MP3s or irreplaceable digital pictures for example. This facility is apparently called a “drop-box”.
Hmmmm. Now let me think… Linux file permissions are rwx: Read Write eXecute. So, if you have write access, you can delete too. How can I fix this?
After some Googling and reading the Samba documentation it is actually pretty straightforward. Here’s how to make a drop-box on a Linux file server using Samba (CIFS) as the file sharing protocol and access mechanism.
- Create a directory somewhere on your server and give it a sensible name: I called it “shared” and put it under the
/hometree. - Create a Linux group for all users who you want to access the drop-box: I called the group “shared”. Then add your users to that group.
- Using sudo or running as root, change the the directory settings as follows:
chmod 770 shared. This prevents access to the directory by anyone other than root, and the owner and group members.chown nobody:shared shared. This changes the directory ownership to a user “nobody” and the group “shared”. It is important that you use a user who is NOT a member of the shared group. Any user will do, but it must be defined in/etc/passwd. I chose “nobody” as it has very minimal permissions and is unlikely to pose any sort of security hazard. On my server, the user nobody is configured thus:nobody:x:99:99:Unprivileged User:/dev/null:/bin/falsechmod g+s shared/. This sets the directory’s SGID bit so that any new files or directories created in our shared directory will have their group id set to that of the of the shared directory. This ensures all members of the shared group can read the contents.chmod +t sharedThis sets the “sticky bit” of our shared directory. On Linux, setting the sticky bit, means items inside the directory can be renamed or deleted only by the item’s owner, the directory’s owner, or the superuser; without the sticky bit set, any user with write and execute permissions for the directory can rename or delete contained files, regardless of owner.- Here’s a listing of the directory showing how it should look now:
drwxrws--T 3 nobody shared 62 2008-04-15 21:48 shared
Now we can set-up our share in Samba as follows:
[shared]

comment = Our Shared Data/Media

path = /home/shared/

read only = no

valid users = @shared

browseable = yes

inherit owner = yes
The valid users @shared line tells samba that only members of the “shared” group can access this share. And the line inherit owner = yes is what makes it all work. This tells samba to set the owner of any files created to the owner of the directory we are in. In this case the owner is “nobody”. As the sticky bit is set on this directory, only the user “nobody” or the superuser can remove files as their ownership is instantly changed by Samba when first created from the actual user to the user “nobody”.
After dropping a file into the shared directory over a samba connection the listing looks like this:
-rwxr--r-- 1 nobody shared 1272366 2008-04-17 14:17 14_-_Jubilee.mp3.
See how the file is owned by “nobody:shared” and only has group and other read set.
It might sound like a bit of a palaver, but it doesn’t take very long to set up. This is a very useful way of creating drop-boxes for many kinds of applications.
I hope someone finds this useful, and please leave a comment if you do!
[UPDATE]
A big thanks to Simbul who noted the obvious flaw in my suggestion. Although you could safely drop files into this folder, you couldn’t create directories which was a bit of a PITA to be honest. However Simbul made a simple addition to the [shared] section that fixes this issue (See the comments at the bottom of this post for details):
[shared]

comment = Our Shared Data/Media

path = /home/shared/

read only = no

valid users = @shared

browseable = yes

inherit owner = yes
Add the following two lines:
directory mode = 3770

force directory mode = 3770
And that’s it. Thanks Simbul. It works a treat.

