Untangle, Asterisk PBX and File Server; All-in-One. Part 8
If you’ve been following the story so far you’ll now where I am. If you haven’t, please go back to Part 1 and read from there. Alternatively if you click on the Untangle tag in the tag cloud then you should get all of the posts so far.
Hi all,
I’ve not yet got any further with the Untangle portion, but pretty much everything else is now in place and working 🙂
Last night I built and installed the few remaining applications that are necessary to support my objectives:
- MySQL (I need this for Joomla! and vtiger)
- Postgresql (I need this for untangle)
- Apache
- PHP (and some associated libraries for added functionality, i.e. HTML-Tidy, mm, libmcrypt, mhash…)
I have also been thinking about what it is actually I am trying to achieve. I find a picture really helps so here’s a block diagram of the applications I want and how they should interface to the outside world…
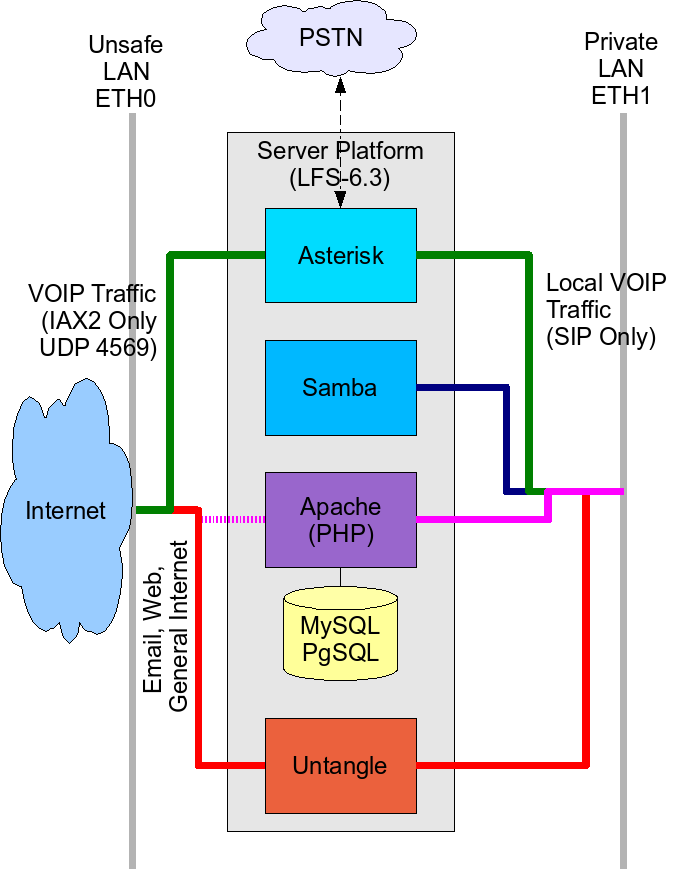
This was a good exercise that helped me to understand the flow of traffic and what needs to be prevented from passing through the server. The dotted line from Apache to the Internet is because I’m not sure yet whether I’ll actually provide any sort of public web presence from this box or not. I doubt it somehow but you never know…
If anyone has any comments or suggestions for improvements I’d be happy to hear them. I made the original diagram in OOo draw. Here’s the original file if you want to use it or alter it. As with all other stuff on here, its CC licensed.
Untangle, Asterisk PBX and File Server; All-in-One. Part 7.1 (OSLEC)
O.K. I said I’d write a bit about an excellent new echo canceller which happens to work with Asterisk. Here it is it’s called OSLEC the Open Source Line Echo Canceller and it’s written by a chap called David Rowe.
As readers may recall, I’ve built a small home server (VIA CN700) on which I plan to run Asterisk, Samba and Untangle. Samba is up and running and Asterisk is too. I have a single port, very cheap (about £15 inc postage from the USA) x100p card providing an interface to a normal analogue PSTN telephone line.
When we got everything working, we noticed a great deal of echo on voice calls over the x100p. Lots of playing with gains and various settings in the zaptel configuration failed to make any noticeable difference.
I came across this site whilst looking for something completely different and started to read… It sounded like just the thing. A bit of jiggery and a quick patch to the zaptel-1.4.5.1 sources – thanks to the asterisk mailing list – and I got the OSLEC canceller working.
Basically here’s what to do:
- Build the OSLEC module (it will need to find your kernel sources – just like zaptel) according to the instructions on the website. Once built and you’ve checked that you can install it by inserting the module into your running kernel, copy it (oslec.ko) to your kernel’s loadable module directory: on my system the zaptel modules reside in
/lib/modules/2.6.23/misc/so that’s where I put the oslec module too. - Patch your zaptel source tree (if you have version 1.4.5.1 you will need to patch
Makefile.kernel26or OSLEC will never get loaded) and rebuild and re-install as described. (Caution: Backup your/etc/zaptel.conf, /etc/asterisk/zapata.confand your modified SysV init scripts so you can simply overwrite the default files installed when you rerunmake installon the zaptel sources.) - Edit your zapata.conf so the following are as below:
echocancel=yes

echocancelwhenbridged=no

;echotraining=400 - Reload everything (if in doubt, stop asterisk and zaptel using your SysV init scripts, e.g # /etc/rc.d/init.d/{asterisk,zaptel} stop. Then start them again. When zaptel starts you should see a message saying Echo canceller OSLEC or something like that; if it says MG2 then it isn’t working so you need to go back and recheck your build and patching and module loading.
That’s it.
Now make or receive a call through your cheap x100p card and marvel at the clear echo free sound! It worked brilliantly for me. Of course YMMV but it is definitely worth a try. Most of the reports on the ‘net are incredibly positive about this.
Untangle, Asterisk PBX and File Server; All-in-One. Part 7
There’s no Untangle in this installment – I’m awaiting a new kernel from the developers before I can get any further; it should be here shortly however.
In the previous article of this series I mentioned that I’d explain how to get Asterisk built and running as a non-root user. It wasn’t too hard to be honest but I’ll document it anyway.
The problem: Asterisk by default, when compiled from source, expects to be run as root. For userspace applications, this is NEVER a good idea in my opinion. After all we’re running on a multi user system that can support non-root processes – unlike Windows – so we really should… 😉
The solution for Asterisk-1.4.13 on my LFS based system, is as follows:
Build any hardware add-ons and codecs you need before building Asterisk. I built the Zaptel module for my x100p card and the Speex Open Source VBR codec. The zaptel module needs to find your kernel source tree (usually in /usr/src/linux-2.6.x.x). To build the zaptel source:
./configure --prefix=/usr (to select/deselect the modules you wish to build)
make menuselect
make
then as root:
make install
and optionally:
make config This will install the SysV init scripts and some default configuration files. You may need to modify the init scripts depending on your system.
Simply follow a similar process for the Speex codec…
For Asterisk, start off by creating a group and user that will run and own the asterisk process and files (select {G,U}IDs and names that are appropriate for your system).
groupadd -g 75 asterisk

useradd -c "Asterisk PBX" -d /var/lib/asterisk -g asterisk -s /bin/false -u 75 asterisk
Edit the Makefile in the top of the asterisk source tree so that the line:
ASTVARRUNDIR=${localstatedir}/run becomes ASTVARRUNDIR=${localstatedir}/run/asterisk
Then build as normal
./configure --prefix=/usr (Turn on/off various modules and options. Select sound files/language/format and extra sounds. Type “s” to save and exit)
make menuselect
make
Then as root:
make install
Asterisk is now installed. But because we will run the process as non-root it needs write permissions for these directories and their contents:
/var/lib/asterisk, /var/log/asterisk, /var/run/asterisk, /var/spool/asterisk, /dev/zap/*.
If you installed the zaptel modules and used the ‘make config’ command, a udev rules file (zaptel.rules) will be written to /etc/udev/rules.d. This enables, by default, udev to create the zaptel device files as user:group asterisk. If you chose another name above you will need to edit this file accordingly.
O.K., lets sort out the ownership and access to the files Asterisk needs. First change the owner:
chown -R asterisk:asterisk /var/{lib/asterisk,log/asterisk,run/asterisk,spool/asterisk}
Now set read/write only by owner, read only by group and no access by other:
chmod 750 /var/{lib/asterisk,log/asterisk,run/asterisk,spool/asterisk}

chmod -R o= /var/{lib/asterisk,log/asterisk,run/asterisk,spool/asterisk}
This switch (chmod -R o=) is pretty cool by the way. It removes all access to all files and directories for the “other” classification, effectively setting them to “0” but does not change or overwrite any of the permissions for owner and/or group access.
The asterisk process itself only needs read permission for the configuration directory (/etc/asterisk) and its contents (almost1):
chown -R root:asterisk /etc/asterisk

chmod 750 /etc/asterisk

chmod 640 /etc/asterisk/*
Some of Asterisk’s ‘.conf’ files contain cleartext passwords and other potentially sensitive information. Setting the files as above permits read/write only by the user root and read only by members of the group asterisk.
That’s it basically. When you start asterisk from the SysV init scripts, pass the following arguments to have it run, safely, as your new user:
asterisk ${DEBUG} ${ZAP_TIMING} -U ${USER} -G ${GROUP}
In my startup script, I’ve set those constants above to be:
# If you want debug messages to the console and the logs switch the

# comments below

DEBUG=""

#DEBUG="-d"
# The user and group we created earlier

GROUP="asterisk"

USER="asterisk"
# Use this if you want to limit the maximum number of simultaneous calls

# to prevent system failure for example

MAXCALLS=""

#MAXCALLS="-m 20"
# If you have a Zaptel card/timing source, enable it here

#ZAP_TIMING=""

ZAP_TIMING="-I"
That’s it.
When asterisk starts, it will run as the user and group defined above. In the next installment, I will write a bit about a fantastic new echo canceler which sorts out cheap x100p cards and makes them work properly… It’s really excellent.
1. Except for voicemail.conf. When a user changes their pin asterisk writes these changes to the voicemail.conf file.
Untangle, Asterisk PBX and File Server; All-in-One. Part 6
If you’ve been following the story so far you’ll now where I am. If you haven’t, please go back to Part 1 and read from there. Alternatively if you do a search for Untangle in the little search box top-left then you should get all of the posts so far.
I have stalled on Untangle due to kernel issues already well documented on here before. The good news is the guys from Untangle are in contact with me and are working on a new kernel for the upcoming 5.1 release. I am hoping to get something to play with in the next few weeks. And it will most likely be based on a 2.6.22 release which is excellent news as that has direct support for my hardware.
So in the meantime I have been installing Samba – which is fairly straightforward – and Asterisk which is a bit more involved.
As you will know, I am using the Linux From Scratch (LFS) project for this server’s operating system. From the same stable, comes the Beyond Linux From Scratch (BLFS) book that contains many (i.e. hundreds) excellent resources and instructions for installing various applications; including Samba. So I will not go into detail about how to build Samba here. The configuration of Samba for my home network is another subject and I will discuss this further once I’m happy with the set up.
Asterisk, the Open Source PBX, is another ballgame entirely. To build asterisk itself from source is not too hard. From an LFS core, there were no dependencies to satisfy first. If you are on a major distro however, you will certainly need to add quite a few -dev packages to your system first. With Ubuntu they have a meta package called build-essentials which will certainly help. Here is a good starting point for information: http://www.voip-info.org/wiki/index.php?page=Asterisk+installation+tips.
To build asterisk for testing purposes, build and install as root*. As I have an x100p analogue FXO card I need to install the zaptel driver first like this (after extracting the source tarball and cd‘ing into it):
./configure --prefix=/usr &&

make menuselect &&

make &&

make install &&

make config
Both this and the Asterisk build expect your kernel source tree (the headers) to be in /usr/src/linux-`uname -r` by default. The make menuselect command will enable you to select which hardware drivers you need and to disable the building of those you do not. make config will install a rc.d script for init so the card is properly initialised during boot-up. Although I had to hack this a bit to work with the LFS/BLFS boot scripts. Even if you do not have any analogue cards, you are recommended to install the zaptel drivers as they can provide timing a source for Inter-Asterisk Trunks (IAX) and conferencing via the ztdummy module.
Once the zaptel modules are installed, repeat a similar process for the Asterisk source:
./configure --prefix=/usr &&

make menuselect &&

make &&

make install
This should build and install the Asterisk server into the /usr hierarchy with the configuration files in /etc/asterisk and the runtime information and sound files under /var. When you run make menuselect pay attention, you can choose whether to install various language files, codecs, add-on sounds (I installed the extra sound files) and other goodies. Here’s a page that should help you get going once again: http://www.voip-info.org/wiki/index.php?page=Asterisk+Compile.
You can elect to install sample configuration files, by typing make samples. This will basically give you a working PBX out of the box for testing purposes. This is sort-of-useful but the files are very complicated and hard to follow, although they are well commented so they make a good reference. I quickly removed the whole /etc/asterisk directory to somewhere else (to keep for reference) and started from scratch with a clean directory.
Learning how to setup asterisk is time consuming. Then comes that moment when, after reading for hours and looking into lots of text files and learning about channels, priorities, applications and contexts, suddenly the penny drops! It will become clear. But don’t rush it and I would strongly recommend NOT going for one of the packaged appliance builds that come with a GUI front end to start with. Why? Because you will never learn what’s under the hood and you will be limited by the GUI designer’s ideas of what you need to configure. Once you ‘get it’, by all means use a GUI, but not before…
For testing you will need a phone 🙂 I know. Obvious but it had to be said. There are plenty of SIP phones on the market that are inexpensive, and there are several “soft phones” that you can run on your PC and use a headset, or mic & speakers. I chose to go the soft phone route for now and tried the following three soft phones for Linux.
- Ekiga: Formerly Gnome Meeting. Initially I thought this was great but I have had several weird issues with DTMF and sound quality, so this is on the back-burner for now.
- Wengo Phone: Looks nice, seems to work O.K. but I preferred the User Interface and overall experience of the final one in my list.
- Twinkle: This just works. Has a simple and easy to use interface and is a cinch to setup. My personal favourite of the three (apart from the name, that is.)
These soft phones I used purely for SIP connectivity on my local LAN to the Asterisk server. There are others that can connect to Asterisk using IAX or H.323 but I didn’t try those, nor see a need to.
Here are a couple of resources I found very helpful along the way:
- The voip-info.org wiki for Asterisk
- This excellent short slide presentation (They say a picture paints a thousand words don’t they…)
- This e-book: The “TFOT” Book (If this site is down, google for it. It’s available from lots of other sources)
- And google. There is loads of information out there if you are prepared to look for it.
Along with my business partner who has installed Asterisk on his similarly small and low-powered server, we now have fully networked digital PBX functionality (IAX trunking between our servers), Voicemail (with email notification and forwarding), and Dial-in & Dial-out via the PSTN (through the x100p card on my box). Next is to try conferencing and call parking.
 With this little server (shown here with the x100p card installed), I now have Samba, providing a home network file server for all the family, Asterisk running happily and providing advanced digital telephony throughout the house. And all using free and Open Source software. Once I’d bought the hardware, the software costs were zero, and will be zero. How much is Windows Home Server? And more to the point, why do you need it? Oh yes, does it also have a fully fledged enterprise grade digital PBX? And is it secure? (Just like the rest of Windows… lol)
Once I’ve nailed the configuration down and got asterisk running securely*, I’ll post some more on this including configuration details.
* The usual way to install Asterisk from source is by, and as, root. For a test-bed that’s no problem but for a production environment with direct internet connectivity (as this device will have) this is not a good idea. I will spend a little time developing an installation procedure that will install it as a non-root user and with limited privilages. The suggested mechanisms I have found on-line are not quite as I would like them. I try and keep to the FHS where possible and maintain a “tight” ship. This process I will also document once it’s nailed…
Untangle, Asterisk PBX and File Server; All-in-One. Part 5
If you’ve been following the story so far you’ll now where I am. If you haven’t, please go back to Part 1 and read from there.
I’ve been a bit busy recently so haven’t had as much time as I’d like to crack on with this. However, I’ve actually come to a bit of a halt regarding Untangle due to the kernel…
I managed to get the initial Rake (Ruby’s Make) build scripts to run to completion on my LFS-6.3 system :-). For those who are interested, after editing some of the Rake files for hard-coded environment variables, I had to drop down to the last version 5 release of the JDK. Version 6 is not supported due to the issues mentioned in part 4 of this series.
After the build completed, trying to run Untangle caused it to barf badly. But I wasn’t surprised by this. I hadn’t installed Postgresql, and I discovered I was missing a setting in my kernel config (IP Userspace queueing via NETLINK (OBSOLETE)) which caused this file ip_queue_maxlen to be created in /proc. There was another file in /proc missing too: icmp_frag_accept. It was searching for this, that led me to get to the bottom of the kernel issues.
After some dialogue on their mailing lists, it became clear that the build process was not going to be as simple as I’d first thought. The current version of Untangle (5.0.2) uses a very heavily patched Debian kernel (2.6.16-ck11). The method they use for patching relies on some debian tools which, seeing as I am building on LFS, I don’t have – nor do I really want.
A little side note: In the Untangle kernel, they are using the now infamous CK scheduler from Con Kolivas, that is no longer being developed for, or ported to, the main kernel tree (Google for Con Kolivas to read about the saga). I’m not sure how this will affect the UT project in the long run but it is quite an interesting area of kernel development and fuelled some big arguments.
When I have some more time to concentrate, I’ll try and work out what is really needed and see if I can patch my recent 2.6.22.5 kernel. They are developing a new release of Untangle (5.1) which may well give me what I need anyway; the ability to run other apps on the same platform and a more modern kernel version. Watch this space…
In the meantime, I have managed to get Asterisk installed. It’s a fairly straightforward CMMI (configure, make, make install) install for the needed packages (in build order): zaptel-1.4.5.1 drivers for the x100p card, asterisk-1.4.11 and asterisk-addons-1.4.2.
Configuring asterisk however is another ball game entirely. It is fairly complicated and involves a steep learning curve. Although thankfully, there are plenty of resources available on-line. I strongly recommend to get the Creative Commons Licensed O’Reilly book from 2005: Asterisk – The Future of Telephony which is widely available on-line and is an excellent resource. Also, there are lots of good blogs 😉 and other online resources to help you get started.
In addition, you will almost certainly need a SIP phone of some description. I’m currently using the Ekiga softphone as it is open source and happily runs on Ubuntu (it’s gnome based). It was originally called GnomeMeeting.
I can now make and receive calls locally between the Asterisk server and my PSTN line. Next is to try and get it work over a NAT’ed firewall to Alan Bell’s (my business partner) Asterisk server. Using IAX2 (Inter-Asterisk Exchange protocol) seems the way to ge here as it was specifically designed to use a single IP port, as opposed to SIP that uses independent ports (and potentially many of them) for connection management (UDP) and actual call data (RDP). Using SIP requires you to open up hundreds, if not thousands, of ports on your firewall. More reading and learning to follow.
Laterz…
Untangle, Asterisk PBX and File Server; All-in-One. Part 4
If you’ve been following the story so far you’ll now where I am. If you haven’t go back to Part 1 and start from there.
The server itself is running smoothly and seemingly reliably. Building Untangle (ut for short) is proving somwhat more problematic, although to be honest, it is what I expected.
After fixing a few hardcoded environment variables (JAVA_HOME) in the [m]rakefiles and changing a class declaration from com.sun.java.swing to javax.swing, the build is failing due to some Java declarations which are requesting an unsupported feature. If anyone is interested, here’s a tarball of the build-log so far: Untangle Build Log
A bit of Googling has thrown up some information that using the SwingUtilities2 package is a big no-no. Even in the JDK 5 version. It has been moved out of the way in JDK 6 and is, apparently, unnecessary due to changes in the way swing now deals with anti-aliasing and sub-pixel font rendering.
Anyway, the guys at Untangle are being very helpful, I’ve got subscribed to their developer mailing list and, hopefully, we’ll have a fix soon.
If there are any Java gurus out there who could suggest an alternative way of dealing with this using the JDK 6 release, the error is caused in this try/catch block:
try{ ((JComponent)nameJLabel).putClientProperty(javax.swing.SwingUtilities2.AA_TEXT_PROPERTY_KEY, new Boolean(true)); }

catch(Throwable t){}
or here in the util class:
public static void setAAClientProperty(Component parentComponent, boolean isAAEnabled){

if( parentComponent instanceof JComponent ){

try{ ((JComponent)parentComponent).putClientProperty(javax.swing.SwingUtilities2.AA_TEXT_PROPERTY_KEY, new Boolean(isAAEnabled)); }

catch(Throwable t){}
Meanwhile, I’ve been playing with file systems and sorting out the partitioning to my liking. Reading several articles on-line I have decided to use XFS for the file system on most partitions. According to what I can find, it offers generally better performance and scalability than the more commonly used ext2/3. It certainly takes up less disk space, I gained 4GB on the biggest partition /home: ext3 = 260GB v XFS = 264GB. On the smaller partitions (4.7GB) I gained 100MB when going from ext3 to XFS and lost that silly and irrelevant lost+found directory.
Keep Tuned, and don’t hesitate to comment 🙂

