How to install a Squid & Dansguardian content filter on Ubuntu Server
Being a family man and a geek, our household has both children and lots of tech; there are 6 or so computers, various tablets, smartphones and other devices capable of connecting to, and displaying content from, the Internet.
For a while now I’ve wanted to provide a degree of content filtering on our network to prevent accidental, or deliberate, access to some of the worst things the Internet has to offer. What I didn’t want to do however was blindly hand control of this very important job to my ISP (as our beloved leader would like us all to do). Also, I absolutely believe this is one of my responsibilities as a parent; it is not anyone else’s. In addition, there are several problems I have with our government’s chosen approach:
- Filtering at the ISP network-side means the ISP must try and inspect all my internet traffic all of the time (what else could they potentially do with this information I wonder?)
- If the ISP’s filter prevents access to content which we feel that our kids should be able access, how can I change that? Essentially I can’t.
- I reckon that most kids of mid-teenage years will have worked out ways to bypass these filters anyway (see footnote) leaving more naive parents in blissful ignorance; thinking their kids are protected when in fact they are not.
With the above in mind I set about thinking how I could provide a degree of security on our home network using tried and trusted Open Source tools…
Firstly this is how our networked looked before.
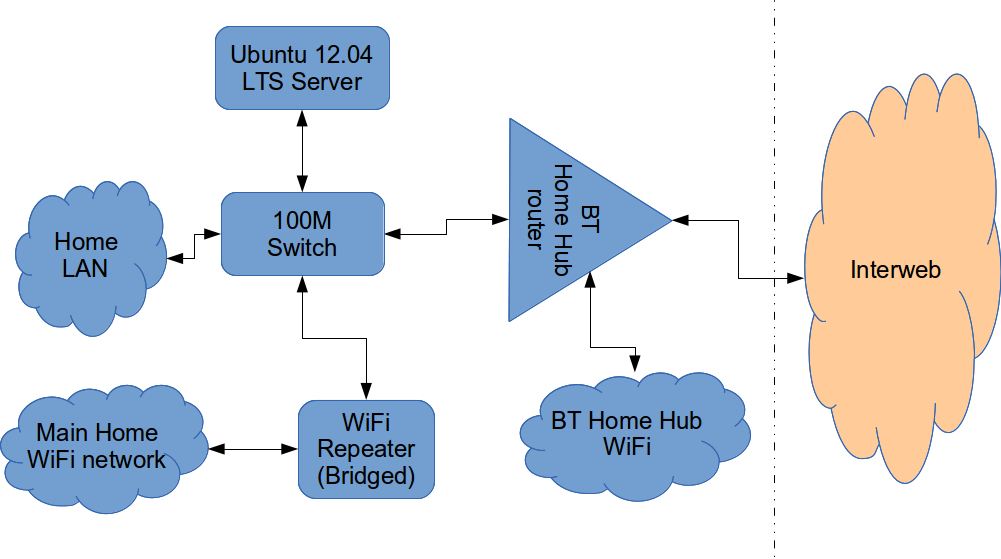
The BT Router is providing the DHCP service in the above diagram.
The Ubuntu 12.04 Server is called vimes (after Commander Vimes in the Discworld novels by Terry Pratchett) and is still running the same hardware that I described way back in 2007! It’s a low power VIA C7 processor, 1G of RAM and it now has a couple of Terabytes of disk. It’s mainly used as a central backup controller and dlna media store/server for the house.
I never did get Untangle working on it, but now it seemed like a good device to use to do some filtering… There are loads of instructions on the Internet about using Squid & Dansguardian but none covered quite what I wanted to achieve: A dhcp serving, bridging, transparent proxy content filter.
Architecturally, my network needed to look like this:
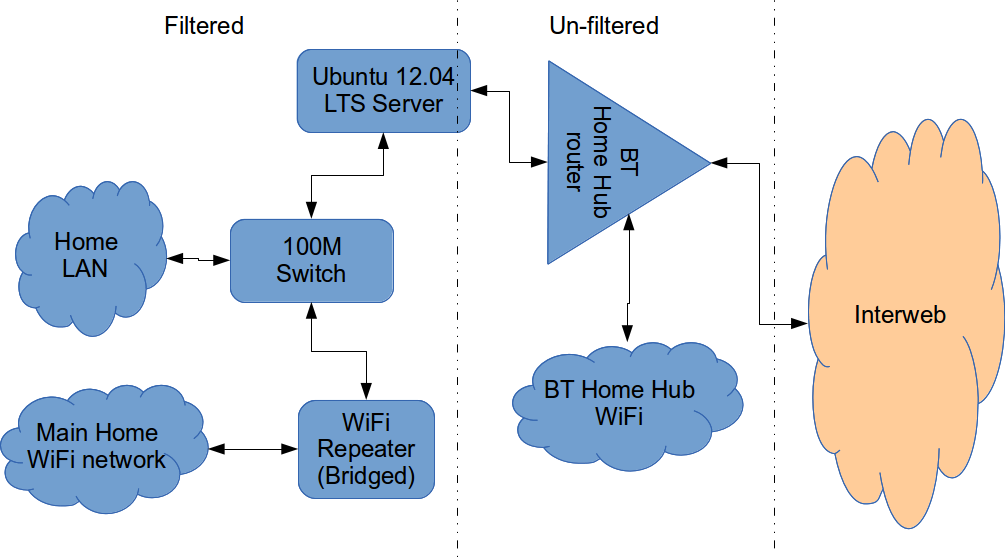
As you can see above, the physical change is rather negligible. The Ubuntu server now sits between the home LAN and the broadband router rather than as just another network node on the LAN as it was before.
The configuration of the server to provide what I required can be broken down into several steps.
1. Get the Ubuntu server acting as a transparent bridge
This is relatively straightforward. First install the bridge-utils package: sudo apt-get install bridge-utils
Then I made a backup of my /etc/network/interfaces file and replaced it with this one:
# This file describes the network interfaces available on your system
# and how to activate them. For more information, see interfaces(5).

# The loopback network interface
auto lo
iface lo inet loopback

# Set up interfaces
iface eth0 inet manual
iface eth1 inet manual

# Bridge setup
auto br0
iface br0 inet static
  bridge_ports eth0 eth1
  address 192.168.1.2
  broadcast 192.168.1.255
  netmask 255.255.255.0
  gateway 192.168.1.1
Probably the most interesting part of this file is where we assign a static IP address to the bridge itself. Without this I would not be able to connect to this server as both ethernet ports are now just transparent bridge ports so not actually listening for IP traffic at all.
(Obviously you will need to determine the correct IP address scheme for your own network)
2. Disable DHCP on the router and let Ubuntu do it instead
The reason for this is mostly down to the BT Home Hub… For some bizarre reason, BT determined that they should control what DNS servers you can use. Although I’m not using it right now, I might choose to use OpenDNS for example, but I can’t change the DNS addresses served by the BT Home Hub router so the only way I can control this is to turn off DHCP on the router altogether and do it myself.
Install the dhcp server: sudo apt-get install dhcp3-server
Tell the dhcp server to listen for requests on the bridge port we created before by editing the file /etc/default/isc-dchp-server so that the INTERFACES line reads: INTERFACES="br0".
Then edit the dhcp configuration file /etc/dhcp/dhcpd.conf so we allocate the IP addresses we want to our network devices. This is how mine looks:
ddns-update-style none;

default-lease-time 600;
max-lease-time 7200;

# If this DHCP server is the official DHCP server for the local
# network, the authoritative directive should be uncommented.
authoritative;

# Use this to send dhcp log messages to a different log file (you also
# have to hack syslog.conf to complete the redirection).
log-facility local7;

subnet 192.168.1.0 netmask 255.255.255.0 {
        range 192.168.1.16 192.168.1.254;

        option subnet-mask 255.255.255.0;
        option routers 192.168.1.1;

        #Google DNS
        option domain-name-servers 8.8.8.8, 8.8.4.4;
        #OpenDNS
        #option domain-name-servers 208.67.222.222, 208.67.220.220;

        option broadcast-address 192.168.1.255;
}
There are many options and choices to make regarding setting up your DHCP server. It is extremely flexible; you will probably need to consult the man pages and other on-line resources to determine what is best for you. Mine is very simple. It serves one block of IP addresses within the range 192.168.1.16 to 192.168.1.254 to all devices. Currently I’m using Google’s DNS servers but as you can see I’ve also added OpenDNS as a comment so I can try it later if I want to.
3. Install Squid and get it working as a transparent proxy using IPTables
This bit took a while to get right but, as with most things it seems to me, in the end the actual configuration is fairly straightforward.
Install Squid: sudo apt-get install squid.
Edit the Squid configuration file /etc/squid3/squid.conf… By default this file contains a lot of settings. I made a backup and then reduced it to just those lines that needed changing so it looked like this:
http_port 3128 transparent
acl localnet src 192.168.1.0/24
acl localhost src 127.0.0.1/255.255.255.255
acl CONNECT method CONNECThttp_access allow localnet
http_access allow localhost
always_direct allow allcache_dir aufs /var/spool/squid3 50000 16 256
Probably the most interesting part in the above is the word “transparent” after the proxy port. Essentially this means we do not have to configure every browser on our network: http://en.wikipedia.org/wiki/Proxy_server#Transparent_proxy. The final line of the file is just some instructions to configure where the cache is stored and how big it is. Again, there are tons of options available which the reader will need to find out for themselves…
To actually cause all the traffic on our LAN to go through the proxy rather than just passing through the bridge transparently requires a bit of configuration on the server using ebtables to allow easier configuration of the Linux kernel’s bridge & iptables to redirect particular TCP/IP ports to the proxy.
First I installed ebtables: sudo apt-get install ebtables
My very simplistic understanding of the following command is that it essentially tells the bridge to identify IP traffic for port 80 (http) and pass this up to the kernel’s IP stack for further processing (routing) which we then use iptables to handle.
sudo ebtables -t broute -A BROUTING -p IPv4 --ip-protocol 6 --ip-destination-port 80 -j redirect --redirect-target ACCEPT
Then we tell iptables to forward all port 80 traffic from the bridge to our proxy:
sudo iptables -t nat -A PREROUTING -i br0 -p tcp --dport 80 -j REDIRECT --to-port 3128
Restart Squid: sudo service squid3 restart
At this point http browser traffic should now be passing through your bridge and squid proxy before going on to the router and Internet. You can test to see if it is working by tailing the squid access.log file.
I found that squid seemed to be very slow at this juncture. So I resorted to some google fu and looked for some help on tuning the performance of the system. I came across this post and decided to try the configuration suggestions by adding the following lines to my squid.conf file:
#Performance Tuning Options
hosts_file /etc/hosts
dns_nameservers 8.8.8.8 8.8.4.4
cache_replacement_policy heap LFUDA
cache_swap_low 90
cache_swap_high 95
cache_mem 200MB
logfile_rotate 10
memory_pools off
maximum_object_size 50 MB
maximum_object_size_in_memory 50 KB
quick_abort_min 0 KB
quick_abort_max 0 KB
log_icp_queries off
client_db off
buffered_logs on
half_closed_clients off
log_fqdn off
This made an immediate and noticeable difference to the performance; enough so in fact that I haven’t yet bothered to go any further with tuning investigations. Thanks to the author Tony at last.fm for the suggestions.
4. Install Dansguardian and get it filtering content
sudo apt-get install dansguardian is all you need to install the application.
To get it to work with our proxy I needed to make a couple of changes to the configuration file /etc/dansguardian/dansguardian.conf.
First, remove or comment out the line at the top that reads UNCONFIGURED - Please remove this line after configuration I just prefixed it with a #.
Next we need to configure the ports by changing two lines so they look like this:
filterport = 8080
proxyport = 3128
Finally, and I think this is right, we need to set it so that Dansguardian and squid are both running as the same user so edit these two lines:
daemonuser = ‘proxy’
daemongroup = ‘proxy’
As you will see in that file, there are loads of other configuration options for Dansguardian and I will leave it up to the reader to investigate these at their leisure.
One suggestion I came across on my wanderings around the Interwebs was to grab a copy of one of the large collections of blacklisted sites records and install these into /etc/dansguardian/blacklists/. I used the one linked to from the Dansguardian website here http://urlblacklist.com/ which says it is OK to download once for free. As I understand it, having a list of blacklist sites will reduce the need for Dansguardian to parse every url or all content but this shouldn’t be relied on as the only mechanism as obviously the blacklist will get out-of-date pretty quickly.
Dansguardian has configurable lists of “phrases” and “weights” that you can tailor to suit your needs.
Now that’s installed we need to go back and reconfigure one of the iptables rules so that traffic is routed to Dansguardian rather than straight to Squid first and also enable communication between Squid and Dansguardian. You can flush (empty) the existing iptables rules by running iptables -F.
Now re-enter the rules as follows:
sudo iptables -t nat -A PREROUTING -i br0 -p tcp –dport 80 -j REDIRECT –to-port 8080
sudo iptables -t nat -A OUTPUT -p tcp –dport 80 -m owner –uid-owner proxy -j ACCEPT
sudo iptables -t nat -A OUTPUT -p tcp –dport 3128 -m owner –uid-owner proxy -j ACCEPT
sudo iptables -t nat -A OUTPUT -p tcp –dport 3128 -j REDIRECT –to-ports 8080
Restart Squid and Dansguardian: sudo service squid3 restart & sudo service dansguardian restart.
Now if you try to connect to the internet from behind the server your requests should be passed through Dansguardian and Squid automatically. If you try and visit something that is inappropriate your request should be blocked.
If it all seems to be working OK then I suggest making your ebtables and iptables rules permanent so they are restored after a reboot.
This can be achieved easily for iptables by simply running sudo iptables-save.
I followed these very helpful instructions to achieve a similar thing for the ebtables rule.
And that’s it. Try rebooting the server to make sure that it all still works without you having to re-configure everything. Then ask your kids and wife to let you know if things that they want to get to are being blocked. YOU now have the ability to control this – not your ISP… 😀
Footnotes
Be aware that on the network diagrams above the Wifi service provided by the BT Homehub router, and the LAN on the router side of the server, are not protected by these instructions. For me this is fine as the coverage of that Wifi network only makes it as far as the Kitchen anyway. And if it was more visible I could always change the key and only let my wife and I have access.
Also, I should make it clear that I know what I have above is not foolproof. I am completely aware that filtering/monitoring encrypted traffic is virtually impossible and there are plenty of services available that provide ways to circumvent what I have here. But I am also not naive and I reckon that if my kids have understood enough about networking and protocols etc. to be able to use tunnelling proxies or VPN services then they are probably mature enough to decide for themselves what they want to look at.
Of course there are plenty of additional mechanisms one can put in place if desired.
- Time-based filters preventing any Internet access at all at certain times
- Confiscation of Internet connected devices at bedtime
- Placing computers and gaming consoles in public rooms of the house and not in bedrooms
- And many more I’m sure you can think of yourself
As I see it, the point is simply this: As a parent, this is your responsibility…
Bier vandeStreek

A few days ago here at Libertus Towers we received a lovely gift from a friend in the Netherlands: Free Beer!
vandeStreek Beer is from
Two enhusiastic brothers from Utrecht, the Netherlands who enjoy tasteful craft beers. After several years brewing on a micro scale, we are now sharing our beers with the world.
Thankfully our friend, a brother of the two brewers above, knew our love of all things beer, and thought it would be a good idea to let us sample his siblings’ art…
There are two brews called BROEDERS and DARK ROAST.
After leaving them for a good session in my fridge I thought I’d start by cracking open a Broeders…
-

- Bottle, Opener & Beer Mat.


-

- Small head, but it lasted the duration.

I’m a big fan of very hoppy beers with a good bitter finish (think really good IPA) and this Broeders is right up there for me. The first taste thought I had on the palette was “nutty”, very nutty, then the hops kicked in followed by a gentle breeze of burnt caramel. The beer was lovely and dry, clean tasting, surprisingly refreshing for a beer of this strength, and the head, whilst not deep, kept it’s consistency right to the bottom of the glass.
Broeders a strong beer by UK standards at 6.3% ABV so probably not one you’d want to do a long session on, but the high alcohol content didn’t destroy the flavours unlike some high-strength beers tend to do.
Whilst I was drinking Broeders I did think that the finish (the length of time the flavour lingers afterwards) might be rather short but how wrong I was! When I tottered off to bed, probably a good hour or so after I’d finished the glass, that hoppy, nutty complex of flavours was still there; it seemed a shame to have to clean my teeth!
To conclude then, I really liked this beer. So if you fancy trying something different I’d recommend vandeStreek Broeders any day.
Next week I’ll give you my take on the Dark Roast. To be honest I’m not expecting to like it so much. I’ve never really liked dark beers, many seem to me to be too sweet and a bit “thick” & sickly. But hey ho – I’m not going to not drink it; that would just be rude wouldn’t it… 😉
Ubuntu Coaster and other animals
My son James (12) has presented me with two gifts he’s made at school recently. Both are terrific and he designed and made them himself.
As a proud dad I felt it only right to show them off…

Note the clever location of the hole for use as a keyring…
Then yesterday he presented me with this very nice USB Device modelled into a Seahorse:


There’s a clip to hold the two parts together and I’m really impressed how the two halves line up; seeing as they are cut from two different sheets of perspex!
OT: Chillies for 2013
 I’ve sown my seeds for this year and have decided to document the process on G+ for a change.
So if you want to find out about what I and other chilli heads will be growing this year head over to the Chillies Community on Google Plus…
Time for an Upgrade
The Ubuntu UK Local Team allocation of CDs arrived yesterday and as usual these are available for free to anyone who wants one in the UK. Just send me an SAE following the procedure here and please please try to put enough postage on it, I get bored of walking to the post office to pay the fine.
If you want several of them to hand out at an event then please get in touch and we can sort that out.
As usual there is one special CD that gets upgraded each release, the one my chickens peck at! They were using Ubuntu Server 12.04 LTS before, but today I upgraded them to Ubuntu Server 12.10 the Quantal Qetzal. I think they were pleased at the bird themed code name and they have been getting quite familiar with the command line over the last few months. I tested the retired 12.04 CD and it still works great in a computer after washing the muck off it.

Would you put that in your chicken run?

It might have Long Term Support, but would you put it in your laptop?
OT: Chillies 2012
It’s that time again.
This evening (Saturday 21/01/2012) I have sowed 13 varieties of chillies, just over 50 seeds! I’m very excited about the prospects for the year ahead but have absolutely no idea what I will do if I have 50 plants to tend – they won’t all fit in our small greenhouse and we don’t have a conservatory… Suggestions welcome.
 From the left there is “Black Naga” which I managed to grow last year and by the end of October the pods had ripened to a dark chocolate brown colour. They were hot too 🙂 . Next is a Red Habanero – These seeds were a gift from my sister-in-law and I have no idea what they will be like but Habaneros are generally quite hot and a have lovely fruity flavour. Finally in this tray is Goat Horn which I also grew last year and they were an absolute delight! A lovely traditional torpedo shaped chilli with a great flavour. They aren’t blisteringly hot but a very, very nice chilli.
 In this tray I have the famous “Dorset Naga” which has been a reliable variety over the last two seasons. Hope these seeds still germinate OK. Next is a Bhut Jolokia and to be honest I can’t remember where these seeds came from or if I have grown from this packet before, but there were only 5 seeds in the bag so they have all gone in the tray. Finally is another Habanero style called Congo Trinidad.
 I have two varieties in this tray I also grew last year from the first time and liked them so much am growing again: Aji Crystal was quite prolific and produces big meaty chillies with a nice (but not insanely hot) kick. The Lemon Drop on the other side was also quite a good cropper and I loved the bright yellow chillies. These look great on the plate and taste yummy too – a slight citrus note. In the centre is a new variety for me this season – The Habanero 7 Pot. Called the 7 pot apparently as this is how many pots of stew one chilli will flavour! I’m really looking forward to getting these on my tongue!
 Here are the “HOT Ones”… The Naga Viper held the hottest chilli world record in 2011 for a while at around 1.4million Scovilles! However within just a few days this Viper was beaten by the Trinidad Scorpion “Butch T” which was measured at just under 1.5million Scovilles. Also in this tray is a chilli called Portugal, which is a Jumbo Cayenne type. Not in the same league heat-wise as it’s 2 neighbours but I like a bit of variety.
 And finally, I remember growing this one a few years ago and being pleasantly surprised so I thought I’d give it another go. It’s Italian seed with a description of Peperoncino piccante tondo calabrese. It’s a round chilli that is commonly used for stuffing or in salads. I recall it having a nice punch and the plants being excellent croppers.
I’ll provide updates through the year as, hopefully, the seeds germinate, plants grow and bear fruit.

