How to install a Squid & Dansguardian content filter on Ubuntu Server
Being a family man and a geek, our household has both children and lots of tech; there are 6 or so computers, various tablets, smartphones and other devices capable of connecting to, and displaying content from, the Internet.
For a while now I’ve wanted to provide a degree of content filtering on our network to prevent accidental, or deliberate, access to some of the worst things the Internet has to offer. What I didn’t want to do however was blindly hand control of this very important job to my ISP (as our beloved leader would like us all to do). Also, I absolutely believe this is one of my responsibilities as a parent; it is not anyone else’s. In addition, there are several problems I have with our government’s chosen approach:
- Filtering at the ISP network-side means the ISP must try and inspect all my internet traffic all of the time (what else could they potentially do with this information I wonder?)
- If the ISP’s filter prevents access to content which we feel that our kids should be able access, how can I change that? Essentially I can’t.
- I reckon that most kids of mid-teenage years will have worked out ways to bypass these filters anyway (see footnote) leaving more naive parents in blissful ignorance; thinking their kids are protected when in fact they are not.
With the above in mind I set about thinking how I could provide a degree of security on our home network using tried and trusted Open Source tools…
Firstly this is how our networked looked before.
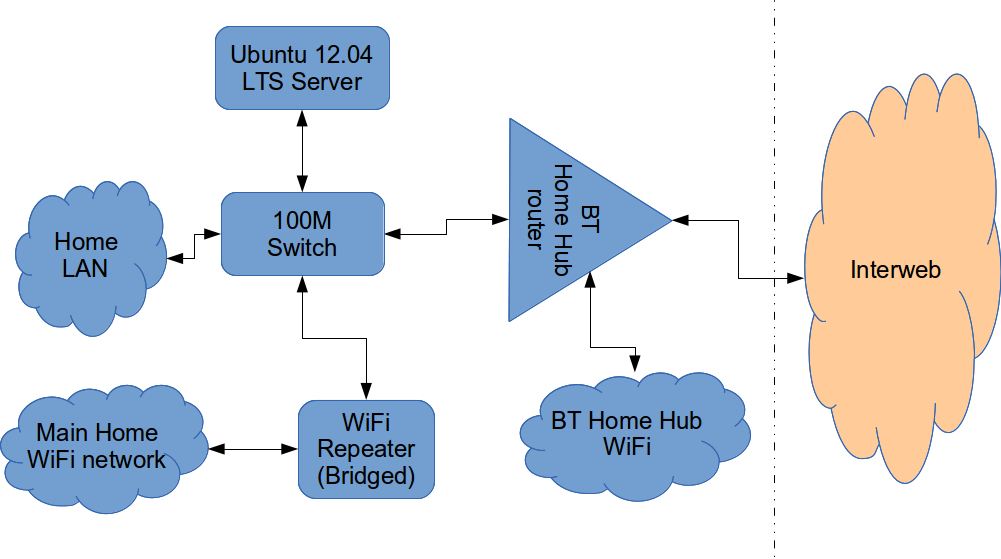
The BT Router is providing the DHCP service in the above diagram.
The Ubuntu 12.04 Server is called vimes (after Commander Vimes in the Discworld novels by Terry Pratchett) and is still running the same hardware that I described way back in 2007! It’s a low power VIA C7 processor, 1G of RAM and it now has a couple of Terabytes of disk. It’s mainly used as a central backup controller and dlna media store/server for the house.
I never did get Untangle working on it, but now it seemed like a good device to use to do some filtering… There are loads of instructions on the Internet about using Squid & Dansguardian but none covered quite what I wanted to achieve: A dhcp serving, bridging, transparent proxy content filter.
Architecturally, my network needed to look like this:
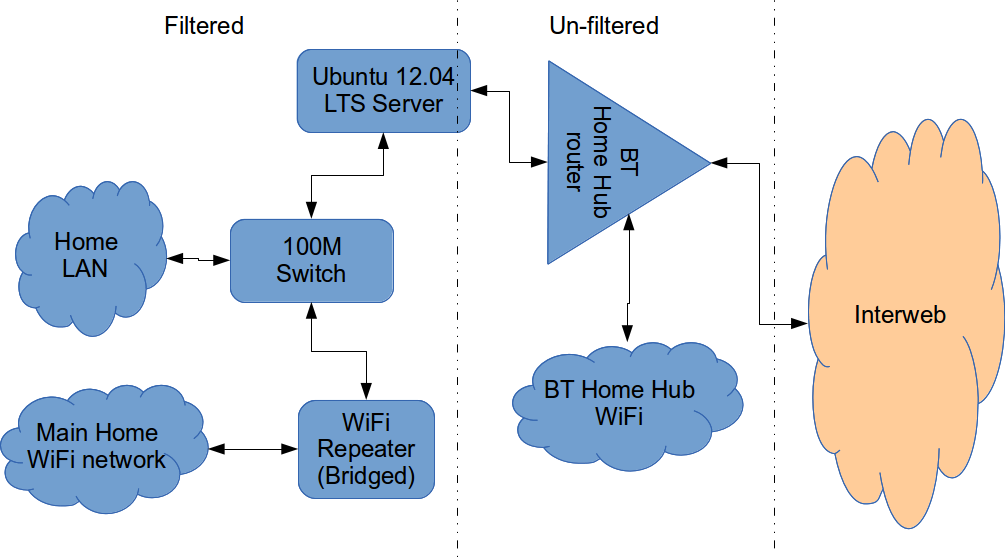
As you can see above, the physical change is rather negligible. The Ubuntu server now sits between the home LAN and the broadband router rather than as just another network node on the LAN as it was before.
The configuration of the server to provide what I required can be broken down into several steps.
1. Get the Ubuntu server acting as a transparent bridge
This is relatively straightforward. First install the bridge-utils package: sudo apt-get install bridge-utils
Then I made a backup of my /etc/network/interfaces file and replaced it with this one:
# This file describes the network interfaces available on your system
# and how to activate them. For more information, see interfaces(5).

# The loopback network interface
auto lo
iface lo inet loopback

# Set up interfaces
iface eth0 inet manual
iface eth1 inet manual

# Bridge setup
auto br0
iface br0 inet static
  bridge_ports eth0 eth1
  address 192.168.1.2
  broadcast 192.168.1.255
  netmask 255.255.255.0
  gateway 192.168.1.1
Probably the most interesting part of this file is where we assign a static IP address to the bridge itself. Without this I would not be able to connect to this server as both ethernet ports are now just transparent bridge ports so not actually listening for IP traffic at all.
(Obviously you will need to determine the correct IP address scheme for your own network)
2. Disable DHCP on the router and let Ubuntu do it instead
The reason for this is mostly down to the BT Home Hub… For some bizarre reason, BT determined that they should control what DNS servers you can use. Although I’m not using it right now, I might choose to use OpenDNS for example, but I can’t change the DNS addresses served by the BT Home Hub router so the only way I can control this is to turn off DHCP on the router altogether and do it myself.
Install the dhcp server: sudo apt-get install dhcp3-server
Tell the dhcp server to listen for requests on the bridge port we created before by editing the file /etc/default/isc-dchp-server so that the INTERFACES line reads: INTERFACES="br0".
Then edit the dhcp configuration file /etc/dhcp/dhcpd.conf so we allocate the IP addresses we want to our network devices. This is how mine looks:
ddns-update-style none;

default-lease-time 600;
max-lease-time 7200;

# If this DHCP server is the official DHCP server for the local
# network, the authoritative directive should be uncommented.
authoritative;

# Use this to send dhcp log messages to a different log file (you also
# have to hack syslog.conf to complete the redirection).
log-facility local7;

subnet 192.168.1.0 netmask 255.255.255.0 {
        range 192.168.1.16 192.168.1.254;

        option subnet-mask 255.255.255.0;
        option routers 192.168.1.1;

        #Google DNS
        option domain-name-servers 8.8.8.8, 8.8.4.4;
        #OpenDNS
        #option domain-name-servers 208.67.222.222, 208.67.220.220;

        option broadcast-address 192.168.1.255;
}
There are many options and choices to make regarding setting up your DHCP server. It is extremely flexible; you will probably need to consult the man pages and other on-line resources to determine what is best for you. Mine is very simple. It serves one block of IP addresses within the range 192.168.1.16 to 192.168.1.254 to all devices. Currently I’m using Google’s DNS servers but as you can see I’ve also added OpenDNS as a comment so I can try it later if I want to.
3. Install Squid and get it working as a transparent proxy using IPTables
This bit took a while to get right but, as with most things it seems to me, in the end the actual configuration is fairly straightforward.
Install Squid: sudo apt-get install squid.
Edit the Squid configuration file /etc/squid3/squid.conf… By default this file contains a lot of settings. I made a backup and then reduced it to just those lines that needed changing so it looked like this:
http_port 3128 transparent
acl localnet src 192.168.1.0/24
acl localhost src 127.0.0.1/255.255.255.255
acl CONNECT method CONNECThttp_access allow localnet
http_access allow localhost
always_direct allow allcache_dir aufs /var/spool/squid3 50000 16 256
Probably the most interesting part in the above is the word “transparent” after the proxy port. Essentially this means we do not have to configure every browser on our network: http://en.wikipedia.org/wiki/Proxy_server#Transparent_proxy. The final line of the file is just some instructions to configure where the cache is stored and how big it is. Again, there are tons of options available which the reader will need to find out for themselves…
To actually cause all the traffic on our LAN to go through the proxy rather than just passing through the bridge transparently requires a bit of configuration on the server using ebtables to allow easier configuration of the Linux kernel’s bridge & iptables to redirect particular TCP/IP ports to the proxy.
First I installed ebtables: sudo apt-get install ebtables
My very simplistic understanding of the following command is that it essentially tells the bridge to identify IP traffic for port 80 (http) and pass this up to the kernel’s IP stack for further processing (routing) which we then use iptables to handle.
sudo ebtables -t broute -A BROUTING -p IPv4 --ip-protocol 6 --ip-destination-port 80 -j redirect --redirect-target ACCEPT
Then we tell iptables to forward all port 80 traffic from the bridge to our proxy:
sudo iptables -t nat -A PREROUTING -i br0 -p tcp --dport 80 -j REDIRECT --to-port 3128
Restart Squid: sudo service squid3 restart
At this point http browser traffic should now be passing through your bridge and squid proxy before going on to the router and Internet. You can test to see if it is working by tailing the squid access.log file.
I found that squid seemed to be very slow at this juncture. So I resorted to some google fu and looked for some help on tuning the performance of the system. I came across this post and decided to try the configuration suggestions by adding the following lines to my squid.conf file:
#Performance Tuning Options
hosts_file /etc/hosts
dns_nameservers 8.8.8.8 8.8.4.4
cache_replacement_policy heap LFUDA
cache_swap_low 90
cache_swap_high 95
cache_mem 200MB
logfile_rotate 10
memory_pools off
maximum_object_size 50 MB
maximum_object_size_in_memory 50 KB
quick_abort_min 0 KB
quick_abort_max 0 KB
log_icp_queries off
client_db off
buffered_logs on
half_closed_clients off
log_fqdn off
This made an immediate and noticeable difference to the performance; enough so in fact that I haven’t yet bothered to go any further with tuning investigations. Thanks to the author Tony at last.fm for the suggestions.
4. Install Dansguardian and get it filtering content
sudo apt-get install dansguardian is all you need to install the application.
To get it to work with our proxy I needed to make a couple of changes to the configuration file /etc/dansguardian/dansguardian.conf.
First, remove or comment out the line at the top that reads UNCONFIGURED - Please remove this line after configuration I just prefixed it with a #.
Next we need to configure the ports by changing two lines so they look like this:
filterport = 8080
proxyport = 3128
Finally, and I think this is right, we need to set it so that Dansguardian and squid are both running as the same user so edit these two lines:
daemonuser = ‘proxy’
daemongroup = ‘proxy’
As you will see in that file, there are loads of other configuration options for Dansguardian and I will leave it up to the reader to investigate these at their leisure.
One suggestion I came across on my wanderings around the Interwebs was to grab a copy of one of the large collections of blacklisted sites records and install these into /etc/dansguardian/blacklists/. I used the one linked to from the Dansguardian website here http://urlblacklist.com/ which says it is OK to download once for free. As I understand it, having a list of blacklist sites will reduce the need for Dansguardian to parse every url or all content but this shouldn’t be relied on as the only mechanism as obviously the blacklist will get out-of-date pretty quickly.
Dansguardian has configurable lists of “phrases” and “weights” that you can tailor to suit your needs.
Now that’s installed we need to go back and reconfigure one of the iptables rules so that traffic is routed to Dansguardian rather than straight to Squid first and also enable communication between Squid and Dansguardian. You can flush (empty) the existing iptables rules by running iptables -F.
Now re-enter the rules as follows:
sudo iptables -t nat -A PREROUTING -i br0 -p tcp –dport 80 -j REDIRECT –to-port 8080
sudo iptables -t nat -A OUTPUT -p tcp –dport 80 -m owner –uid-owner proxy -j ACCEPT
sudo iptables -t nat -A OUTPUT -p tcp –dport 3128 -m owner –uid-owner proxy -j ACCEPT
sudo iptables -t nat -A OUTPUT -p tcp –dport 3128 -j REDIRECT –to-ports 8080
Restart Squid and Dansguardian: sudo service squid3 restart & sudo service dansguardian restart.
Now if you try to connect to the internet from behind the server your requests should be passed through Dansguardian and Squid automatically. If you try and visit something that is inappropriate your request should be blocked.
If it all seems to be working OK then I suggest making your ebtables and iptables rules permanent so they are restored after a reboot.
This can be achieved easily for iptables by simply running sudo iptables-save.
I followed these very helpful instructions to achieve a similar thing for the ebtables rule.
And that’s it. Try rebooting the server to make sure that it all still works without you having to re-configure everything. Then ask your kids and wife to let you know if things that they want to get to are being blocked. YOU now have the ability to control this – not your ISP… 😀
Footnotes
Be aware that on the network diagrams above the Wifi service provided by the BT Homehub router, and the LAN on the router side of the server, are not protected by these instructions. For me this is fine as the coverage of that Wifi network only makes it as far as the Kitchen anyway. And if it was more visible I could always change the key and only let my wife and I have access.
Also, I should make it clear that I know what I have above is not foolproof. I am completely aware that filtering/monitoring encrypted traffic is virtually impossible and there are plenty of services available that provide ways to circumvent what I have here. But I am also not naive and I reckon that if my kids have understood enough about networking and protocols etc. to be able to use tunnelling proxies or VPN services then they are probably mature enough to decide for themselves what they want to look at.
Of course there are plenty of additional mechanisms one can put in place if desired.
- Time-based filters preventing any Internet access at all at certain times
- Confiscation of Internet connected devices at bedtime
- Placing computers and gaming consoles in public rooms of the house and not in bedrooms
- And many more I’m sure you can think of yourself
As I see it, the point is simply this: As a parent, this is your responsibility…
Asus 1008HA with Ubuntu 9.10 Karmic Koala Alpha2
Following my earlier post about getting the Microsoft Tax on the Asus netbook refunded very efficiently and painlessly by Amazon, I’ve been doing a little reading, formatting, re-partitioning, installing and updating.
The newest PC in The Open Sourcerer’s household is now duly christened, cleansed and freed from proprietary software hell and will, from this moment forth, be known as Magrat. All our machines are named after characters from the Discworld novels by Terry Pratchett.
I thought I’d take a quick screenshot:

magrat running Ubuntu 9.10.
That’s me being filmed by the built-in webcam and I have printed a list of the disk partitions showing that there are now no NTFS or FAT left. The fourth partition was already on the disk and is for Asus’ “Boot Booster” utility which, from what I can tell simply dumps the BIOS and the results of some the POSTs into this partition and it causes the unit to get from power up to grub in about 1/2sec flat! So I thought I’d leave that one for now.
I re-partitioned the HDD to have a 15GB Ext4 partition for /, about 135GB for /home using ext3, and a 2GB swap partition.
Apart from a minor hiccup early on with the eth0 device disappearing, probably due to my incompetence rather than anything else, everything seems to be working as it should. The Wifi was detected, the screen looks great, the webcam, speakers and mic all work. I chose Karmic as the WiFi hardware for this netbook is a fairly recent addition to the Linux kernel and although it seems to be supported in the more recent Jaunty kernels, there still seemed to be some issues on various forums, whereas one contributor reported a perfect install using Karmic very recently.
So here’s the Asus Eee 1008HA PC running the regular Desktop version of Ubuntu Karmic Koala 9.10 Alpha 2 (I’ve removed several stickers from the area below the keyboard. These were telling me about some proprietary OS that I didn’t want in the first place):

Magrat in the flesh.
I may well use the UNR (Ubuntu Netbook Remix) edition one day, but I do like having Compiz and multiple desktops around; something that doesn’t really “fit” with the UNR interface. But the cool thing is I have the freedom to choose…
For those interested in knowing more about the hardware of the Asus 1008HA, here’s the output of lshw, lspci -v, and dmidecode.
Building your own PC…
My regular desktop computer, Twoflower*, that I use for work and play is dying… 🙁
Twoflower is pretty old now by PC terms and is becoming quite unreliable. I built it about 4 or 5 years ago I guess, although I can’t remember exactly when, and it has been a good workhorse until quite recently. But the time has finally come to move on.
I like building my own PCs and find it can also be a very cost effective way to get exactly the PC you want and, of course, you don’t have to pay the Microsoft Tax either. So, after planning and reading for a couple of months or so, I have just ordered the new bits which will come together to create Lobsang*.
I’m not a “gamer” so I don’t need a heavy duty graphics card or excessive cooling, but I do tend to run a lot of apps at the same time and some of them are quite “hungry”: Eclipse, VirtualBox Virtual Machines, Inkscape, Gimp, OpenOffice.org, Thunderbird & Lightning with as many email accounts and CalDAV calendars as I have, and Firefox with usually a dozen or so tabs open at one time and perhaps further instances of Firefox running too. I’ve also often got a remote X sessions running to a development server as well.
So, it was important to me that I built a PC that is pretty quick, can be expanded easily and will – again – hopefully last me for a good few years.
Here is my shopping list:
| Antec Three Hundred Case w/o PSU |
| 520W Corsair HX Series Modular PSU, ATX, EPS12V, whisper quiet, 5 year warranty |
| Asrock P43R1600Twins, iP43, S 775, PCI-E 2.0 (x16), DDR2/DDR3 1066/1333/800, SATA II, SATA RAID, ATX |
| Intel Core 2 Duo, E8400, Wolfdale Core, S775, 3.0 GHz, 1333MHz, 6MB Cache, Retail |
| Arctic Cooling Freezer 7 Pro |
| 2GB (2x1GB) Corsair TwinX DDR2 XMS2 Dominator, PC2-8500 (1066), 240 Pin, Non-ECC Unbuffered, CAS 5 |
| 256MB Palit 9500GT, PCI-E 2.0(x16), 1600MHz GDDR3, GPU 550MHz, 32 Cores, HDTV/ D-Sub/ DL DVI-I |
| 320 GB Samsung HD322HJ Spinpoint F1, SATA 300, 7200 rpm, 16MB Cache, 8.9 ms |
| Samsung TS-H653B/DEBH 20x DVD±R, 8x DVD±DL, DVD+RW x8/-RW x6, x12 DVD-RAM SATA Black OEM |
The notable items on here I would say are:
- Power Supply – It is a really important part of your system. A cheap “no-name” PSU gives you unstable voltages that will lead to operational and reliability problems, crap cabling which restricts airflow, inefficiency so you just waste money making heat and they can be surprisingly noisy. The reviews I read lead me to choose either this Corsair model or a 450W unit from “Be Quiet”.
- The Asrock Motherboard – This was probably the hardest component to choose. I don’t need a top-end mobo that will overclock like a wild thing, but I did want one that would provide me with a decent platform and will allow some level of growth. This board looked to be just about right and very well priced for an Intel LGA775 board. It supports DDR3 (up to 4GB) as well as DDR2 (up to 8GB) memory and will run any of the latest generation Core2 dual and quad core processors including the most recent 45nm designs.
- The Processor – I was, until quite recently, going to go for the outstanding Q6600 65nm Quad core chip but having read some more recent reviews it seems as though the newer 45nm designs are much more efficient and yet more powerful. In most review tests, this dual core E8400 outperforms the Q6600 device and has about half the power consumption. There are certain times when 4 cores are better, but seeing as I’ve happily lived with just one up until now I think two will be just fine!
- No Operating System – I will, of course, be installing a Free and Open Source OS and that will almost certainly be Ubuntu Hardy Heron 8.04.1. In fact I am planning to have a spare partition or two so I can install other OS’s too.
The rest of the items are nothing too special. I am very fond of Samsung drives and have used them for many years now. They are usually very quiet, fast, reliable and are excellent value. The graphics card is a passively cooled device that will be very fine for Compiz and the minimal other 3D requirements I have. I wanted a new case as my current PC’s case is terrible. It was cheap, looked it too and is really noisy with quite a few 80mm fans churning away constantly. This new Antec Three Hundred case looks much better, has bigger 120mm and 140mm fans (that turn slower and thus make less noise) and has better cable management so air should flow well and is quite capacious so I have room to expand too.
My main source of knowledge for this lot comes from the excellent Custom PC Magazine. Although it is heavily geared toward gamers and high end systems, their no-nonsense reviews and technical features are the best I have come across, and I’ve been reading computer magazines virtually since they first appeared. When Custom PC review a product, if it is crap they really say so. There never seems to be any of the “polite excuses” or bias toward particular suppliers or vendors – unless they make really good gear that is. My only gripes with it are I’d like it to cover more Media and power efficiency topics and feature more Open Source software. Perhaps I should suggest some articles…
For the supplier of the bits, I have gone to Scan Computers. I have used them several times before and have no complaints at all. They have a great reputation for service and they do tend to have the best prices too. Hopefully the bits will be here by the weekend, just in time for my 10th Wedding Anniversary, so how much actually ends up getting assembled before next week remains to be seen…
For this blog, I’ll take some pictures of the bits before, during and after assembly and run through the way I put together a new PC. It isn’t terribly hard and is very satisfying when it’s finished.
Update: I’ve written two articles covering the build process. Part 1 is here.
* All the computers in our house are named after characters from Terry Pratchett’s Discworld novels. So far I have used: Rincewind, Mort, Binky, Moist, Angua, Twoflower, Gladys and Vimes.

