S685IP and the VCard format
Last night my wife harangued me about not having her phone directory installed on our new handsets so she can see who is calling.
She sent me a spreadsheet with all the contacts and their respective numbers. The manual for the S685IP is a little unintuitive regarding the formatting and options for the vcard format so I started doing some digging about.
Firstly, I created a dummy entry in my handset using all the fields I could find. Then I turned on Bluetooth and transferred it to my laptop so I could see what it looked like. The Bluetooth link worked great. I could have got the vcard from the handset via the web interface, but I just wanted to test the Bluetooth functionality. Here it is:
BEGIN:VCARD

VERSION:2.1

N:Lord;Alan

TEL;HOME:XXXX79XXXX

TEL;WORK:XXXX27XXXX

TEL;CELL:XXXX457XXXX

EMAIL:test@testingcentre.com

BDAY:1900-11-01T00:00

END:VCARD
I didn’t find a perfect csv to vcard converter for this structure, although this online one worked pretty well and only needed a bit of local massaging to import correctly. I also tried a rather old but still useful ruby project from sourceforge here, that also worked but left out the vital VERSION:X.X line altogether.
Anyway, as you should be able to see from above, the name field N: takes two parameters separated by a semicolon and does not use the discreet FN: and LN: format. Note that it is last name first.
The rest should be obvious. If you don’t have data for a field, leave the entire field out. I didn’t try sending a blank field to the handset, but leaving the fields out entirely worked just fine.
The only other “gotcha” is that the file containing your vcard data needs to be DOS formatted and not Unix formatted: CR+LF vs LF. If you are on Windows then you won’t have a problem but Linux users will need to use the tofrodos package (Ubuntu users just do sudo apt-get install tofrodos) and run the file through the unix2dos command before sending it to the handset. If you don’t, the transfer fails.
Once you have the format right, using the Web interface on the base station to upload the directory seemed to work absolutely fine. I was able to send a directory containing 70 entries to each handset. It isn’t blisteringly fast (I guess it took about 2 minutes/handset), but it’s a whole lot quicker than typing the entries in by hand!
Siemens Gigaset 685IP Phones and Asterisk Review
[Update and Introduction: This article was originally posted on the 27th April 2008. I am still using the phones and am very happy with them indeed. I have had no operational problems to speak of. I make this updated comment because this is still a very popular article and new visitors read this daily but the date is only shown at the bottom.]
Last week I purchased a triple set of the brand new Siemens S685IP telephones. This is a DECT home telephone system with support for both PSTN and VOIP services. I’d spent quite some time looking for a decent replacement for our aging and now unreliable existing DECT handsets.
I bought these from a UK based on-line telephone vendor DSTelecom and their service and price was very good. I’d been waiting for this model to become available for a couple of months and they were offering the best price and the were first to get them in stock too!
There were a few reasons I selected these Siemens phones, but the main one is their ability to act as a basic telephone switch between handsets and incoming services. The Base unit can support up to 8 incoming services: 1 x PSTN, 1 x Gigaset VOIP Network, and 6 further VOIP (SIP) services.
This is the latest release and the handsets support very high quality voice between each other and on compatible networks. They also support Bluetooth so you can use a wireless headset and upload/download your mobile phone’s address book etc.
Here’s my personal review of these new phones for use in our home network. (Just click on the thumbnails for bigger images)
My initial impressions: Nice packaging and a good looking handset.


There are very easy to follow 1st time instructions that get the system installed and running. Once I’d plugged the phones in and got them charging, and base station in to the LAN, the phone started showing me the weather forecast in Lisbon! 🙂
Once the physical install is done, you can do almost everything else from the web based interface of the base station. I’ll cover that in detail in a minute.
But first the handsets. When you get them you need to do a first time charge and discharge cycle. The batteries are supplied (a pair of AAA rechargeables). The first full charge took between 3 and 5 hours depending on the handset. To discharge them all, I made internal calls between the phones and put them all on handsfree. It took a good 8-10 hours for them to get fully discharged. So talk-time is excellent.
The first thing my wife commented on when we were talking internally was the voice quality. She said it was brilliant! And having now just had a conversation with her somewhat hard-of-hearing father, he also attested to the much better sound than our previous telephones. So that’s good!
They have a nice big colour screen where you can – apparently although I haven’t done this yet – add pictures to your directory so the phone shows the caller’s face or avatar when ringing.
Anyway, all-in-all my initial impressions of the system was very positive indeed. Now let’s look at how the whole DECT/VOIP thing is configured and what really makes these stand out for a home phone…
Accessing the Web based user interface was easy. Here’s the login screen you first see:

Due to the way I have our home network set-up, I used a static IP address for the base unit. It also supports DHCP however.

Next is to configure some VOIP service providers. For me it’s my Asterisk server… Only one change seemed to be needed to get the registration to work: Add subscribemwi=yes to your sip.conf. I’m not actually sure if this made any difference, as I think I didn’t click the “Active” box first time round. But apparently this setting is needed to get the message waiting light working properly when you are using Asterisk’s voice-mail anyway.

You configure the details for each service by clicking the “Edit” button. Here’s a default screen showing most of the options.

The next section allows you to select the codecs you’d like each service to support and their priority. As you can see again, it’s a simple, clean and easy-to-understand interface.

After that, you are ready to choose which handsets work with what services. I configured my handsets first to give them meaningful names: “Alan’s, Helen’s and Kitchen”. Note also you can upload/download your handset’s directory from here too. The directory needs to be in vcard format. I haven’t done this yet but I can’t see any major obstacles apart from the time it will take to get a csv spreadsheet into vcard.


This is, for me at least, the coolest feature. From this screen, you can choose which handset rings depending on the service it is coming in on. And you can decide which calls use the built-in answer machine and which do not. It’s basic switch functionality and when you stick Asterisk behind this you have a really flexible solution to handling multiple incoming lines and different types of users.
My wife and I both run our respective businesses from our home offices. Now we have individual incoming VOIP lines into Asterisk plus the home PSTN service. Calls for my business ring, my phone and the kitchen phone. Calls for Helen’s ring her phone and the kitchen phone. Neither uses the Siemens Answer machine but the features of Asterisk’s voice-mail system. Calls for the family ring all three phones and use the built-in answering machine. You can configure this any way you wish basically.
Now we have a basic phone system set-up there are various add-on features to play with 😉
Here is the call forwarding screen where for each service you can decide what to do under certain conditions: “When Busy, No Reply or Always”. Simple but this is a home telephone system.

Next, you have a section for creating dialling plans. You have here, the ability to choose which service gets used for particular number sequences. So, for example, you could put in the international prefix for Australia and only allow numbers with that prefix to go via a particular VOIP service. You can also block certain number sequences completely too.
The Network Mailbox screen allows you to configure the voice-mail service for each provider. So for Asterisk that will be the numbers configured in voicemail.conf. This enables the service to work with the handsets so you get message waiting indications and access to the mailbox without needing to know the mailbox number.

Also in the Telephony section of the configuration tree is an “Advanced Settings” screen. This lets you configure the way DTMF tones are handled, SIP and RTP port numbering and a few other odds and sods.

That’s it for the telephony section. Comprehensive, easy-to-use and nicely laid out.
The next area is “Messaging”. The handsets support SMS type texting and there is an option to configure a jabber server (IM). The Siemens Gigaset VOIP network, which you get automatically subscribed too when you buy your phone is the default configuration, but you can change it to your favourite IM network should you wish. Not being a big user of either SMS or IM I haven’t used this. Maybe one of my kids will show me later!
Also under the Messaging section you can configure a POP3 email server. It is for the network, not per handset so I am not sure of it’s value. I suppose for a family who have a single email account it might be useful. But this feature doesn’t really do it for me. If it was per handset or per network service it would make far more sense.
After Messaging come the last few configuration pages.
The first is called “Info Services” and you can, via the Gigaset Network, configure a few somewhat limited network based information feeds. You can enter an RSS feed, or choose a weather forecasting service. The weather seemed more useful for me so I set it to show me the weather for London for the next three days.
The final screen is the ubiquitous “Miscellaneous” settings. Here you can update the firmware directly from Siemens or use a locally stored file. You also get to choose the NTP server for the clock and whether to automatically deal with daylight saving time changes.

That’s the Siemens S685IP phone system. Having had them running for a few days now, I’m very pleased. Everything has worked, call quality is excellent, ease-of-use is superb.
I have come up with a couple of tricks I’d like Siemens to do that would really enhance the overall functionality however. Two are to do with time. And as there is an accurate and network-synchronised clock in the base station, I can’t see this being terribly hard to do to be honest.
- Use the in-built clock to allow you to configure different network connection settings. So, for example, after 6pm, If a call comes in my office number I might not want it to ring the other (our kitchen or family) phone. Perhaps during a weekend also.
- Ditto with call forwarding. After 6pm or during weekends forward calls to my mobile for example…
- Ditto with the dial plans. Being able to route certain type of call via different networks is great, but being able to choose to do it during certain hours would be even better…
- The email and IM features are nice but in my opinion they would be far more useful if it was configurable based on per handset or service basis rather than a single account for all devices.
- Also to do with the email feature; I’d like the option of IMAP as well as POP3.
I’m sure there will be some other ideas that will crop up have as we get used to them, but all-in-all my first impressions are that this is an absolutely cracking phone system for home and small business. When you use this with Asterisk of course, they get even better. Some of the time based features could possibly be got around by some fiddling with Asterisk. If I get chance to work something out I’ll write it up here.
Open Source Cars and More
I love this article on zdnet from David Greenfield. It’s a round-up of what’s happening in the up and coming area of Open Source Hardware. According to David,
A burgeoning trend in open source hardware is putting up some devices on the Web — from machines that make anything (including themselves) to cars — with the specs to make them yourself (See our list below). While still in its infancy, the trend could redefine hardware cost models much as its done for software.
And there are some neat really ideas like this one which I have been following myself for a while:
Now that you’ve got Asterisk, what hardware platform will you run the software on? Usually folk settle on a Intel or AMD based-server of one kind or another. You can build your own PBX hardware with the Astfin Project or buy one for just $450 from the Free Telephony Project store.
This Asterisk appliance project has the chap who wrote the brilliant Open Source Echo Canceller I mentioned before in it.
But how about your own, Open Source Car…
Open Source isn’t just for your office. The OScar aims to be the first open source automobile. The goal is to create a utilitarian car that aims to move people from place-to-place sans a lot of the high-tech gadgetry that runs in today cards. Initial concepts call for a four-door, four meter length vehicle weighing about 1000 Kilo capable of reaching 145 KM/hour.
Cool – just the thing to keep a man happy and content in his shed for months. 😉
Windows in a nutshell
I read this on a posting on the asterisk mailing list this morning courtesy of Doug at NaTel. It is probably not new but I found it funny.
Windows is a half-baked, dying OS that in essence is a 32 bit extension and graphical shell, for a 16 bit
patch to an 8 bit operating system, originally coded for a 4 bit microprocessor, written by a 2 bit
company, that can’t stand 1 bit of competition.
lol
Untangle, Asterisk PBX and File Server; All-in-One. Part 8
If you’ve been following the story so far you’ll now where I am. If you haven’t, please go back to Part 1 and read from there. Alternatively if you click on the Untangle tag in the tag cloud then you should get all of the posts so far.
Hi all,
I’ve not yet got any further with the Untangle portion, but pretty much everything else is now in place and working 🙂
Last night I built and installed the few remaining applications that are necessary to support my objectives:
- MySQL (I need this for Joomla! and vtiger)
- Postgresql (I need this for untangle)
- Apache
- PHP (and some associated libraries for added functionality, i.e. HTML-Tidy, mm, libmcrypt, mhash…)
I have also been thinking about what it is actually I am trying to achieve. I find a picture really helps so here’s a block diagram of the applications I want and how they should interface to the outside world…
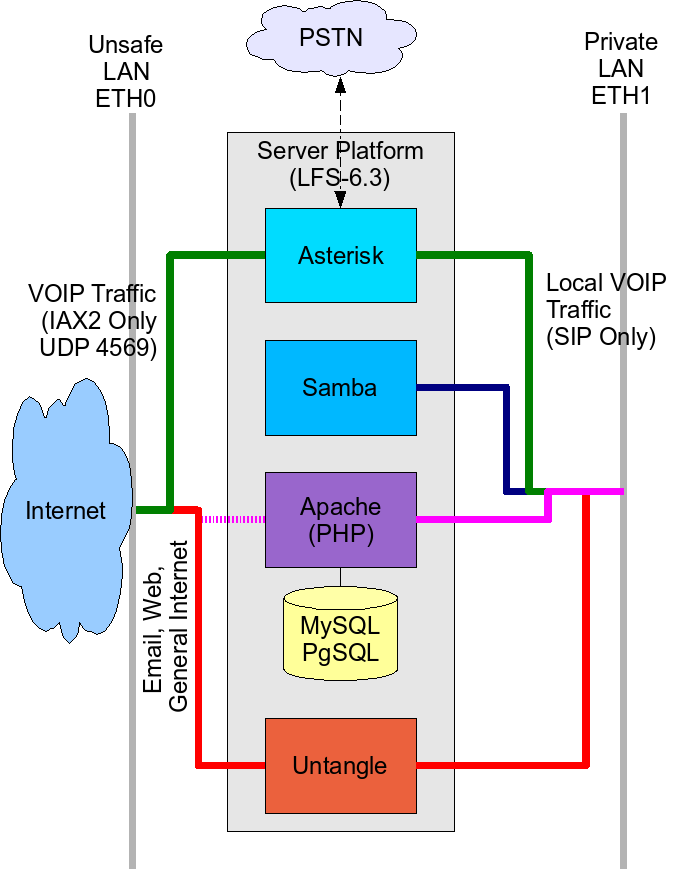
This was a good exercise that helped me to understand the flow of traffic and what needs to be prevented from passing through the server. The dotted line from Apache to the Internet is because I’m not sure yet whether I’ll actually provide any sort of public web presence from this box or not. I doubt it somehow but you never know…
If anyone has any comments or suggestions for improvements I’d be happy to hear them. I made the original diagram in OOo draw. Here’s the original file if you want to use it or alter it. As with all other stuff on here, its CC licensed.
Playing with Asterisk and VOIP
I haven’t written much recently – the day job keeps getting in the way 🙁
Anyway – some of my spare time has been used getting Asterisk working just the way we want. The more I play with it, the more I really like it.
We now have multiple voice mail accounts set-up for our various business interests, linked to an Automated Attendant or IVR (which is currently using my voice, but we are hoping to get one of our wives to record the greetings as girls are better than boys!). Once the caller has pressed the appropriate digit on their phone, Asterisk simultaneously calls multiple extensions (some on another Asterisk server connected across the ‘net), and if no-one answers within a pre-defined time, then the call is routed to the relevant voice mail account. The audio message left by the caller is then attached and emailed to one or more recipients depending on how we configure Asterisk and Exim. When the call is initially presented to our SIP phones, not only do we see the caller ID (which we could use to trigger application events in a CRM like vtiger for example), but we also see which business (or choice) the caller selected, thus we are able to appropriately answer the call.
This is a pretty advanced feature set for any PBX. But when you realise it’s running on a box that cost under £200, which also provides file server, content filtering/firewall, and local web based, application services too, and the software costs have been zero, it’s really quite amazing. Obviously for more “serious” telephony you’d want to run Asterisk on hardware that is designed to be ultra-reliable. But still the software is free. However for a home or home-office set-up I would suggest that this is an excellent platform.
The other thing I have just set-up is a free (for me) local rate DID (Direct Inward Dialling) number that connects, via the net, to my asterisk server using the IAX2 protocol. The provider of the service is the not-for-profit organisation http://www.voipuser.org. This is quite an amazing service:
VoIP User is a non-profit community, formed with the intention of creating a base for early adopters, consumers and professionals alike to exchange ideas, discuss new developments and generally experiment with
VoIP technology. We have a natural bias toward open standards. In the VoIP space, this is primarily SIP and IAX (Asterisk).…
When we started building the foundations of what became VoIP User at the end of 2002 there was nothing available to the developer and early adopter that enabled experimentation with PSTN gateways. Of course with the majority of telephone users on the PSTN, only being able to call another VoIP User in a test environment was too restrictive – some form of free access gateway was required.
In order to fill this need we setup a service system provisioning a PSTN/VoIP gateway for public access at no charge. In order to make this possible we created a unique financial model whereby calls outbound from the gateway are financed by calls inbound to the gateway. Every member signing up for access obtains an inbound PSTN number, on which revenue is generated and VoIP User receives a share. It’s that share of revenue that funds the outbound calls.
All inbound funds are credited to a central “pot” which is made available to those members who are making reasonable use of the facility. Excessive use is dealt with by member and number restrictions. We aim to run this in as fair and reasonable a manner as we possibly can but the over-riding principle is it is offered for experimentational use. We are not a VoIP provider. If you require long term telephony services, you will need to look elsewhere. If you’re looking to test a new piece of SIP or Asterisk equipment, you’re in the right place.
As they state, this service is for experimentation and testing but it works, is very easy to setup and has enabled me to test many of the features of Asterisk. If you are going to start experimenting, pay them a visit. And remember incoming calls are charged at the UK local call rate, and as long as you don’t abuse the service, outbound PSTN calls are free.
Back to the grindstone then…

